I remember finding an old, stained index card in Grandma’s kitchen drawer, tucked safely behind the ginger snaps. It was titled “Velvet Sun” and written in her careful, looping script that always smelled a little like lavender and flour. This cake wasn’t just a dessert; it was her way of bringing a bit of sunshine into the house on those long, gray Sunday afternoons when the air felt still.

This Lemon Velvet Cake is the softest, most tender crumb you will ever taste, thanks to the careful balance of buttermilk and a touch of vinegar. It is a bright, cheerful treat that feels like a quiet celebration in every bite, perfect for sharing with those you hold dear around a small wooden table.
The Magic of a Velvety Crumb
There is something truly special about a velvet cake that sets it apart from your typical sponge or pound cake. While many people think only of red velvet, the “velvet” actually refers to the texture of the cake itself. It is a heritage technique that dates back many decades, focusing on a fine, tight crumb that feels almost like silk on the tongue. This Lemon Velvet Cake achieves that timeless quality through a specific reaction between the buttermilk and the leavening agents, creating a crumb that is sturdy enough to hold frosting but delicate enough to melt away as you eat.
You will love this recipe because it brings a sense of bright joy to the kitchen. The scent of lemon zest mingles with the sweetness of the sugar, filling your home with a fragrance that feels like a warm hug. It is a simple pleasure, really. There are no fancy gadgets required, just a few bowls and a bit of patience. This cake is meant for moments when you want to show someone you care, providing a dessert that is consistently reliable and deeply comforting.
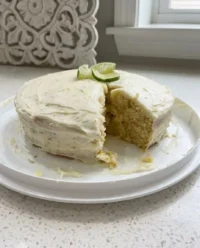
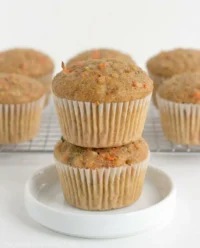
Another reason to cherish this recipe is its striking appearance. The soft yellow hue, whether you choose to use a touch of food coloring or let the lemon zest speak for itself, looks beautiful against a white cream cheese frosting. It is the kind of cake that looks right at home on a floral cake stand or a simple pewter plate. It is not trying to be trendy; it is simply trying to be the best version of itself, much like the recipes our grandmothers kept in their wooden boxes for a lifetime.
Print
Lemon Velvet Cake
- Total Time: 55 mins
- Yield: 12 servings
- Diet: Vegetarian
Description
Experience the ultimate citrus luxury with this Lemon Velvet Cake, featuring a fine-textured, silky crumb made possible by a traditional buttermilk and vinegar reaction. Topped with a rich, tangy lemon cream cheese frosting, it is a bright and nostalgic dessert perfect for any special gathering.
Ingredients
- 1 1/2 cups all-purpose flour
- 1 1/2 cups cake flour
- 1 teaspoon baking soda
- 1 teaspoon baking powder
- 1/2 teaspoon salt
- 2 cups granulated sugar
- 1/2 cup vegetable oil
- 1/2 cup butter-flavored shortening
- 3 large eggs
- 1 teaspoon vanilla extract
- 2 teaspoons lemon extract
- 1 tablespoon lemon zest
- 1 cup buttermilk
- 1 teaspoon white vinegar
- 1/2 cup hot lemon water
- 2–3 drops yellow food coloring (optional)
- 16 ounces full-fat cream cheese, softened
- 1 cup unsalted butter, softened
- 4 cups powdered sugar
- 1 teaspoon vanilla extract
- 1 teaspoon lemon extract
- 1 tablespoon lemon zest
- 1 teaspoon lemon juice
Instructions
- Preheat your oven to 325°F and grease two 9-inch cake pans with shortening and a light dusting of flour.
- In a medium bowl, whisk together the all-purpose flour, cake flour, baking soda, baking powder, and salt until well combined.
- In a large mixing bowl, beat the granulated sugar, vegetable oil, and shortening until pale and fluffy, then add eggs one at a time followed by the vanilla, lemon extract, and zest.
- Alternately add the dry flour mixture and the buttermilk to the wet ingredients, starting and ending with the flour, and stir until just combined.
- Stir the white vinegar and optional food coloring into the hot lemon water, then gently fold this mixture into the cake batter.
- Divide the batter evenly between the prepared pans and bake for 25 to 30 minutes, or until the centers are set and spring back to the touch.
- Allow the cakes to cool in the pans for 10 minutes before transferring them to a wire rack to cool completely.
- Prepare the frosting by beating together the softened cream cheese and butter, then gradually adding powdered sugar, extracts, and zest; frost the cooled cake layers generously.
Notes
For the most successful rise, ensure your baking soda is fresh and your buttermilk is at room temperature before mixing. To achieve perfectly clean slices, try chilling the assembled cake in the refrigerator for at least one hour before cutting with a sharp, warm knife.
- Prep Time: 25 mins
- Cook Time: 30 mins
- Category: Dessert
- Method: Baking
- Cuisine: American
The Pantry Staples

To make a cake that truly deserves the name “velvet,” we must look at our ingredients with a bit of reverence. Each one has a specific job to do in creating that signature texture. We start with a mixture of all-purpose flour and cake flour. The all-purpose flour provides the structure we need, while the cake flour, which has a lower protein content, keeps the crumb light and airy. Using both is a little trick from the old days to get the balance just right.
Essential Ingredients:
- Buttermilk: This is the heart of the velvet texture. Its acidity reacts with the baking soda to create tiny bubbles, making the cake light. It also adds a subtle tang that complements the lemon perfectly.
- Butter-flavored Shortening and Vegetable Oil: We use a combination of these two fats. The oil keeps the cake incredibly moist even after it has cooled, while the shortening helps with the height and creates a tender bite.
- Lemon Extract and Zest: For the brightest flavor, we use both. The zest provides the natural oils from the fruit, while the extract gives it that concentrated citrus punch that stands up to the rich frosting.
- Vinegar and Hot Lemon Water: This might seem like an odd addition, but it is the secret to the velvet method. The vinegar gives the leavening a final boost, and the hot water helps bloom the flavors and keeps the batter smooth.
For the frosting, we use blocks of full-fat cream cheese and unsalted butter. It is important that these are softened to room temperature so they whip together without any lumps. The addition of more lemon zest in the frosting ties everything together, making sure the citrus flavor is present from the first bite of icing to the last crumb of cake. This is a cake built on the foundation of quality pantry staples, treated with care.
The Baking Process
Step 1: Prepare Your Kitchen
Begin by preheating your oven to 325°F. This lower temperature is a vintage secret for ensuring the cake rises evenly without a large dome or cracked top. Take two 9-inch cake pans and grease them thoroughly with a bit of shortening, then dust them with flour, tapping out the excess. This creates a non-stick barrier so your layers come out cleanly.
Step 2: Whisk the Dry Ingredients
In a medium-sized bowl, whisk together the all-purpose flour, cake flour, baking soda, baking powder, and salt. Spend a moment here to make sure everything is well-distributed. Sifting these together is even better if you have the time, as it removes any lumps from the flour and aerates the mixture for a lighter cake.
Step 3: Cream the Fats and Sugar
In a large mixing bowl, combine the granulated sugar, vegetable oil, and butter-flavored shortening. Beat these together until the mixture looks pale and fluffy. Add your eggs one at a time, beating well after each addition. This is when you will stir in the vanilla extract, lemon extract, and that beautiful lemon zest. The batter should look creamy and smell wonderful.
Step 4: The Alternating Method
Now, you will begin adding your dry ingredients and the buttermilk to the wet mixture. Start with about a third of the flour mixture, then add half of the buttermilk. Repeat this, ending with the last of the flour. Stir until just combined; you want to be gentle here to avoid making the cake tough. Overworking the batter is the enemy of a velvety texture.
Step 5: The Final Touch
Mix the white vinegar into your hot lemon water. If you are using yellow food coloring to give the cake a sunny glow, add it to this liquid now. Gently stir this hot mixture into your batter. It will thin out the batter slightly and help activate the baking soda for a beautiful rise.
Step 6: Bake the Layers
Divide the batter evenly between your prepared pans. Place them in the center of the oven and bake for 25 to 30 minutes. You are looking for the centers to be just set. If you gently touch the top, it should spring back slightly. Every oven is a bit different, so keep a close eye on them during those last few minutes.
Step 7: Cool with Care
Let the cakes rest in their pans for about 10 minutes. This allows the structure to firm up. Then, carefully run a knife around the edges and turn the cakes out onto a wire cooling rack. They must be completely cool before you even think about the frosting. A warm cake will simply melt the butter in your cream cheese icing, and we want those beautiful, sharp layers.
Step 8: Frost and Decorate
While the cakes cool, beat your softened cream cheese and butter until they are light and airy. Gradually add the powdered sugar, extracts, and zest. If the frosting feels too thick, a teaspoon of lemon juice will thin it out. Once the cake is cold, spread a generous layer of frosting between the two cakes, then cover the top and sides. A few thin slices of lemon on top make a lovely, simple garnish.
Secrets from the Recipe Box

One of the best pieces of advice I can give you is to always use room temperature ingredients. When your eggs, buttermilk, and butter are all at the same temperature, they emulsify much better, resulting in a smoother batter and a more consistent bake. This is a rule Grandma always followed, often setting her ingredients out on the counter an hour before she started baking. If you find yourself in a hurry, you can place eggs in a bowl of warm water for a few minutes to take the chill off.
Another secret is the way you handle the lemon zest. Instead of just tossing it in, try rubbing the zest into the granulated sugar with your fingertips before mixing it with the fats. This releases the natural oils and permeates the entire cake with a deeper citrus aroma. For those looking for more vintage inspiration, you might enjoy reading about our velvet spray cake which uses similar principles of texture. Also, for those who enjoy seeing different versions of this classic, I often find inspiration from others who cherish these flavors, like this lemon velvet cake recipe. Lastly, always check your baking soda for freshness; if it’s been in the pantry too long, your velvet won’t have that signature lift.
Classic Flavor Twists
While this recipe is a treasure exactly as it is, there are ways to make it your own while keeping that nostalgic feel. If you prefer a more subtle citrus note, you can replace the lemon extract with almond extract for a delicate, nutty undertone that pairs beautifully with the cream cheese. For a different shape, this batter works wonderfully in a 9×13 inch rectangle pan for a simple snack cake that is easy to carry to a potluck or a neighbor’s house. Just be sure to adjust your baking time slightly as a single larger pan will take longer than two rounds.
You could also transform this into a fruit-studded delight. Gently folding in a half cup of fresh blueberries tossed in flour will create a Lemon Blueberry Velvet Cake that is truly stunning when sliced. If you find yourself wanting a more traditional citrus flavor without the “velvet” tang, you might consider our classic lemon cake which offers a different but equally beloved crumb. Some folks even like to add a thin layer of raspberry jam between the cake layers before frosting for a bright pop of color and a tart contrast to the sweet lemon cream cheese icing.
At the Table

Serving this cake is an act of love, and I believe it deserves a bit of ceremony. I like to slice it into generous wedges and serve it on my favorite mismatched vintage plates. It pairs wonderfully with a hot cup of Earl Grey tea or a dark roast coffee, as the bitterness of the drink cuts through the richness of the cream cheese frosting. If you are serving this during the warmer months, a glass of cold milk is a classic companion that never goes out of style.
For a truly elegant presentation, you can serve a slice alongside a few fresh berries or a small dollop of lemon curd on the side of the plate. If you enjoy this style of citrus dessert, you might also like to try our lemon pound cake for your next afternoon tea gathering. This cake is meant to be enjoyed slowly, perhaps while sitting on the porch or gathered around the kitchen island sharing stories with family. It is a reminder that the simplest things, like a homemade cake and a good conversation, are often the most meaningful.
A Final Word on Baking Memories
There is a special kind of peace that comes from baking a cake from scratch, watching simple ingredients like flour and sugar transform into something that brings a smile to someone’s face. This Lemon Velvet Cake is more than just a recipe; it is a bridge to the past and a gift for the future. I hope that as you bake this in your own kitchen, you feel the same warmth and nostalgia that I do every time I pull that old recipe card from my box. If you are looking for another bright citrus treat to add to your collection, don’t miss our lemon yogurt cake. Please share your baking photos with us and join our community of home bakers who cherish the old ways. You can find us and share your creations on Pinterest, Instagram, and Facebook. Happy baking, from my kitchen to yours.

