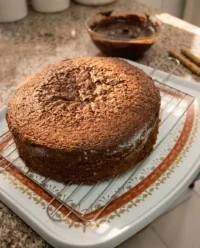
Years ago, in a quiet corner of a Parisian laboratory, I learned that the secret to a truly evocative dessert lies in the harmony of contrasting textures. This Red Velvet Cheesecake is a tribute to that principle, combining the earthy, cocoa-inflected crumb of a traditional velvet cake with the dense, ivory silkiness of a perfectly baked cheesecake. It is a dessert that speaks of celebration and precision, requiring a patient hand and an appreciation for the chemistry of the kitchen.

This particular rendition is constructed as a dual-layered masterpiece, featuring a robust cake base that provides a structural foundation for a luxurious cream cheese layer. We finish the assembly with a cloud-like topping of vanilla-scented cream, creating a profile that is as visually stunning as it is palate-pleasing. It is a sophisticated choice for those who value the art of the small-batch approach, where every gram of sugar and every drop of vanilla is chosen for its superior quality.
The Art of This Romantic Confection
There is a certain gravity to a Red Velvet Cheesecake that other desserts simply cannot match. It isn’t merely a cake; it is a sensory experience defined by the interplay of acidity and sweetness. The slight tang of the buttermilk and cocoa in the cake base is designed to perfectly complement the rich, lactic sharpness of the cream cheese. This balance is what makes each bite feel purposeful rather than overwhelming.
Mastering this recipe allows you to showcase your command over two distinct disciplines: the aeration of a tender cake and the emulsification of a smooth custard. Unlike a standard cheesecake, the inclusion of the red velvet layer adds a vibrant visual pop that is essential for grand occasions. The deep crimson hue, achieved through a careful marriage of cocoa and color, sets a stage of elegance that is impossible to ignore.
Furthermore, this dessert is built for stability and clean presentation. By using a small-batch mindset, we can focus on the technical details—like the precise temperature of the ingredients—that result in a cheesecake without a single crack or blemish. It is the type of recipe that builds your reputation as a baker who values finesse above all else.
Print
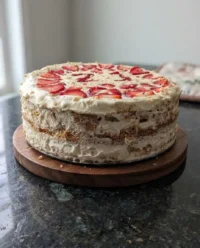
Red Velvet Cheesecake
- Total Time: 7 hours 30 mins
- Yield: 12 servings
- Diet: Vegetarian
Description
This elegant Red Velvet Cheesecake features a tender, cocoa-infused cake base topped with a dense and creamy cheesecake layer. Finished with a light vanilla chantilly and vibrant cake crumbs, it is a sophisticated dessert designed for those who appreciate the balance of rich textures and classic flavors.
Ingredients
- 1 box (15.25 oz) Red Velvet cake mix (plus oil, water, and eggs as required by package)
- 16 oz full-fat block cream cheese, softened
- 1/2 cup granulated sugar
- 2 large eggs, room temperature
- 1/4 cup full-fat sour cream
- 1 tablespoon all-purpose flour
- 2 teaspoons pure vanilla extract, divided
- 1/8 teaspoon salt
- 1 cup heavy whipping cream, chilled
- 1/4 cup powdered sugar
Instructions
- Preheat oven to 350°F (175°C) and grease a 9-inch springform pan.
- Prepare the red velvet batter according to package instructions, pour into the pan, and bake for 30–32 minutes until set.
- Cool the cake completely on a wire rack, then level the top with a serrated knife to create a flat surface; reserve crumbs for decoration.
- Lower the oven temperature to 325°F (163°C).
- In a mixing bowl, beat softened cream cheese and granulated sugar on low speed until smooth.
- Add eggs one at a time, mixing until just combined, then fold in the sour cream, flour, one teaspoon of vanilla, and salt.
- Line the pan sides with parchment paper, place the leveled cake base back inside, and pour the cheesecake batter on top.
- Bake for 55–60 minutes until the edges are firm but the center remains slightly jiggly.
- Cool in the turned-off oven with the door cracked for 1 hour, then refrigerate for at least 4 hours or overnight.
- Whisk heavy cream, powdered sugar, and the remaining teaspoon of vanilla to firm peaks, spread over the chilled cheesecake, and garnish with reserved cake crumbs.
Notes
To ensure a crack-free finish, avoid over-mixing the cheesecake batter once the eggs are added, as excess air causes the cake to rise and fall. Always allow the cake to come to room temperature gradually before refrigerating to prevent thermal shock and maintain a smooth, velvety consistency throughout the layers.
- Prep Time: 20 mins
- Cook Time: 1 hour 35 mins
- Category: Dessert
- Method: Baking
- Cuisine: American
Foundations of a Flawless Dessert

To achieve the refined results expected in a professional patisserie, we must look at our ingredients as the structural blocks of our creation. Each component serves a technical purpose that goes beyond simple flavoring. Using premium, full-fat dairy and fresh eggs at the correct temperature will determine the final mouthfeel of your work.
- Red Velvet Foundation: We use a prepared mix as a reliable base for this specific layering technique, though we handle it with the care of a scratch-made sponge. The inclusion of cocoa powder and acidity is vital for that signature ‘velvet’ texture that distinguishes it from a standard chocolate cake.
- Cream Cheese: You must use full-fat block cream cheese (not the spreadable kind from a tub). The high fat content (approx. 33%) is necessary for the cheesecake to set with a firm yet creamy density that can support the weight of the topping.
- Granulated Sugar: This does more than sweeten; it breaks down the proteins in the cream cheese during the beating process, helping to create a smooth, aerated batter without lumps.
- Sour Cream: A classic French addition for moisture and tang. It softens the protein structure of the eggs, resulting in a more tender, less rubbery cheesecake layer.
- Heavy Whipping Cream: For the final layer, we require a cream with at least 36% milkfat. This allows for a stable Chantilly-style topping that holds its shape when piped or spread.
- Pure Vanilla Extract: Synthetic flavors have no place in a refined kitchen. Use a high-quality extract or bean paste to provide a sophisticated floral note to the cream.
The Methodical Assembly
Step 1: Prepare the Velvet Foundation
Begin by preheating your oven to 350°F (175°C/177°C). Prepare your 9-inch (23cm) springform pan by greasing the bottom and sides thoroughly. Mix the red velvet batter according to the package directions, but be careful not to overwork the gluten; whisk just until the dry particles disappear. Pour the batter into the pan and bake for 30–32 minutes. You are looking for a gentle spring back when touched and a clean tester. Once baked, let it cool completely on a wire rack. To create a professional look, level the top with a serrated knife so the cheesecake layer can sit perfectly flat.
Step 2: Create the Cheesecake Emulsion
Lower your oven temperature to 325°F (163°C). In a clean bowl, beat your softened cream cheese and sugar on low speed. It is vital to avoid high speeds here, as too much air can cause the cheesecake to puff up and then collapse, leading to cracks. Add your eggs one at a time, making certain each is fully integrated before adding the next. This slow process maintains the emulsion. Finally, fold in the sour cream, flour, vanilla, and salt until the mixture is glossy and uniform.
Step 3: The Second Bake
Line the interior sides of your springform pan with a fresh collar of parchment paper to help with a clean release later. Pour the cheesecake batter directly over the cooled, leveled red velvet cake. Smooth the surface with an offset spatula. Bake for 55–60 minutes. The cheesecake is ready when the edges are set and slightly golden, but the center still has a subtle, jelly-like wiggle. Turn off the oven and crack the door slightly, letting the cake cool slowly for an hour to prevent thermal shock.
Step 4: The Essential Chill
Once the pan is cool to the touch, transfer it to the refrigerator. Precision requires time; the cheesecake needs at least 4 hours—preferably overnight—to allow the fats to crystallize and the flavors to meld. This step is non-negotiable if you want clean, sharp slices that hold their shape on the plate.
Step 5: Stabilize the Chantilly Topping
In a chilled bowl, combine your heavy whipping cream, powdered sugar, and vanilla. Whisk until you reach soft peaks. For a more professional presentation, you can continue whisking until the peaks are firm enough to hold their shape in a piping bag. Spread this light, airy layer over the chilled cheesecake, or use a star tip to pipe elegant rosettes around the border.
Step 6: Final Decoration and Garnish
For the finishing touch, take the cake scraps you trimmed from the red velvet base and crumble them into fine, ruby-colored sand. Sprinkle these crumbs over the cream. You may also consider a very light drizzle of red fruit glaze if you desire a more dramatic aesthetic. Remove the springform ring with care and slide the cake onto a pedestal or serving plate.
Precision Secrets for the Master Baker

One of the most important factors in achieving a professional finish is temperature control. Make certain that your cream cheese and eggs are at room temperature before you begin the cheesecake layer. If the cheese is too cold, it will form small lumps that are impossible to remove without over-beating the batter. If you find yourself in a rush, you can warm the eggs in a bowl of tepid water for ten minutes to bring them to the correct state.
When it comes to slicing, a hot, clean knife is your best tool. Dip your blade into a tall container of hot water, wipe it completely dry, and make one clean downward stroke. Wipe the blade again before every subsequent cut. This prevents the cream topping from dragging into the red velvet layer, keeping each slice pristine. For those who enjoy experimenting with different textures in their desserts, you might find our technique for strawberry-cheesecake helpful for mastering fruit-based fillings. Also, remember that a slow cooling process is your best defense against cracking; the goal is to lower the temperature gradually so the cake can contract slowly.
Refined Twists for the Master Baker
While the classic red velvet and vanilla pairing is timeless, a few subtle adjustments can provide a new perspective on this dessert. For a deeper, more sophisticated flavor profile, consider adding a teaspoon (approx. 5ml) of espresso powder to the red velvet batter. The coffee notes will not taste like coffee; instead, they act as a catalyst to heighten the natural cocoa notes in the cake.
Another elegant variation is to transform these into individual portions. Using a muffin tin lined with parchment cups, you can create miniature versions that are perfect for a formal tea service or a dessert buffet. If you are looking for a more traditional cake structure without the cheesecake layer, you might look into our guide for a classic red-cake which focuses on a moist, velvet crumb. For a winter-inspired version, you could even fold finely chopped white chocolate into the cheesecake batter before baking for an extra layer of decadence.
Presentation and the Final Touch

The presentation of a Red Velvet Cheesecake should be as refined as its preparation. I recommend serving this on a chilled white porcelain plate to allow the vibrant crimson of the cake to stand out. A small sprig of fresh mint or a single, perfectly ripe raspberry placed beside the slice can add a touch of natural beauty without distracting from the main event.
Pair this dessert with a beverage that can cut through the richness of the cream cheese. A glass of chilled Champagne or a dry sparkling Rosé works beautifully for an evening celebration. If serving during the day, a high-quality Darjeeling tea or a light-roast coffee will provide a clean finish. For those who prefer a different flavor profile for their afternoon gatherings, consider the bright notes of our lemon-cheesecake as a seasonal alternative. Always serve the cake chilled to maintain the integrity of the layers.
Final Thoughts on Small Batch Mastery
Mastering the Red Velvet Cheesecake is a journey in patience and technical discipline. By focusing on the quality of your ingredients and the precision of your temperatures, you transform a simple dessert into a professional-grade masterpiece. There is a quiet satisfaction in seeing those clean, colorful layers revealed as you take the first slice. I hope this recipe encourages you to take your time and enjoy the methodical beauty of fine baking.
If you have enjoyed this process, you may find our chocolate-cheesecake equally rewarding for your next project. For more inspiration and technical guides, I invite you to follow our journey and share your creations with our community on Pinterest, Instagram, or Facebook. You can also find additional inspiration for this specific flavor profile by checking out this creative red velvet variation. Happy baking, and may your kitchen always be a place of quiet mastery.

