Grandma always kept a basket of fresh peaches on the counter, their fuzzy skins catching the morning light as she hummed a quiet tune while wearing her favorite flour-dusted apron.

This No Bake Caramel Peach Upside Down Cake brings back the scent of vanilla warming a quiet kitchen without the need for a hot oven. It is a humble dessert that honors the fruit and the simple joy of gathering around a wooden stool at the counter. When you want a peach cake that feels like a shared secret from an old tin index box, this recipe is the one to reach for. It is unhurried, gentle, and rooted in the traditions of the old way.
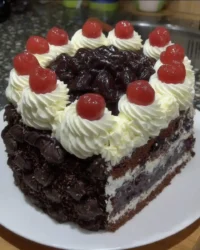
A Bite of Pure Nostalgia with No Bake Caramel Peach Upside Down Cake
Prep: 15 min · Serves: 8 · Difficulty: Easy
- Rich caramel flavor from a cast iron skillet.
- Fresh peaches softened to honeyed perfection.
- A tender crumb that melts in your mouth.
- No hot oven required during summer months.
- Simple staples found in any home pantry.
This is the recipe my family gathers for every harvest season. It reminds me of the peach upside down cake Grandma would present on her finest china for Sunday dinner.
Get The Full Cake Recipe
Print
No Bake Caramel Peach Upside Down Cake
- Total Time: 45 mins
- Yield: 8 servings
- Diet: Vegetarian
Description
Experience the nostalgic comfort of a classic peach upside down cake without ever turning on your oven. This stovetop recipe features caramelized peaches and a tender, moist crumb, perfect for warm summer days.
Ingredients
- 1/2 cup unsalted butter, melted
- 3/4 cup granulated sugar
- 3 large fresh peaches, peeled and sliced
- 2 large eggs
- 1/2 cup whole milk
- 1 cup all-purpose flour
- 1 teaspoon baking powder
- 1/2 teaspoon vanilla powder
- 1 tablespoon vegetable oil
Instructions
- Prepare the peaches. Peel the peaches and slice each into eight even segments, setting them aside in a bowl.
- Whisk the base. Beat the eggs and sugar in a large bowl until the mixture turns pale yellow.
- Combine liquids. Slowly whisk in the melted butter, oil, and milk until the batter is smooth and well-combined.
- Incorporate dry ingredients. Sift in the flour, baking powder, and vanilla powder, then gently fold until no streaks of flour remain.
- Create caramel base. Melt the sugar in a non-stick pan over medium heat until amber, then stir in the remaining melted butter.
- Arrange and bake. Place peaches over the caramel, pour the batter over the fruit, cover with a tight lid, and cook on low heat for twenty-five minutes.
- Test for doneness. Insert a toothpick into the center to ensure it comes out clean before removing from heat.
- Invert the cake. Place a flat plate over the pan and carefully flip the cake onto the plate in one quick motion.
Notes
- Ensure the peaches are ripe but firm to prevent them from turning into mush during the stovetop cooking process.
- Use a heavy-bottomed non-stick skillet to ensure the sugar melts evenly without burning in spots.
- Check that your stovetop lid creates a tight seal to trap the steam necessary for cooking the cake batter properly.
- Allow the cake to rest for at least fifteen minutes after inverting to let the caramel juices settle and soak into the sponge.
- Prep Time: 15 mins
- Cook Time: 30 mins
- Category: Dessert
- Method: Stovetop
- Cuisine: American
Gathering Your Ingredients

We gather these few things with intention before we begin our work. Each item sits on the counter like an old friend ready to help us create something meaningful from our recipe box.
- Butter: This provides the richness that carries the flavor of the caramel and the cake itself.
- Sugar: We use this to draw out the natural juices of the fruit and create the golden sauce.
- Peaches: Choose fruit that is ripe but still firm to the touch so it holds its shape.
- Eggs: These are the foundation of our batter, giving it the structure and lift it needs.
- Milk: A splash of milk creates a tender crumb that reminds me of early morning baking.
- Flour: All-purpose flour is sifted gently to keep the cake light and airy under the fruit.
- Vanilla powder: This adds a deep, aromatic warmth that scents the entire house as it cooks.
| Ingredient | Why It Matters |
|---|---|
| Melted Butter | Creates a silky caramel and a rich batter |
| Granulated Sugar | Caramelizes into a deep amber nectar for the fruit |
| Fresh Peaches | The star of the show that provides natural sweetness |
| Baking Powder | Gives the cake a gentle rise without an oven |
| Whole Milk | Adds moisture for a soft and delicate texture |
Bringing It Together

Step 1: Preparing the Fruit
We start by peeling the peaches with a small, sharp knife, letting the skins fall away onto a clean towel. Slice each fruit into eight even parts so they look uniform when we eventually invert the cake. Set these golden slices aside in a glass bowl and let them rest while we turn our attention to the batter.
Step 2: Mixing the Batter Foundation
In a large mixing bowl, beat the eggs and sugar together until they reach a pale yellow color. Use a steady rhythm with your whisk, much like the way Grandma used to work at her wooden table. You want the sugar to begin dissolving into the eggs before we introduce the heavier liquids.
Step 3: Incorporating the Fats and Dairy
Add the melted butter, oil, and milk to the egg mixture with a slow and steady hand. Stir these together until they are fully combined and the mixture looks smooth and glossy. The scent of the butter should begin to fill the air, signaling the start of something beautiful.
Step 4: Sifting the Dry Ingredients
Measure out the flour, baking powder, and vanilla powder with care. Sift them directly into the wet ingredients to avoid any lumps that might interrupt the delicate texture of the cake. Fold them in gently until the batter is thick and free of any visible white streaks of flour.
Step 5: Crafting the Caramel Base
Place your non-stick pan over a medium flame and sprinkle the sugar evenly across the bottom. Watch closely as the granules melt and transform into a rich amber liquid that smells of burnt sugar and honey. Once the color is deep and vibrant, stir in the melted butter to create a smooth, bubbling caramel sauce.
Step 6: Baking the No Bake Caramel Peach Upside Down Cake
Arrange the peach slices in a circular pattern over the hot caramel, working quickly so they sit snugly together. Pour the cake batter over the fruit, spreading it to the edges of the pan with a wooden spoon. Cover the pan with a tight-fitting lid and turn the heat down to the lowest setting possible.
Step 7: Testing for Doneness
Allow the cake to cook undisturbed for twenty minutes before you even think of lifting the lid. After twenty-five minutes, slide a thin wooden toothpick or a knife into the center to see if it comes out clean. The top of the cake should feel firm to a light touch and have a matte appearance.
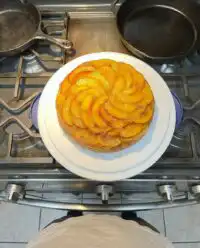
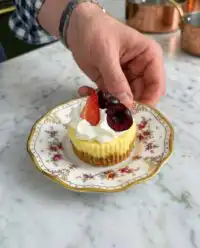
Step 8: The Moment of Inversion
Turn off the heat and let the pan sit for a few minutes so the caramel can settle slightly. Place a large, flat plate over the top of the pan and, using thick oven mitts, flip the whole thing over in one confident motion. Lift the pan away to reveal the glistening peaches nestled into their golden caramel bed.
Secrets from the Recipe Box

When you are making the caramel, keep a close eye on the color of the melting sugar. It can go from a beautiful amber to a bitter burnt state in a matter of seconds. If the sugar smells acrid, it is best to start that part again to ensure the flavor remains sweet and mellow.
If you find the cake is sticking to the pan, it might be because the caramel cooled too much before you attempted the flip. You can place the pan back on low heat for thirty seconds to loosen the sugar before trying again. This gentle warmth is often all that is needed to release the fruit from the surface.
Always use a lid that fits your pan perfectly to trap the steam inside. This steam is what actually cooks the batter since we are not using the dry heat of an oven. It creates a texture that is remarkably similar to a ritz cracker salted caramel icebox cake in its soft consistency.
To get the best results, you must learn how to choose the best fruit for upside down cakes so they do not turn to mush. Firm peaches are your best friend here because they will soften during the cooking process without losing their shape or identity.
Never rush the cooling process once the cake is on the plate. Let it sit for at least fifteen minutes so the juices from the peaches can soak into the top layer of the cake. This creates a natural glaze that makes every bite feel like a gift from a handwritten recipe card.
If your cake batter seems too thin, you may have used large eggs instead of medium ones. You can add a single tablespoon of flour to regain the proper weight of the batter. The consistency should be like thick cream that falls slowly from a spoon.
Frequently Asked Questions
Do I need to peel the peaches?
Yes, peeling the peaches ensures a much more delicate texture in the finished cake. The skin can become tough and chewy when cooked in caramel, which interrupts the softness of the dessert. You can use a vegetable peeler or quickly blanch them in boiling water to make the skins slip right off.
Can I use canned or frozen peaches?
Canned peaches can be used if they are drained very well and patted dry with a clean cloth. Frozen peaches also work, but they must be completely thawed and any excess juice removed. Fresh fruit is always preferred for the best flavor, but the recipe box is flexible for those who plan ahead.
Can I use other fruits?
This method works beautifully with many types of stone fruits or even pineapples. Apricots or plums are wonderful substitutions that offer a slightly more tart experience against the sweet caramel. Just ensure the fruit is sliced to a similar thickness so it cooks evenly on the stovetop.
When do I invert the cake?
You should wait about five to ten minutes after removing the pan from the heat. If you wait too long, the caramel will harden and the peaches will stick to the bottom of the pan. If you flip it too soon, the caramel will be too runny and may splash or soak too deeply into the batter.
Does peach upside-down cake need to be refrigerated?
Because of the fresh fruit and moist crumb, this cake should be stored in the refrigerator if you do not finish it the same day. Keep it in an airtight container to prevent it from picking up other scents in the fridge. It is best enjoyed within two or three days of being made.
Can I freeze this cake for later?
Freezing is not recommended for this particular cake as the texture of the peaches can become grainy once thawed. The caramel also tends to weep and become watery, which ruins the beautiful presentation. It is such a quick process to make that it is better to prepare a fresh batch whenever the craving strikes.
How do I serve it?
This cake is most traditional when served slightly warm with a dollop of unsweetened whipped cream. The coolness of the cream balances the richness of the caramel sauce perfectly. You can also serve it at room temperature on a quiet afternoon with a hot cup of tea.
Through the Seasons
While we love the tradition of fresh summer fruit, you can easily adapt this recipe for the autumn months. Swapping the peaches for thinly sliced apples and adding a pinch of cinnamon creates a warm dessert that feels right as the leaves begin to turn. This is the same logic we use when making a peach dump cake during the colder seasons.
For a different flavor profile, you might consider using brown sugar in the caramel base instead of white sugar. This results in a deeper, more molasses-like flavor that pairs wonderfully with pecans scattered among the fruit. It changes the character of the dish from a light summer treat to a rich and hearty end to a Sunday dinner.
If you find yourself without fresh fruit, frozen slices can work as long as you thaw them and pat them dry first. Too much extra moisture will thin the caramel and make the cake soggy. Using frozen fruit allows you to enjoy this nostalgic treat even when the trees in the orchard are bare and sleeping.
The Perfect Occasion
I often think this cake belongs at the center of a worn wooden table surrounded by family. It does not need a fancy garnish or a complicated presentation to be beautiful. Simply placing it on a vintage cake stand allows the glistening fruit to be the star of the afternoon.
If you are looking for something a bit more decadent, a small scoop of vanilla bean ice cream on the side is a lovely choice. The way the ice cream melts into the warm caramel reminds me of the chocolate caramel toffee crunch cake we serve during the holidays. It is a small addition that makes a humble stovetop cake feel like a grand celebration.
For a lighter touch, a few fresh mint leaves scattered over the top can add a hint of color and a clean scent. This is especially nice during the peak of summer when the garden is full of life. Serving the cake with a glass of cold milk or a light coffee is the old way of finishing a meal with grace.

A Final Word
Baking this cake is about more than just the ingredients; it is about the time spent in a quiet kitchen. It is a way to honor the hands that came before us and the recipes that have stood the test of time. I hope this peach cake brings a sense of peace and nostalgia to your home, much like it does to mine every time I smell the caramel bubbling.
When you share this with your loved ones, you are sharing a piece of history that has been kept in our recipe box for generations. It is a reminder that we do not always need a hot oven or a complicated process to make something that tastes like love. Until next time, keep your apron close and your kitchen full of warmth.

