The rule dictating that vegetables belong only in savory side dishes crumbles the second you fold three full cups of shredded zucchini into a cocoa-soaked batter.

This One-Bowl Chocolate Zucchini Cake proves that we do not need complex equipment to build deep, fudgy crumb structures. By letting the natural moisture of grated zucchini work alongside dark brown sugar, you establish a crumb that stays remarkably tender for days. No creaming butter, no separate dry-ingredient bowls, and zero vegetable taste to disrupt the dark chocolate experience.
Baking is often treated like a fragile science, but sometimes the best results come from breaking the rules. Adding fresh summer squash to a decadent dessert might sound like a wild experiment, but the chemistry is completely solid. You get maximum texture with minimal cleanup, making this the ultimate rebellious treat for busy nights.
Why This One-Bowl Chocolate Zucchini Cake Earns Its Place
Prep: 15 min · Serves: 10-12 · Difficulty: Easy
- One bowl means lightning-fast kitchen cleanup.
- Grated zucchini delivers unbelievable crumb moisture.
- Brown sugar creates a deep caramel undertone.
- Rich chocolate buttercream covers every single inch.
- Ideal for making ahead of busy weekends.
This cake is built for the home baker who demands rich results without sacrificing a whole afternoon to dishwashing. By keeping everything in a single bowl, we focus all our energy on flavor extraction and texture management. If you love a classic easy chocolate cake, this moisture-packed variation will challenge everything you know about baking. This is the bold chocolate run that turns vegetable skeptics into instant devotees.
Get The Full Cake Recipe
Print
One-Bowl Chocolate Zucchini Cake
- Total Time: 1 hour 47 mins
- Yield: 12 servings
Description
This decadent chocolate cake uses finely shredded zucchini to achieve a remarkably moist, fudgy crumb without any hint of vegetable flavor. Prepared entirely in one bowl, this fuss-free recipe delivers bakery-quality results perfect for any occasion.
Ingredients
- 3 cups shredded zucchini
- 2 cups all-purpose flour
- 1/2 cup unsweetened natural cocoa powder
- 1 teaspoon baking soda
- 1/2 teaspoon baking powder
- 1/2 teaspoon salt
- 1 teaspoon espresso powder
- 1 cup granulated sugar
- 1 cup dark brown sugar, packed
- 1/2 cup sour cream
- 2/3 cup canola oil
- 2 large eggs, room temperature
- 1 teaspoon vanilla extract
- 1 cup semi-sweet chocolate chips
- 1/2 cup unsalted butter, softened
- 3 cups confectioners’ sugar
- 1/4 cup cocoa powder
- 2 tablespoons cream
Instructions
- Prep the pans. Preheat oven to 350°F (177°C) and grease two 9-inch round cake pans, lining the bottoms with parchment paper.
- Combine dry base. Whisk together flour, cocoa, baking soda, baking powder, espresso powder, and salt in a large bowl until uniform.
- Mix wet ingredients. In a separate bowl, beat oil, sugars, eggs, sour cream, and vanilla until glossy before stirring in the shredded zucchini.
- Incorporate dry mixture. Add the flour mixture to the wet base and beat on medium speed until just combined.
- Fold in chips. Gently fold in the semi-sweet chocolate chips using a silicone spatula.
- Bake the layers. Pour batter into pans and bake for 28 to 32 minutes until a toothpick inserted into the center emerges clean.
- Cool the cake. Rest cakes in pans for one hour on a wire rack before inverting them to cool completely.
- Prepare the buttercream. Beat softened butter, confectioners’ sugar, cocoa, cream, salt, and vanilla until thick and creamy.
- Assemble and frost. Level the cooled cake layers, then stack and frost the top and sides with the prepared buttercream.
Notes
- Use a fine-mesh box grater for the zucchini to ensure it melts seamlessly into the batter.
- Always spoon and level your flour to avoid accidental over-measuring and a dense, dry crumb.
- Bring your eggs and butter to room temperature to ensure a smooth, stable emulsion for the cake and frosting.
- If your environment is warm, chill the finished cake briefly to help the buttercream set before slicing.
- Prep Time: 15 mins
- Cook Time: 32 mins
- Category: Dessert
- Method: Baking
- Cuisine: American
What You Actually Need

To build a crumb this rich, every component must pull its weight. We are bypassing filler ingredients to let the dark cocoa and natural moisture from the squash perform their magic together. This is a deliberate setup where precision meets playful experimentation in your home kitchen.
- Shredded Zucchini: This is our secret hydration engine, delivering steady moisture during the bake without adding any unwanted vegetable taste. When shredded finely on a box grater, it practically disappears into the crumb during the bake, leaving behind nothing but texture.
- Unsweetened Natural Cocoa Powder: This ingredient provides a sharp, robust chocolate backbone that offsets the sweetness of the sugars. It is acidic enough to react with our baking soda, which helps lift the heavy batter into a light and tender crumb.
- Light or Dark Brown Sugar: The molasses content in brown sugar keeps the crumb dense, fudgy, and intensely caramelized. It works alongside granulated sugar to balance sweetness with deep, warm undertones.
- Sour Cream: This thick dairy addition adds a necessary hit of acid to activate the baking soda while contributing to a tender, cakey texture. The fat content helps create a velvety mouthfeel that rivals traditional butter cakes.
- Canola Oil: Unlike solid butter, liquid vegetable oil keeps this crumb incredibly soft even when served cold from the refrigerator. It coats the flour proteins during mixing to prevent tough gluten networks from forming.
- Espresso Powder: A tiny measure that does not make the cake taste like coffee, but instead intensifies the dark cocoa notes. It acts like a magnifier, making the overall chocolate experience feel twice as dark and rich.
- Large Eggs: These provide structural stability and lift, holding our moisture-rich batter together as it bakes. Make sure they are at room temperature so they emulsify smoothly into the oils and sugars without curdling.
- Semi-Sweet Chocolate Chips: These melted pockets of chocolate offer a gorgeous textural contrast to the soft cake crumb. We fold them in late so they remain distributed throughout the layers instead of sinking to the bottom.
| Ingredient | Why It Matters | Details |
|---|---|---|
| Grated Zucchini | Introduces structural moisture | Fine shred dissolves completely into the crumb |
| Natural Cocoa | Establishes the deep chocolate baseline | Acidic profile reacts well with baking soda |
| Sour Cream | Activates leavening and softens gluten | Full-fat dairy adds necessary tenderness |
| Espresso Powder | Sharpens the chocolate profile | Small dose amplifies cocoa without coffee flavor |
| Canola Oil | Keeps the baked layers incredibly soft | Prevents gluten overdevelopment during mixing |
Let’s Bake

Step 1: Prep Pans and Heat the Oven
Preheat your oven to 350°F (177°C) to establish the correct thermal environment. Grease two 9-inch round cake pans and line the bottoms with parchment paper before greasing the paper itself. This double-greasing method guarantees your layers release smoothly without leaving precious crumb behind. Having your pans prepped early prevents the mixed batter from sitting and losing its carbon dioxide lift.
Step 2: Combine the Dry Base
Grab a large mixing bowl and whisk together your flour, cocoa powder, baking soda, baking powder, espresso powder, and salt. You want to see a uniform, light brown color with no pockets of white flour remaining. This ensures the leavening agents are evenly distributed before the wet elements enter the equation. A thorough whisking also breaks up any stubborn cocoa clumps that could ruin your first bite.
Step 3: Mix the One-Bowl Chocolate Zucchini Cake Batter
In a separate large bowl, beat the oil, granulated sugar, brown sugar, eggs, sour cream, and vanilla until the mixture turns a glossy, pale amber color. Stir in the shredded zucchini until it is fully suspended in the liquid. Add the dry flour mixture and beat on medium speed until the batter is thick, dark, and completely uniform. This is the moment the batter changes color and texture mid-mix, signaling that the dry ingredients have successfully bonded with the wet base.
Step 4: Fold in the Chocolate Chips
Scatter your semi-sweet chocolate chips across the dark batter. Use a flexible silicone spatula to gently fold them in until they are evenly distributed. You should see pockets of chocolate studs throughout the thick, glossy mixture. Avoid overworking the batter here; a few gentle folds are all it takes to suspend the chips properly.
Step 5: Bake the Cake Layers
Pour the batter evenly between your two prepared pans, smoothing the tops with your spatula. Bake for 28 to 32 minutes, watching for the moment the cake centers bounce back when lightly pressed. A toothpick inserted into the center must emerge clean or with only a few moist crumbs. The aroma of toasted chocolate filling your kitchen is your reliable sensory cue that baking is nearly complete.
Step 6: Cool the Layers Completely
Place the pans on a wire rack and let them rest undisturbed for one full hour. Run a thin knife around the edges, invert the cakes to discard the parchment paper, and return them upright to the rack. They must feel completely cool to the touch before you even think about applying the buttercream. Frosting a warm cake will melt the butter, turning your beautiful frosting into a runny glaze.
Step 7: Beat the Rich Buttercream
Using your stand mixer fitted with the paddle attachment, beat the softened butter on medium speed for two minutes until it looks pale and creamy. Sift in the confectioners’ sugar and cocoa powder, then add the cream, salt, and vanilla extract. Beat on low for thirty seconds, then increase to high speed until the frosting is thick, spreadable, and holds soft peaks. Watch for the frosting to double in volume and turn a beautiful milk-chocolate color.
Step 8: Assemble and Frost
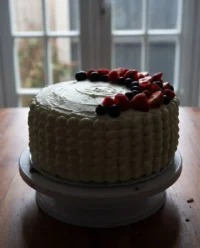
Slice a very thin layer off the top of each cooled cake to create flat surfaces. Place the first layer on your turntable, spread a generous cup of buttercream across it, and top with the second layer. Coat the top and sides with the remaining frosting, swirling it with your spatula for visual drama. You can use a piping bag with a decorative tip to add beautiful swirls around the top edge.
The Details That Matter

When shredding zucchini, use the fine holes on your box grater rather than the coarse ones. Coarse shreds can create wet pockets in the baked crumb, whereas fine shreds dissolve completely into the batter during baking. This fine shredding technique allows the moisture to distribute evenly without leaving obvious green ribbons in your finished cake slices.
To measure your flour accurately, always spoon it into your measuring cup and level it off with a flat knife. Scooping directly from the bag packs the flour down, adding too much starch and drying out what should be a rich, fudgy crumb. Using a digital kitchen scale is the ultimate liberation device, ensuring you get exactly 250 grams of flour every single time.
If your cake layers turn out dense and gummy, here is why and how to fix it: you likely over-mixed the wet and dry ingredients. Over-mixing develops excess gluten, so next time, stop beating the batter the second you no longer see dry streaks of flour. A slow, steady hand during the final mixing phase preserves the delicate rise of the baking soda.
Your buttercream needs real room-temperature butter to achieve the correct emulsion. Cold butter will create a lumpy, broken frosting that slides off the layers, while melted butter will leave you with a soupy mess. If your kitchen is cold, slice the butter into small cubes and let it sit for thirty minutes to soften evenly before beating.
If you want to transition this recipe into a standard chocolate cake recipe format, you can easily substitute the round pans for a single 9×13-inch sheet pan. Just extend the baking time to roughly 45 minutes to make sure the deep batter bakes completely. Make sure to test the center with a toothpick, as sheet cakes bake more slowly in the middle.
For a truly pristine presentation, freeze your cake layers for fifteen minutes before assembling. Firm layers do not shed crumbs, making it much easier to glide your frosting across the surface without tearing the cake. This quick chilling step saves you from needing a dedicated crumb coat, giving you a clean finish in half the time.
Frequently Asked Questions
Can you taste the zucchini in this cake?
No, you cannot taste the zucchini at all. The shredded vegetable melts completely into the batter during baking, acting solely as a hydration agent while the cocoa and sugar dominate the flavor profile. It is the ultimate sneaky way to introduce moisture into a cake without adding heavy fats.
Do you have to peel the zucchini before shredding?
There is no need to peel the zucchini. The skin is very tender and disintegrates during baking, though you will see tiny green flecks in the crumb if you look closely. If you are baking for incredibly picky eaters, using a fine grater ensures the skin is virtually invisible.
Should you squeeze the water out of the zucchini?
Do not squeeze the water out completely, as that moisture is required for the cake’s unique texture. Simply give the shredded zucchini a very light blot with a clean kitchen towel before tossing it into the bowl. This preserves the natural hydration that keeps the crumb soft for days.
Can I freeze the frosted cake layers?
Yes, you can freeze this cake easily for up to two months. Wrap the cooled, unfrosted layers tightly in plastic wrap and foil, then thaw them overnight in the refrigerator before frosting. If the cake is already frosted, freeze it uncovered for an hour to set the buttercream before wrapping.
Why did my cake sink in the center?
A sunken center typically happens if the oven door is opened too early or if the baking soda is expired. Always verify your leaveners are fresh and keep the oven door closed until the final minutes of baking. Additionally, make sure you measure your flour accurately using a scale to avoid a heavy batter.
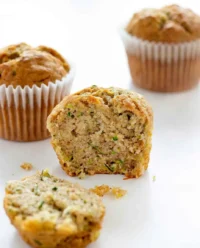
Can I use this batter to make cupcakes?
This recipe easily adapts to yield 24 to 30 cupcakes. Bake them at the same temperature of 350°F (177°C) for 18 to 22 minutes, checking for doneness with a toothpick inserted into the center. Let them cool completely before frosting them with your chocolate buttercream.
What can I use instead of sour cream?
You can substitute plain Greek yogurt at a one-to-one ratio with excellent results. Make sure it is full-fat yogurt to maintain the correct level of richness and structure in the crumb. The acidity of the yogurt will react with the baking soda just like sour cream does.
Where to Deviate
If you want a lighter alternative, you can swap the rich buttercream for a simple glaze or a dusting of powdered sugar. This variation works beautifully as a healthy cake recipe option for weekday breakfasts or afternoon coffee pairings. It reduces the overall sweetness while allowing the deep cocoa flavor of the cake itself to stand out.
For an extra layer of texture, fold half a cup of toasted, finely chopped walnuts or pecans into the batter along with the chocolate chips. The nutty crunch offers a beautiful contrast to the incredibly soft and tender crumb of the baked cake. Toasting the nuts in a dry pan for three minutes beforehand helps release their essential oils, bringing out a toasted hazelnut aroma.
To play with the base flavors, you can try the original chocolate zucchini cake technique which balances different ratios of spices. Adding a half-teaspoon of ground cinnamon along with the espresso powder brings a warm, Mexican chocolate undertone to the finished layers. This subtle addition creates a beautiful complexity that keeps your guests guessing what secret ingredient you used.
Cutting, Plating, Presenting
To serve this rich cake cleanly, use a long, sharp chef’s knife dipped in hot water and wiped dry between each slice. This clean-cut technique prevents the fudgy buttercream from sticking to the blade, ensuring your cross-section slices look pristine and professional. Slicing with a warm blade also highlights the gorgeous contrast between the dense cake layers and the creamy frosting.
While this cake stands beautifully on its own, pairing a slice with a scoop of cold vanilla bean ice cream or a dollop of unsweetened whipped cream balances the intense cocoa flavors. You can present it alongside a warm pot of black coffee or espresso to highlight the deep chocolate undertones. The bitterness of the coffee cuts through the sweetness of the buttercream beautifully.
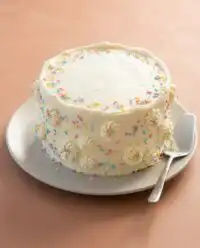
If you are setting this up for a formal gathering, slice the cake ahead of time and display the pieces on a vintage cake stand. It has all the rustic charm of a classic homemade chocolate cake while carrying a modern, sophisticated texture that will surprise your guests. Your friends will appreciate the beautiful presentation as much as the decadent taste.

What You Just Proved
By pulling this rich cake from your oven, you have officially bypassed the need for fussy baking rules. You have proved that a single bowl, a simple garden vegetable, and some dark cocoa can create a crumb more luxurious than any commercial mix. Make less. Mean more.
If you are ready to expand your baking repertoire beyond standard cake mix recipes, this bold experiment is the perfect starting point. The kitchen is your laboratory, and you are fully in charge of the variables. Tradition noted. Proceeding anyway.
Make sure to share your baking results and cross-section slices with our community of flavor rebels. You can find us on Pinterest, Facebook, and TikTok to swap your own creative kitchen data.


