The tangy, sharp scent of cultured buttermilk hits the warm paddle attachment, cutting through whipped sugar and butter like a cool breeze on a humid summer afternoon.

You are here because you want to build a real dessert, not a fragile tower of fluff. This classic Two-Layer Buttermilk Cake is a deliberate act of baking geometry, engineered to balance rich moisture with structural integrity. We are leaving the standard box mixes behind to focus on how acidity transforms simple starches into a melt-in-your-mouth crumb. The kitchen scale is your friend today, and we are going to use it to create something spectacular.
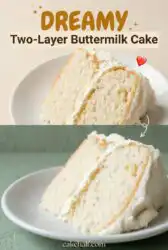
The Case for Making This Two-Layer Buttermilk Cake
Prep: 40 min · Serves: 12 · Difficulty: Medium
- Crumb remains tender for days.
- Real buttermilk adds complex, subtle tang.
- Sturdy layers support heavy frosting beautifully.
- No complicated specialty equipment is required.
- Double-sifting guarantees an incredibly velvety texture.
You do not need to settle for dry crumb when our reliable yellow cake recipe teaches you how fat and moisture interact on a molecular level. This is the reliable foundation you will return to whenever a celebration demands real flavor.
Get The Full Cake Recipe
Print
Two-Layer Buttermilk Cake
- Total Time: 1 hour 13 mins
- Yield: 12 servings
- Diet: Vegetarian
Description
This classic buttermilk cake features a tender, velvety crumb and a delicate tang, perfectly paired with a rich vanilla buttercream. It is an ideal foundational recipe for any home baker looking to master the science of structural baking through precise measurement and proper emulsification.
Ingredients
- 2 1/2 cups cake flour
- 1 cup unsalted butter, softened
- 1 1/2 cups granulated sugar
- 3 large eggs, room temperature
- 1 cup buttermilk, room temperature
- 1 tsp baking soda
- 1 tsp baking powder
- 1/2 tsp kosher salt
- 2 tsp vanilla extract
- 2 cups powdered sugar (for frosting)
- 1/4 cup milk (for frosting)
Instructions
- Prepare cake pans. Butter two nine-inch round cake pans, line with parchment, butter the parchment, and dust with cake flour. Preheat oven to 350°F.
- Sift dry ingredients. Double-sift the cake flour, then whisk together with baking powder, baking soda, and kosher salt in a medium bowl.
- Cream butter mixture. Beat softened butter and sugar in a stand mixer on medium speed for two minutes until pale and fluffy, scraping down the sides as needed.
- Emulsify with eggs. Add eggs one at a time, beating for one full minute after each addition to ensure a stable, shiny emulsion.
- Combine batter ingredients. Alternately stir in the flour mixture and room-temperature buttermilk in three additions, ending with flour, and add vanilla just before stopping the mixer.
- Bake the layers. Divide batter into prepared pans and bake for 30 to 33 minutes until the edges pull away from the pan sides.
- Cool completely. Rest cakes in the pans for 20 minutes, then invert onto a wire rack to cool fully before frosting.
- Prepare the frosting. Beat butter and salt until smooth, then gradually incorporate powdered sugar and milk, whipping for three minutes until light and airy.
- Assemble the cake. Frost the top of the first layer, stack the second layer, and coat the top and sides of the entire cake with the remaining buttercream.
Notes
- Ensure all ingredients are at room temperature to prevent the batter from curdling during the mixing process.
- Weighing flour on a digital scale is highly recommended to avoid the density caused by over-packing measuring cups.
- Avoid opening the oven door during the first 25 minutes of baking to prevent the delicate cake structure from collapsing.
- If the frosting appears too soft due to ambient kitchen heat, chill the bowl for ten minutes to firm up the fats before final assembly.
- Prep Time: 40 mins
- Cook Time: 33 mins
- Category: Dessert
- Method: Baking
- Cuisine: American
Build Your Mise en Place

Baking is a series of chemical reactions waiting for your permission to begin. Grouping your ingredients on the counter at room temperature is the first step toward a flawless rise. Every item in this lineup plays a specific structural role in building the crumb.
- Cake Flour: Lower protein content guarantees a tender structure without developing tough gluten networks during mixing.
- Buttermilk: Acidity tenderizes the flour proteins while activating the baking soda for a clean, even lift.
- Unsalted Butter: Providing the fat base that traps air pockets during the crucial creaming process.
- Egg Temp: Room-temperature eggs emulsify smoothly into the butter-sugar paste without causing the batter to split.
- Baking Soda: This alkaline powder reacts instantly with buttermilk to create tiny carbon dioxide pockets.
- Sifted Sugar: Fine crystals slice through the butter fat, creating the microscopic air cells required for rise.
| Ingredient | Why It Matters |
|---|---|
| Cake Flour | Sifted twice to aerate the batter and prevent density |
| Buttermilk | Adds moisture, acidity, and a deep, complex background flavor |
| Unsalted Butter | Delivers rich flavor and builds the structural base during creaming |
| Baking Powder | Provides secondary leavening to lift the cake evenly |
The Method

Step 1: Prepare Your Cake Pans
Begin by coating two nine-inch round cake pans with unsalted butter, reaching into every corner of the seam. Press a circular sheet of parchment paper flat against the bottom of each pan, then apply a second layer of butter over the paper. Dust the interior with cake flour, tilting and tapping the pans to distribute it evenly before knocking out the excess over your sink. Preheat your conventional oven to 350°F (or 325°F if using convection) so it reaches the target temperature well before the batter is mixed.
Step 2: Sift and Whisk Dry Ingredients
Set your kitchen scale to grams and measure your cake flour, then pass it through a fine-mesh sifter twice onto clean parchment paper. Transfer the aerated flour to a medium mixing bowl and add your kosher salt, baking powder, and baking soda. Whisk the dry ingredients with a wire fork for thirty seconds to distribute the leaveners evenly. This preventative step prevents you from finding pockets of metallic-tasting baking soda in your baked layers.
Step 3: Cream Butter and Sugar
Fit your stand mixer with the paddle attachment and place your softened butter and granulated sugar into the clean bowl. Start on low speed to combine the ingredients, then increase the speed to medium for exactly two minutes. The mixture should shift from a yellow paste to a pale, fluffy mass that holds its shape. Scraping down the sides of the bowl with a flexible spatula halfway through ensures every grain of sugar is integrated.
Step 4: Emulsify the Eggs
Add the room-temperature eggs to the creamed mixture one at a time, running the mixer on medium speed for a full minute after each addition. This slow process builds a strong emulsion, preventing the fat and liquid from separating into a curdled mess. The total beating time for this step is five minutes, resulting in a batter that looks thick and shiny. If the mixture looks split, your eggs were likely too cold, but continuing to whip will help restore the suspension.
Step 5: Bake Your Two-Layer Buttermilk Cake Layers
Turn your mixer to its lowest stir setting to protect the delicate air bubbles you have spent ten minutes creating. Alternately add the sifted flour mixture and room-temperature buttermilk in three separate additions, starting and ending with the flour. Pour in the vanilla extract during the final seconds of mixing, turning off the motor the instant the last flour streaks disappear. Divide the batter evenly between your prepared pans and bake for 30 to 33 minutes until the cake edges pull away slightly from the sides.
Step 6: Cool on a Wire Rack
Slide the hot pans onto a wire cooling rack and let them rest undisturbed for twenty minutes. The heat of the metal will continue to set the delicate crumb structure during this brief resting period. Run a thin offset spatula around the perimeter of each pan before flipping them onto the rack to release the cakes. Gently peel away the parchment paper from the bottoms and allow the layers to cool completely to room temperature.
Step 7: Whip the Vanilla Frosting
Clean your mixer bowl thoroughly and attach a clean paddle to prepare the sweet buttercream frosting. Beat the butter and kosher salt together on medium speed until smooth, then gradually add the powdered sugar alternating with the milk. Pour in the vanilla extract and beat on medium-high speed for three minutes to whip air into the frosting. If the consistency is too soft, add more sugar a tablespoon at a time; if it is too stiff, add milk in tiny drops.
Step 8: Assemble and Frost the Cake
Place your first cooled cake layer onto the center of an attractive serving plate or cardboard round. Spread a thick, even layer of frosting across the top, working it gently to the edges with your offset spatula. Place the second layer top-side down onto the frosting to create a flat, level surface for the top coat. Coat the top and outer sides of the assembled cake with the remaining frosting, sealing it under a protective cake dome.
The Details That Matter

Precision is the ultimate path to baking freedom. Weighing your ingredients with a digital scale eliminates the variance of measuring cups, which can pack flour and throw off the liquid-to-solid ratio. For those who enjoy rich structures, comparing this with our classic vanilla butter cake reveals how fat levels dictate crumb behavior.
Warm buttermilk is a non-negotiable requirement for an even rise. Cold liquids shock the creamed butter, causing the emulsion to break and resulting in a heavy, dense layer with poor volume. If your buttermilk is cold, warm it in the microwave in five-second bursts until it feels neutral to the touch.
If your cake layers sink in the center, here is why and how to fix it. This common failure happens when the oven door is opened too early, releasing the heat before the starch walls have fully set. Keep the oven door closed until the final five minutes of baking, relying on the oven light to monitor progress instead.
Sifting your cake flour after measuring is not an optional suggestion. This process breaks up tiny clumps and introduces air, which helps the dry ingredients distribute evenly throughout the wet batter. Skipping this step leads to pockets of unmixed flour that ruin the velvety texture of the baked crumb.
Avoid the temptation to whip your butter and sugar on high speed. High speeds create large, unstable air bubbles that collapse during baking, leaving you with flat, heavy layers. Stick to medium speed to build a fine, stable matrix of micro-bubbles that hold their shape.
Frosting is highly sensitive to humidity and kitchen temperature. If your frosting becomes too soft to spread, place the mixing bowl in the refrigerator for ten minutes to firm up the butter fats. Whip it briefly on medium speed before attempting to finish assembling your cake layers.
Frequently Asked Questions
Why is my buttermilk cake dry?
This usually occurs if the cake is baked too long or if the flour was scooped directly from the bag rather than weighed. Excess flour absorbs moisture, leaving the crumb dry and crumbly. Always use a kitchen scale to measure your flour and check the cake’s doneness two minutes before the timer ends.
Can I substitute buttermilk in a cake?
While you can use milk mixed with lemon juice or vinegar in an emergency, it will not yield the same rich texture as real cultured buttermilk. Real buttermilk has a thicker viscosity that adds moisture and a subtle tang that cannot be replicated. For the best result, stick to store-bought cultured buttermilk.
What does buttermilk do to a cake?
Buttermilk breaks down gluten strands in the flour, resulting in an incredibly tender and soft crumb. The natural acidity also reacts with the baking soda to help the cake rise evenly. This reaction creates a light, airy texture that is far superior to cakes made with standard whole milk.
Should buttermilk cake be served warm or cold?
This cake is best served at room temperature, where the butter fats are soft and the flavors are fully developed. If you store the cake in the refrigerator, let it sit on the counter for at least thirty minutes before slicing. Serving it cold will make the crumb feel dense and mask the subtle vanilla flavor.
How many people does a two-layer cake feed?
A standard nine-inch double-layer cake comfortably serves twelve to sixteen people depending on how the slices are cut. For clean, neat portions, use a long, thin knife dipped in hot water and wiped clean between each cut. This prevents the frosting from dragging through the delicate crumb of the layers.
How long do I bake a two-layer buttermilk cake?
These nine-inch layers typically bake for 30 to 33 minutes at 350°F in a conventional oven. You will know they are finished when a wooden toothpick inserted into the center comes out clean or with a few moist crumbs. The edges of the cake will also start to shrink slightly away from the sides of the pan.
Can this recipe be used for cupcakes?
Yes, this versatile batter makes wonderful cupcakes that hold their shape beautifully. Divide the batter evenly among twenty-four paper-lined muffin cups and bake at 350°F for 18 to 20 minutes. Keep an eye on them starting at the fifteen-minute mark to prevent over-baking.
Can a buttermilk cake be frozen?
You can freeze the unfrosted cake layers for up to three months by wrapping them tightly in plastic wrap and aluminum foil. Freeze them flat on a baking sheet before stacking to prevent them from warping. Thaw the layers overnight in the refrigerator before assembling and applying your fresh buttercream frosting.
Rebel Swaps
Swapping the traditional vanilla for almond extract and fresh lemon zest is a simple way to change the flavor profile. Add one teaspoon of finely grated lemon zest to the sugar before creaming, and replace half of the vanilla extract with pure almond extract. This bright citrus note pairs beautifully with the natural tang of the cultured milk.
You can easily adapt this batter to bake a single-layer sheet cake or a dozen individual cupcakes. A standard 9×13-inch metal baking pan requires about twenty-eight minutes in the oven, making it an excellent option for casual gatherings. To see how different pan shapes affect baking times, read our classic vanilla bean layer cake story for helpful scaling tips.
If you want to try an older style of frosting, consider a boiled fudge frosting instead of the sweet vanilla buttercream. This dark, glossy coating creates a beautiful contrast against the pale, delicate crumb of the cake layers. For inspiration on historical frosting methods, check out the traditional buttermilk layer cake method to see how early bakers finished their cakes.
Cutting, Plating, Presenting
Presenting a double-layer dessert is a visual performance that starts before the first slice is cut. Place your cake on an elevated pedestal stand to give it the focus it deserves on your dessert table. Keep the cake covered under a glass dome until serving to prevent the air from drying out the exposed frosting edges.
When it is time to serve, use a sharp chef’s knife rather than a serrated bread knife to cut clean slices. Run the blade under warm water and wipe it dry with a clean towel before making each cut. This technique prevents the sweet vanilla buttercream from smearing, keeping the distinct layers looking sharp on the plate. For a visual guide to stellar presentation, check out our classic two layer yellow cake chocolate frosting story to see how to arrange your dessert station.
Pair each slice with a hot beverage that balances the sweet richness of the frosting. A cup of dark roast coffee or a strong black tea provides the ideal bitter contrast to the sweet cake. If you are hosting a summer gathering, serve the slices alongside fresh, macerated berries to add a bright, juicy element to the plate.

What You Just Proved
Baking this dessert is proof that precision and patience yield spectacular results in the home kitchen. By double-sifting your flour and carefully emulsifying your ingredients, you have created a crumb that rivals any professional pastry shop. You have shown that a cake does not need complex decorations to be the center of attention.
As you gain confidence with this recipe, you can use these techniques to tackle other classics. Our guide to a classic vanilla layer cake is an excellent next step for refining your mixing skills. Remember that the recipe is a starting point, and your kitchen is your personal flavor laboratory.
I would love to see how your beautiful dessert turned out on your dining table. Share your baking triumphs with our community of adventurous home bakers online. Connect with us and post your photos on Pinterest, Facebook, and TikTok to join the conversation.


