The sweet, rich scent of a warm baking pan resting on Grandma’s wooden counter always brought a quiet comfort to our old country kitchen.

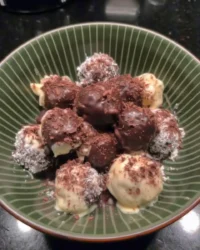
We always looked forward to baking sweet treats during quiet afternoons in the country. Transforming classic chocolate baking into hand-shaped Brownie Cake Pops is a beautiful way to bring generations together.
These little treats require no elaborate decoration, relying instead on the deep flavor of fudge chocolate. Making them by hand offers a moment of deliberate slowness in a busy world. The weight of a grandmother’s rolling pin is not needed here, but the gentle touch of your hands is.
We shape each sweet sphere by hand, honoring the time-tested practice of creating small desserts with care. It is a slow, methodical kitchen craft that feels both nostalgic and deeply satisfying. When you crumble the chocolate base, you connect with a long line of bakers who never wasted a single crumb.
When the glossy outer shell dries, it leaves you with a dessert that feels like a quiet gift from the past. Every bite holds the rich density of homemade style baking that we cherish. Let the flour dust your apron as you work without any rush.
A Bite of Pure Nostalgia: Why We Cherish Brownie Cake Pops
Prep: 10 min · Serves: 24 · Difficulty: Easy
- Fudgy chocolate flavor in every single bite.
- Simple ingredients found on any pantry shelf.
- Hand-shaped portions suited for family gatherings.
- Rich textures that remind you of childhood.
- Fun kitchen activity for quiet weekend afternoons.
These hand-rolled brownie cake pops bring the same joy as traditional cake balls from Grandma’s old recipe box. This is the simple recipe my family gathers for every quiet Sunday dinner.
In our family archives, we find that the simplest recipes are the ones that endure. There is a quiet beauty in taking a humble chocolate sheet and shaping it into delicate spheres. This process requires no modern gadgets, only your hands and a patient spirit.
We gather around the wooden stool at the counter to roll the dough together. This is the old way of kitchen work, where conversation flows as easily as the chocolate glaze. Each little ball represents a moment of connection that stays with you long after the kitchen is clean.
Baking should never feel like a performance for an audience. Instead, it is an act of love meant to be shared with those who crowd around your table. These sweet portions remind us that quiet afternoons spent baking are never wasted.
Get The Full Cake Recipe
Print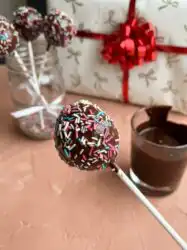
Brownie Cake Pops
- Total Time: 3 hours
- Yield: 24 pops
Description
These decadent brownie cake pops are crafted from moist, crumbled fudge brownies and dipped in a silky chocolate shell. Perfect for family gatherings, these hand-rolled treats offer a nostalgic, homemade experience that is as simple to make as it is delightful to eat.
Ingredients
- 1 box brownie fudge mix (plus required eggs, oil, and water)
- 12 ounces chocolate candy melts
- 2 tablespoons vegetable shortening
- 1/4 cup white sprinkles
- 24 cake pop sticks
Instructions
- Bake the brownies. Prepare and bake the fudge brownie mix according to the package instructions until a toothpick comes out with a few moist crumbs, then let cool completely.
- Crumble the brownies. Trim the dry edges from the cooled brownie block and crumble the soft interior into a large bowl using your fingers.
- Shape the spheres. Mash the brownie crumbles until a uniform dough forms, then roll into twenty-four even spheres and place them on a parchment-lined baking sheet.
- Attach the sticks. Dip the ends of your cake pop sticks into a small amount of melted chocolate, press them into the centers of the brownie spheres, and freeze for two hours.
- Prepare the glaze. Melt the chocolate candy melts with the shortening in a microwave-safe bowl using thirty-second intervals, stirring until the mixture is smooth.
- Dip and decorate. Dip each chilled sphere into the glaze, tap off the excess, immediately apply white sprinkles, and stand upright in a foam block to set.
- Allow to dry. Let the finished pops rest at room temperature until the outer chocolate shell is completely firm and set.
Notes
- Ensure the brownie mixture is completely cooled before crumbling to prevent it from becoming greasy.
- If the brownie dough feels too crumbly to roll, mix in a teaspoon of room temperature cream cheese or frosting to help it bind.
- Keep a dry cloth nearby to ensure your chocolate melting station remains free of moisture, which can cause the chocolate to seize.
- Always use a foam block or a colander to hold the sticks upright, ensuring the pops dry with a perfectly round shape.
- Prep Time: 30 mins
- Cook Time: 30 mins
- Category: Dessert
- Method: No-bake glazing
- Cuisine: American
From the Kitchen Shelf
Before you begin, gather your measuring tools and clear a space on your worn wooden counter. Having everything in its place brings a sense of calm to the baking process. These simple elements come together to create something truly comforting.
- Brownie Fudge Mix: This reliable base provides the dense, fudgy crumb essential for holding its shape without needing excess frosting.
- Chocolate Candy Melts: A traditional coating that sets into a smooth, glossy shell, protecting the moist chocolate center.
- Shortening: A small touch of this classic fat thins the melted chocolate, creating an even glaze.
- White Sprinkles: These simple decorations add a clean contrast to the deep chocolate coat without overwhelming the classic design.
- Cake Pop Sticks: These sturdy wooden or paper rods hold each portion steady as you dip and serve.
| Ingredient | Why It Matters |
|---|---|
| Brownie Fudge Mix | Delivers the rich texture and deep cocoa base. |
| Chocolate Candy Melts | Creates a beautiful, firm shell that snaps when bitten. |
| Shortening | Helps thin the glaze for a smooth dipping experience. |
| White Sprinkles | Offers a clean, decorative touch on top. |
We keep our pantry stocked with these simple staples so we are always ready for unexpected guests. There is a special comfort in knowing you can create a beautiful dessert from a few humble boxes. Grandma always taught us to respect each ingredient and use it with gratitude.
The quality of your chocolate coating is what defines the final texture. When the candy melts are gently warmed, they create a protective blanket around the moist brownie crumb. It is a classic technique that preserves the fudgy interior for days.
Using paper or wooden sticks allows small hands to hold these treats without getting chocolate on their Sunday best. It is a practical detail that has made these treats beloved at family gatherings for years. Every element has its purpose, working together in harmony.
The Baking Process
Step 1: Baking the Fudge Brownie Base
Preheat your oven and prepare the brownie mix according to the traditional package instructions in a standard pan. Bake until a toothpick inserted in the center comes out with a few moist crumbs. Let the pan rest on a cooling rack until the chocolate is completely cool to the touch.
Step 2: Preparing the Crumbled Texture
Remove the cooled brownies from the baking dish with gentle care. Trim away the dry outer edges of the brownie block, leaving only the soft, fudgy interior. Crumble the remaining moist cake into a large, heavy glass mixing bowl using your fingers.
Step 3: Rolling the Brownie Cake Pops
Mash the crumbled chocolate together with your hands until it forms a cohesive, clay-like dough. Shape the mixture into twenty-four even spheres using a small scoop or your hands. Place each hand-rolled sphere onto a parchment-lined baking sheet with space between them.
Step 4: Setting the Sticks
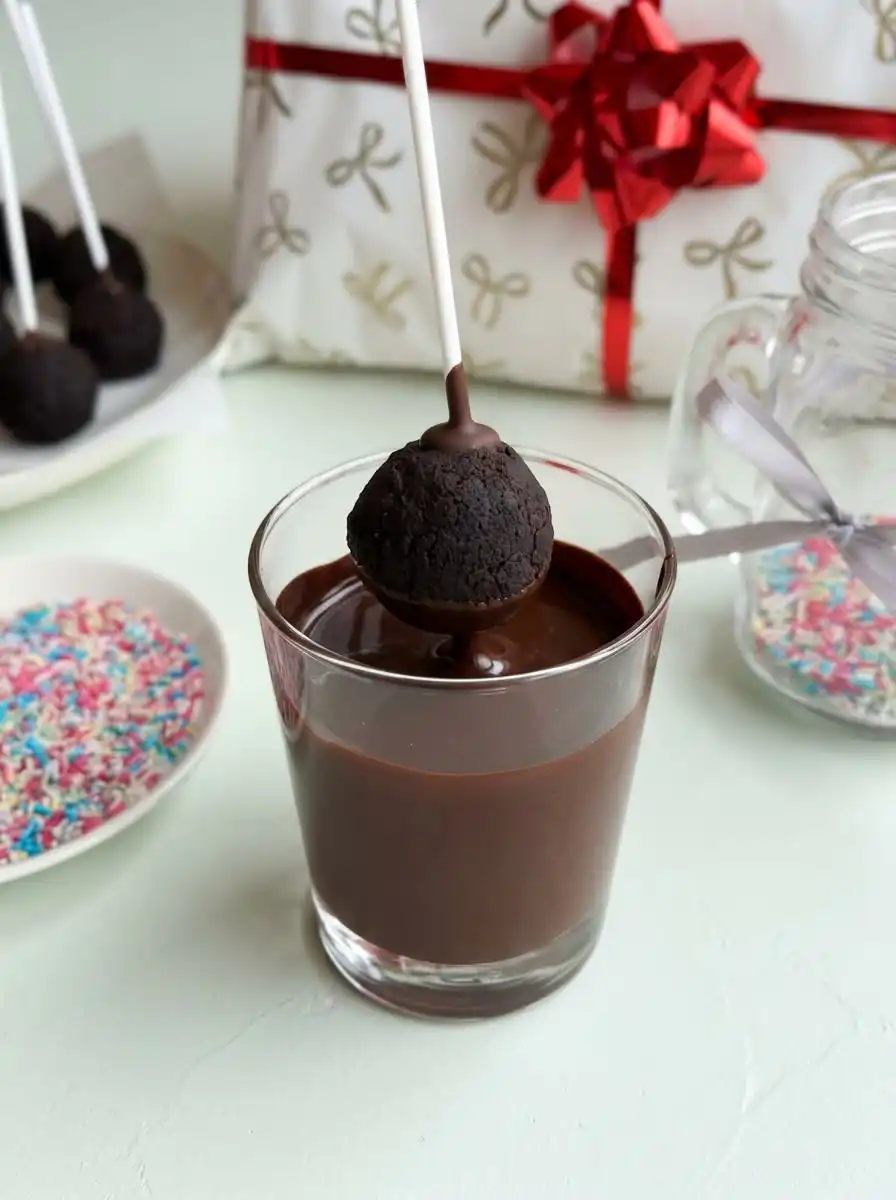
Melt a very small amount of your chocolate coating in a warm glass bowl. Dip the end of each stick into the melted chocolate, then press it firmly into the center of each brownie sphere. Transfer the baking sheet to the freezer for two quiet hours to let them firm up.
Step 5: Preparing the Chocolate Glaze
Warm the chocolate candy melts and the shortening in a microwave-safe glass bowl. Heat in short intervals of thirty seconds, stirring gently with a wooden spoon between each turn. Keep heating until the mixture flows smoothly like warm honey from a spoon.
Step 6: Dipping and Decorating
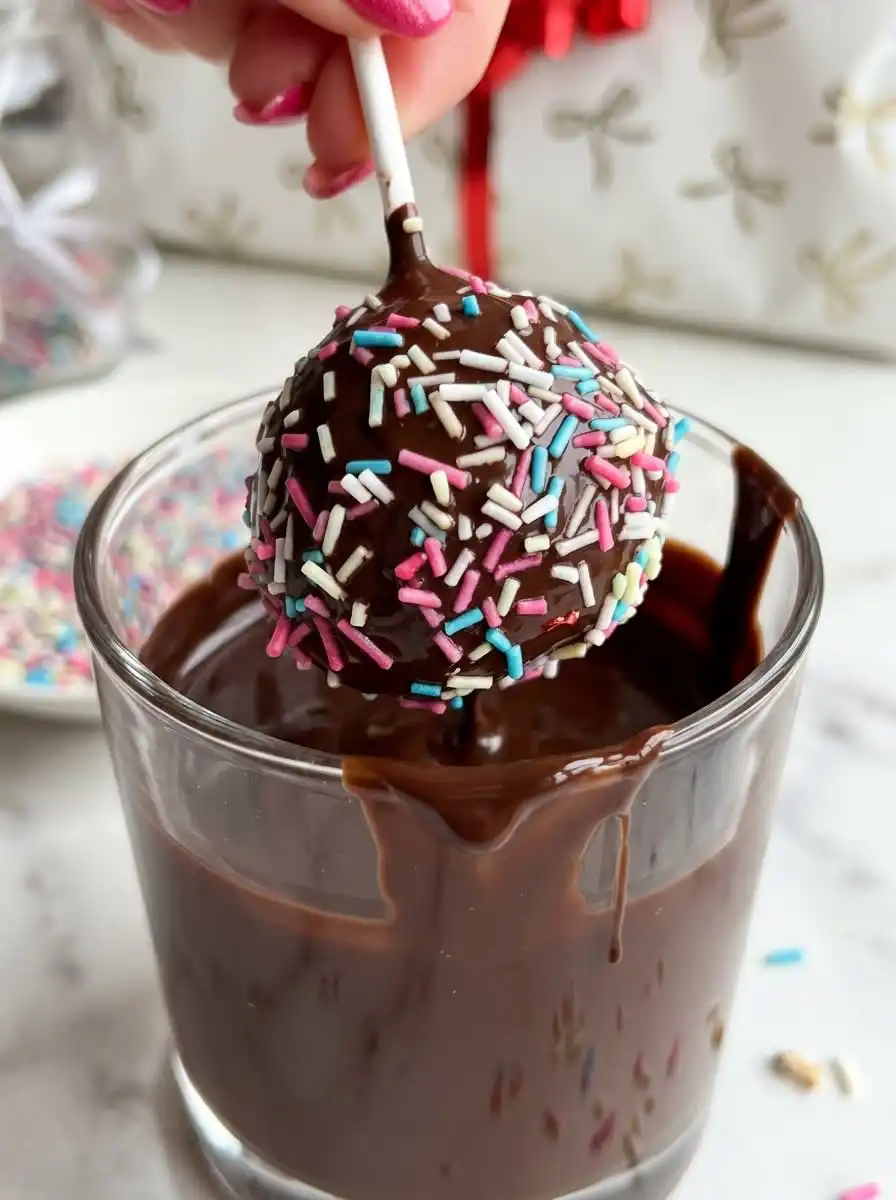
Dip each chilled chocolate sphere into the warm glaze, coating it in one single, smooth motion. Allow the excess coating to drip back into the bowl with a gentle tap of your wrist. Scatter the white sprinkles over the wet shell immediately, then stand the stick upright in a block of foam to dry.
Step 7: Letting the Treats Dry
Leave the dipped sweets to sit undisturbed at room temperature until the outer shell is firm and dry. This quiet waiting period allows the glaze to set into a beautiful matte finish. Once dry, they are ready to be shared with family and friends around the hearth.
What Grandma Would Tell You
Moisture is the secret to a smooth finish when shaping your sweets. If your brownie mixture feels too dry to hold together, add a single spoonful of leftover chocolate frosting to bind the crumbs. This small addition keeps the center moist without making it overly sweet.
Chilling the shaped spheres is an essential step that you must not rush. If the brownie dough is too warm when dipped, it will slip off the stick and dissolve into your warm glaze. Patience in the kitchen always rewards the baker with a beautiful result.
When working with chocolate coatings, keep all water far away from your work station. Even a single drop of water will cause your chocolate to seize into a dull, hard lump that cannot be salvaged. Clean your glass bowls with a dry cloth before you begin.
If your chocolate coating becomes thick and clumpy, here is why and how to fix it. This usually happens from overheating the melts, which you can fix by stirring in a tiny splash of neutral oil or vegetable shortening. For more detailed guidance, you can review this traditional chocolate melting method to make sure your glaze remains silky.
Remember that a quiet, patient hand makes the most beautiful kitchen creations. As when baking a traditional chocolate cake recipe, rushing the temperature changes will always affect the final texture of your sweets. Let each step happen in its own time.
Tap the stick gently against your hand rather than the rim of the bowl. This softer vibration removes the excess glaze without jarring the chocolate ball off its stick. It keeps your workspace clean and your shells smooth.
Frequently Asked Questions
What can I use to bind the crumbled brownies?
High-quality fudge brownies usually contain enough natural moisture and fat to bind together without any extra ingredients. If your batch turns out a bit dry, you can stir in a spoonful of chocolate frosting or chocolate syrup. Use only enough to make the dough pliable like modeling clay.
Why do my brownie pops fall off the stick?
This common issue usually happens when the brownie spheres are too heavy or if they have not been chilled long enough before dipping. Make sure to dip the tip of each stick in melted chocolate before inserting it into the ball. This acts as a firm glue once it chills in the freezer.
Can I use boxed brownie mix instead of homemade?
Yes, a boxed mix is a wonderful time-saving option that delivers the ideal moisture level for shaping. Look for a traditional fudge style mix rather than a cake-like variety. This helps the crumbs mash easily into a dense, decadent filling.
Can I freeze brownie cake pops?
You can freeze these treats easily before or after dipping them in chocolate. Store the finished pops in an airtight container with layers separated by parchment paper for up to three months. Let them thaw slowly in the refrigerator before serving to prevent condensation on the shells.
Can I use candy melts instead of real chocolate for the coating?
Candy melts are excellent for this recipe because they melt smoothly and set quickly without requiring tempering. Real chocolate can be used, but it must be tempered carefully to prevent a dull or soft finish. Candy melts offer a reliable, classic shell every single time.
Is this for a specific holiday or theme?
These simple chocolate bites are highly versatile and suited for any family gathering or holiday table. By changing the color of the sprinkles or using different chocolate coatings, you can adapt them for autumn harvests or spring celebrations. They bring a quiet elegance to any casual Sunday dinner.
How should I store leftover brownie cake pops?
Keep your leftover pops in an airtight container at room temperature for up to five days. If your kitchen is warm, you can keep them in the refrigerator instead to preserve the crisp shell. Always bring them back to room temperature before serving for the best texture.
Classic Variations
A touch of pure peppermint extract added to the brownie dough offers a beautiful holiday twist. This simple addition brings a cool, crisp note that cuts through the deep richness of the dark chocolate base, reminiscent of winter gatherings. It is a wonderful way to adapt the recipe for the winter season.
You can also use a rich brownie cake as your starting point instead of a box mix. Crumbing a homemade pan of chocolate brownies allows you to control the depth of the cocoa flavor and the density of the crumb. This extra care makes the final sweet feel even more special.
Swapping the white sprinkles for finely crushed toasted walnuts provides a wonderful rustic texture. The earthy flavor of the nuts balances the sweet candy shell beautifully, making them feel like a classic autumn harvest dessert. You can also try toasted pecans for a warmer, buttery flavor.
For a subtle floral note, add a tiny scrape of orange zest to the chocolate dough. The bright citrus oils pair beautifully with the deep fudge flavor, creating an elegant contrast that reminds us of old-fashioned holiday treats. It is a quiet variation that will surprise and delight your guests.
Sitting Down Together
Presenting these hand-dipped treats on a vintage glass platter adds a touch of simple elegance to your table. Arrange them standing upright in a small crock filled with clean sugar, or lie them gently on a bed of lace. They look beautiful next to a pitcher of cold farm milk or a pot of hot black coffee.
These bites are suited for sharing after a comforting family dinner. They offer enough sweetness to satisfy without the need for slicing a large dessert. If you are hosting a larger gathering, you can serve them alongside a classic easy chocolate cake to give your guests options.
We love to pack these treats into small tin boxes lined with clean wax paper as thoughtful gifts for neighbors. A handmade gift from a quiet kitchen speaks of care and tradition far better than anything bought from a store. It is a simple gesture that brightens anyone’s afternoon.
During the holidays, we arrange them as a centerpiece on our dining table. The contrast of the dark chocolate and white sprinkles looks lovely under the soft glow of candlelight. It invites guests to help themselves as they share stories of years past.

Before You Close the Recipe Box
Taking the time to shape these brownie cake pops by hand is a quiet reminder of how baking used to be. In a world that constantly rushes, standing at a wooden counter rolling warm chocolate dough offers a peaceful pause. We hope this simple recipe brings a sense of comfort and nostalgia to your home kitchen.
If you find yourself longing for more classic baking traditions, we invite you to try our beloved homemade chocolate cake next. It carries the same rich heritage and simple comfort as these hand-rolled treats, perfect for quiet Sunday afternoons. Let the aroma of baking cocoa fill your home and bring your loved ones together.
We would love to hear about your baking moments and see how your sweet creations turned out. Please share your kitchen stories with us on our Pinterest page or join our community on Facebook. Until we meet again, may your oven remain warm and your kitchen be filled with peace.