I still remember the gasp that went through the room at my seventh birthday party when my mother carried out a cake that looked exactly like a princess. It wasn’t just a dessert; it was magic on a plate, a centerpiece that made every little girl feel like royalty. That tradition of turning a simple cake into a beautiful ballgown is one of those vintage baking memories I hold dear, a perfect example of how a little imagination and a standard Pyrex bowl can create something truly unforgettable.

This recipe is a timeless classic that has graced birthday tables for decades. By baking a sturdy yellow cake in a glass mixing bowl, you create a natural dome shape that transforms perfectly into a flowing skirt. It is a joyful, nostalgic project that relies on simple pantry staples and a whole lot of love, proving you don’t need fancy specialty pans to make a masterpiece.
A Fairytale Centerpiece
There is a specific kind of joy in placing a homemade Barbie cake on the table and watching eyes light up. This recipe captures the heart of vintage baking—taking humble ingredients and turning them into a celebration. You will love how forgiving the process is; the “skirt” is easily trimmed and patched with frosting, making it a stress-free project even for beginners.
Beyond its stunning appearance, this cake is practically designed for making memories. It is the kind of recipe that invites little hands to help mix the batter or choose the frosting colors. Whether you are recreating a childhood favorite or starting a new tradition, this cake delivers pure, old-fashioned happiness in every slice.
Print
Barbie Cake
- Total Time: 4 hours 20 mins
- Yield: 12 servings
- Diet: Vegetarian
Description
Create a magical birthday centerpiece with this nostalgic Barbie cake that transforms a simple bowl-baked cake into a stunning princess gown. This project is surprisingly beginner-friendly and uses common pantry staples to deliver a showstopping dessert that delights guests of all ages.
Ingredients
- 1 box (15.25 oz) yellow cake mix
- Water, oil, and eggs (as required by cake mix)
- 2 cans (16 oz each) vanilla frosting
- Red food coloring
- Shortening (for greasing)
- All-purpose flour (for dusting)
- 1 standard fashion doll (cleaned)
Instructions
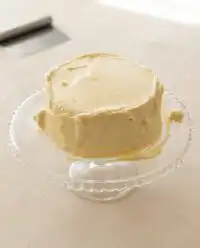
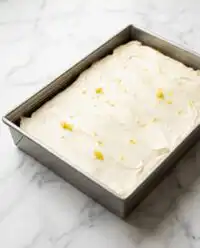
- Preheat your oven to 350°F (175°C) and generously grease a 2-quart ovenproof Pyrex glass mixing bowl with shortening, then dust with flour.
- Prepare the yellow cake mix according to the package directions and pour the batter into the prepared bowl.
- Bake for 50 to 60 minutes, checking for doneness by inserting a long skewer into the center; let cool in the bowl for 15 minutes.
- Invert the cake onto a serving plate and allow it to cool completely for at least 3 hours to ensure the frosting stays in place.
- Insert the cleaned doll into the center of the cake and use pink-tinted frosting and a piping tip to decorate the gown and bodice.
Notes
For the cleanest look, wrap the doll’s hair and legs in plastic wrap before inserting her into the cake; this protects the doll and makes cleanup much easier. If the cake dome is uneven, you can lightly trim the wide base before inverting it to ensure your princess stands perfectly straight on the platter.
- Prep Time: 20 mins
- Cook Time: 60 mins
- Category: Dessert
- Method: Baking
- Cuisine: American
The Pantry Staples

To create this festive treat, we rely on a few trusted ingredients found in almost any kitchen. It is all about simplicity and reliability here.
- Yellow Cake Mix: The sturdy crumb of a classic yellow cake holds up beautifully when carved and stacked. It provides that nostalgic birthday cake flavor we all crave.
- Vanilla Frosting: You will need plenty of creamy frosting—about two cans or a double batch of homemade—to pipe the ruffles and rosettes of the doll’s dress.
- Red Food Coloring: Just a single drop transforms plain white frosting into a classic, soft pink, though you can customize this to match any party theme.
- The Doll: A standard fashion doll works perfectly. Be sure to clean it thoroughly and perhaps wrap the lower half in plastic wrap before inserting it into the cake.
- Shortening and Flour: Essential for preparing the Pyrex bowl to ensure the cake releases cleanly without sticking.
How to Make It
Step 1: Prepare the Oven and Bowl
Preheat your oven to 350°F (175°C). This step is crucial: take a 2-quart ovenproof Pyrex glass mixing bowl and grease it generously with shortening. Dust it thoroughly with flour, tapping out the excess. This vintage trick ensures your “skirt” slides out perfectly later.
Step 2: Mix the Batter
Prepare the yellow cake mix according to the package directions. We want a nice, smooth batter. Pour the batter directly into your prepared glass bowl. It will look a bit different than a standard cake pan, but trust the process.
Step 3: Bake the Skirt
Place the bowl in the oven and bake for 50 to 60 minutes. Because the batter is deep, it takes longer to bake than a flat sheet cake. Test it by inserting a long cake tester or skewer into the very center; it should come out clean when it’s ready. Let it cool in the bowl for at least 15 minutes.
Step 4: Invert and Cool
Carefully invert the bowl onto a cake plate so the widest part of the cake is at the bottom. This forms the bell shape of the dress. Allow the cake to cool completely—I recommend at least 3 hours—before you even think about frosting. A warm cake will melt your decorations.
Step 5: Assemble and Decorate
Once cool, insert the clean doll into the center of the cake (legs first). If the cake isn’t quite tall enough for her legs, you can build up the base with a little extra frosting or a cookie. Tint your vanilla frosting with a drop of red food coloring to create a lovely pink. Use a decorator tip to pipe stars, rosettes, or ruffles over the cake to create the gown, continuing up the doll’s bodice to create the top of the dress.
Secrets from the Recipe Box

- The Skewer Test: Because baking in a bowl creates a deep center, a standard toothpick might not reach the middle. Use a wooden skewer or a long metal tester to ensure the cake is baked through, or you might end up with a gooey center.
- Stabilize the Doll: If the doll feels wobbly, you can core out a small cylinder from the center of the cake before inserting her. Wrapping her legs in plastic wrap keeps things sanitary and makes cleanup easier.
- Crumb Coat: If you have time, apply a thin layer of frosting to the cake to seal in the crumbs (a “crumb coat”) and refrigerate it for 30 minutes. This makes piping the final ruffles much easier.
- Party Planning: If you are planning a larger gathering and need more dessert options, take a look at our guide on celebration cakes for more crowd-pleasing ideas.
Make It Your Own
- Flavor Twists: While yellow cake is traditional, a chocolate fudge or strawberry cake mix works just as well. Just be mindful that darker cakes might show through light frosting, so a crumb coat is extra helpful there.
- Dress Designs: You don’t have to stick to pink! Use gel food coloring for vibrant purples, blues, or yellows. You can even use multiple colors to create a layered petticoat effect.
- Homemade Touch: If you prefer baking from scratch rather than using a mix, you can use any sturdy butter cake recipe. For a reliable base, try the batter from our vintage cake recipe, which holds its shape beautifully.
- Extra Inspiration: If you need more visual guidance on assembling this classic treat, this Barbie cake tutorial is a wonderful resource to check out.
At the Table

This cake is a showstopper, so it deserves center stage. I love placing it on a pedestal cake stand to give the “skirt” even more drama. When it is time to serve, simply remove the doll and slice the dome into wedges.
For a summer birthday, this cake pairs beautifully with a scoop of vanilla ice cream or fresh strawberries. If you are looking for other fun shapes to accompany this for a twin celebration or a mixed party, our heart cake is another lovely, simple shape that delights children and adults alike.
A Final Word
Baking a Barbie cake is about more than just dessert; it is about keeping a sweet tradition alive. Whether it is for a daughter, a niece, or a friend who loves a bit of nostalgia, the effort you put into piping those ruffles translates directly into love. It is a reminder that the best celebrations don’t need to be perfect—they just need to be heartfelt.
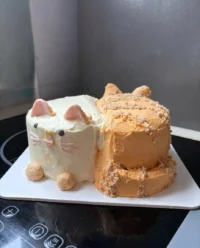
If you have boys in the family or need another fun idea for a sibling’s birthday, you might want to try our car cake next. I would love to see your beautiful creations! Please share your photos with me on Facebook, Instagram, or Pinterest. Happy baking!
