I remember the way the light used to hit my grandmother’s kitchen table on Saturday mornings, illuminating the tiny jars of zest she kept tucked away. She always said that the brightest flavors were found in the simplest fruits, and this Lemon Rainbow Cake 2 is a living testament to that gentle wisdom. It is a recipe that feels like a quiet celebration, born from a time when we baked to honor the ingredients and the people sharing the table.

This particular cake is a beautiful dance of citrus, layering lemon, orange, and lime into a soft, tender crumb that feels like a breath of fresh air. It is not just a dessert; it is a storied piece of baking history that brings a splash of color to any gathering. Whether you are celebrating a milestone or simply the joy of a quiet afternoon, these vibrant layers offer a taste of nostalgia in every bite.
The Magic of This Citrus Treasure
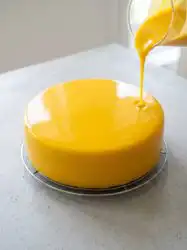
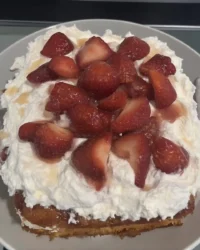
There is something truly special about a cake that reveals its secrets only once it is sliced. While the outside is draped in a soft, orange-scented frosting, the inside holds a cheerful surprise of sunshine-colored layers. This recipe captures the essence of classic baking by relying on the natural oils of citrus fruits to provide a deep, resonant flavor that modern extracts simply cannot replicate. It is a humble yet impressive centerpiece that invites conversation and brings a sense of wonder to the table.
You will find that the texture is remarkably fine, thanks to the use of shortening and the careful incorporation of eggs. It is a sturdy cake that holds up beautifully to the lemon custard filling, yet it remains light enough to enjoy after a full meal. This is the kind of recipe that gets passed down on handwritten index cards, smudged with bits of flour and citrus juice, because it never fails to bring a smile to those who taste it. It represents the beauty of “just enough”—just enough sweetness, just enough tang, and just enough whimsy to make it unforgettable.
Print
Lemon Rainbow Cake 2
- Total Time: 1 hour 55 mins
- Yield: 12 servings
Description
This vibrant three-layer citrus cake features distinct lemon, orange, and lime layers for a beautiful rainbow effect. Finished with a luscious lemon custard filling and orange cream frosting, it is a nostalgic and refreshing centerpiece for any celebration.
Ingredients
- 3 cups all-purpose flour
- 5 teaspoons baking powder
- 1/2 teaspoon salt
- 1 cup shortening
- 2 cups white sugar
- 4 large eggs, room temperature
- 2 teaspoons vanilla extract
- 1 1/2 cups whole milk
- 2 teaspoons lemon zest
- Yellow food coloring
- 2 teaspoons orange zest
- Orange food coloring
- 2 teaspoons lime zest
- Green food coloring
- Lemon Custard Filling
- Orange Cream Frosting
Instructions
- Preheat oven to 350°F (175°C) and grease and flour three 9-inch round cake pans.
- In a medium bowl, sift together the all-purpose flour, baking powder, and salt; set aside.
- In a large mixing bowl, cream the shortening and white sugar together for 3 to 5 minutes until light and fluffy.
- Add the room-temperature eggs one at a time, beating well after each addition, then stir in the vanilla extract.
- Alternately add the flour mixture and the milk to the creamed base, beginning and ending with the flour, mixing just until combined.
- Divide the batter evenly into three separate bowls; stir the lemon zest and yellow coloring into the first, orange zest and orange coloring into the second, and lime zest and green coloring into the third.
- Pour each colored batter into its prepared pan and bake for approximately 30 minutes, or until a toothpick inserted into the center comes out clean.
- Cool the layers in their pans for 5 minutes before turning them out onto wire racks to cool completely.
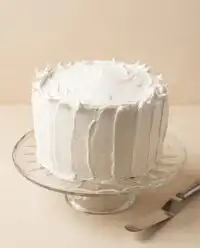
- Assemble by placing the yellow layer on a plate, topping with lemon custard filling, adding the orange layer and more filling, then the green layer; frost the top and sides with orange cream frosting and refrigerate for one hour.
Notes
To ensure the most vibrant flavor, zest your citrus fruits directly into the batter bowls to capture the essential oils that spray out during the process. Always ensure your eggs and milk are at room temperature before starting to prevent the shortening from curdling and to achieve a perfectly smooth batter consistency.
- Prep Time: 25 mins
- Cook Time: 30 mins
- Category: Dessert
- Method: Baking
- Cuisine: American
From the Baker’s Pantry

To begin this journey into citrus flavors, we turn to the staples that have lived in our cupboards for generations. Each ingredient in the Lemon Rainbow Cake 2 serves a specific purpose, working in harmony to create a balanced and tender crumb. We use all-purpose flour for a reliable structure and white sugar for a clean sweetness that allows the citrus to shine.
- The Fats and Leavening: We use shortening in this recipe to achieve that classic, melt-in-the-mouth texture that was so prized in vintage kitchens. Paired with five teaspoons of baking powder, it ensures a high, proud rise for each of our three layers.
- The Citrus Trinity: We use two teaspoons each of lemon, orange, and lime zest. These are not mere garnishes; they are the heart of the cake. The zest contains the essential oils that provide a far more complex flavor than juice alone.
- The Liquid Gold: Four room-temperature eggs and a cup and a half of whole milk provide the richness and moisture needed to bind the batter together. Room temperature ingredients are vital for a smooth, emulsified batter.
- The Colors of the Rainbow: A few drops of yellow, orange, and green food coloring help distinguish each flavor layer, turning a simple citrus cake into a visual masterpiece.
How to Craft Your Lemon Rainbow Cake 2
Step 1: Prep Your Kitchen and Pans
Before you begin the batter, take a moment to preheat your oven to 350 degrees F (175 degrees C). This ensures the cake begins rising the moment it enters the heat. Grease and flour three 9-inch round pans with care. I like to use a bit of extra shortening for this, ensuring every nook and cranny is covered so the layers release perfectly later on.
Step 2: Sift the Dry Ingredients
In a medium bowl, sift together your all-purpose flour, baking powder, and salt. Sifting was a non-negotiable step in my grandmother’s kitchen; it removes any lumps and aerates the flour, contributing to that sought-after tender crumb. Set this mixture aside for a moment while you move on to the creamed ingredients.
Step 3: Cream the Base
In a large, worn mixing bowl, cream together the shortening and white sugar. You want to beat them until the mixture looks light and fluffy, almost like a cloud. This process incorporates air into the fat, which is the secret to a cake that isn’t heavy or dense. Take your time here; it usually takes about three to five minutes of steady mixing.
Step 4: Incorporate the Eggs and Vanilla
Add your room-temperature eggs one at a time. It is important to beat the mixture well after each addition until the egg is completely incorporated. This prevents the batter from breaking. Once all the eggs are in, stir in the two teaspoons of vanilla extract. The scent at this stage should be sweet and inviting, a true hallmark of home baking.
Step 5: Combine the Batter
Now, you will alternate adding the flour mixture and the milk to your creamed base. Start with a third of the flour, then half of the milk, and repeat, ending with the final portion of flour. Mix just until combined; over-mixing at this stage can lead to a tough cake. The batter should be smooth and thick.
Step 6: Create the Colorful Layers
Divide your batter evenly into three separate bowls. In the first bowl, stir in the lemon zest and yellow coloring. In the second, add the orange zest and orange coloring. In the third, fold in the lime zest and green coloring. The vibrant hues against the pale batter are a delight to see, reminding us of the simple joys found in the kitchen.
Step 7: Bake to Perfection
Pour each colored batter into its prepared pan, smoothing the tops with a spatula. Place them in the oven and bake for about 30 minutes. You will know they are ready when a toothpick inserted into the center comes out clean and the edges just begin to pull away from the pans. Let them cool in the pans for 5 minutes before turning them out onto wire racks to cool completely.
Step 8: Assemble with Love
Once the layers are cold to the touch, place the yellow lemon layer on your serving plate. Spread a generous layer of Lemon Custard Filling over the top. Add the orange layer next, more filling, and finally the green lime layer. Finish by frosting the entire cake—top and sides—with the Orange Cream Frosting. Refrigerate the cake for at least an hour before serving to let the flavors meld and the structure set.
Secrets from My Recipe Box

One of the most important lessons I learned from years of baking is the value of patience. When working with citrus zests, always zest the fruit directly over your sugar or batter if possible. This ensures that the fragrant oils, which often spray out during zesting, land right in your cake rather than on the counter. Also, make sure your eggs are truly at room temperature. If you forgot to take them out of the fridge, place them in a bowl of warm water for five minutes. This small step helps the batter stay smooth and prevents the shortening from curdling.
For those who enjoy a slightly different texture, you might find that my lemon yogurt cake offers a similar brightness with a tangier finish. When assembling this rainbow cake, if your layers have domed slightly in the oven, use a long serrated knife to gently level them. This creates a flat surface for the custard filling and ensures your cake stands tall and straight on the pedestal. Always chill your cake before slicing; a cold cake yields much cleaner, sharper lines, showing off those beautiful colored layers to their best advantage.
Making It Your Own
While I adore the classic trio of lemon, orange, and lime, there is plenty of room for your own touch in this recipe. If you prefer a more subtle flavor, you can omit the food coloring entirely and let the tiny flecks of zest be the only hint of the different flavors. For a deeper, more sophisticated profile, try using Meyer lemons or blood oranges when they are in season. These vintage varieties offer a sweetness and floral note that is truly divine.
If you find yourself looking for a different fruit profile entirely, our raspberry white chocolate cake is another wonderful way to celebrate vibrant colors in your baking. For those following a plant-based lifestyle, you might consider how the principles of a vegan lemon cake could be adapted to these layers, perhaps using a high-quality vegan butter substitute and flax eggs. You can also experiment with the filling; a simple raspberry jam between the layers can add a tart contrast to the citrus custard that is quite refreshing.
A Beautiful Spread

When it comes time to serve this Lemon Rainbow Cake 2, I find that simplicity is best. Place the cake on a vintage glass pedestal to show off the Orange Cream Frosting. Because the cake is so flavorful on its own, a simple side of lightly sweetened whipped cream or a few fresh berries is all you need. I often serve this during our family’s mid-afternoon tea, where the citrus notes pair beautifully with an Earl Grey or a light chamomile.
For larger gatherings, this cake fits perfectly among our other celebration cakes, providing a bright alternative to richer desserts. To get the cleanest slices, dip your knife in hot water and wipe it clean between every cut. This prevents the orange frosting from smearing into the lime or lemon layers. If you are serving this outdoors on a warm day, keep the cake chilled until the very last moment to ensure the lemon custard filling stays firm and refreshing.
A Final Slice of Sunshine
There is a certain quiet joy in finishing a cake that took time and care to create. This Lemon Rainbow Cake 2 is more than just a sweet treat; it is a reminder of the heritage and tradition that we keep alive in our kitchens every time we pick up a zester. I hope this recipe finds a permanent home in your own recipe box, perhaps tucked behind a few other favorites. If you enjoyed baking this citrus treasure, I invite you to see our original lemon rainbow cake for more inspiration. Please share your baking photos with our community; I would love to see how your colors turned out. You can find us and share your memories on Facebook, Pinterest, and Instagram. Until next time, may your kitchen always be warm and your heart always be full.
