In the quiet gardens of my childhood, the arrival of a tray of fairy cakes felt like a whispered secret from the kitchen. These petite confections represent the very first lesson in British tea-time tradition, teaching us that the most profound joy often resides in the smallest of bites. Mastering this humble sponge requires a devotion to temperature and timing that separates a simple snack from a true piece of patisserie.

The fairy cake is defined by its lightness and its dainty, unpretentious glaze. Unlike its robust American cousin, the cupcake, this treat demands a delicate crumb that dissolves almost instantly on the tongue. By focusing on the precision of the creaming method, we can achieve a texture that is both airy and resilient, providing a perfect canvas for a glossy silken icing.
The Grace of a Perfect Crumb
There is a specific kind of mastery found in perfecting a recipe that many take for granted. You will love these cakes because they prioritize the fundamental relationship between fat, sugar, and air. This small-batch approach allows you to focus on the sensory cues—the way the butter changes color, the scent of the vanilla, and the golden glimmer of the finished sponge.
While modern baking often leans toward the oversized and the over-frosted, the fairy cake remains a bastion of restraint. It is a beautiful exercise in proportion. When you use premium grass-fed butter and organic eggs, the flavor profile becomes sophisticated, proving that simple ingredients, when treated with respect, create an exquisite experience. This recipe is a tribute to the quiet satisfaction of doing a small thing extraordinarily well.
Print
Fairy Cake
- Total Time: 35 mins
- Yield: 12 cakes
Description
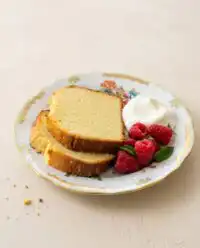
These delicate British fairy cakes feature a light, airy sponge topped with a smooth, glossy glacé icing. Perfectly portioned for tea time, they offer a sophisticated balance of buttery crumb and sweet finish that dissolves beautifully on the palate.
Ingredients
- 125g unsalted butter, softened to room temperature
- 125g caster sugar
- 2 large eggs, at room temperature
- 1 tsp pure vanilla extract
- 125g self-raising flour, sifted
- 200g icing sugar, sifted
- 1–2 tbsp whole milk
Instructions
- Preheat the oven to 180C (160C fan/350F) and line a 12-hole cupcake tin with paper cases.
- Beat the softened butter and caster sugar together in a bowl until the mixture is pale, ivory-colored, and fluffy.
- Add the eggs one at a time, beating thoroughly after each addition, then stir in the vanilla extract.
- Sift the self-raising flour over the batter and gently fold it in using a figure-eight motion until just combined.
- Divide the batter among the cases and bake for 20 minutes until golden and a skewer comes out clean.
- Transfer cakes to a wire rack to cool completely.
- Whisk the icing sugar with milk until it reaches a thick ribbon consistency, then spoon over the cooled cakes and add decorations.
Notes
To ensure the lightest possible texture, always sift your flour from a height and use a gentle folding motion to preserve the air bubbles created during the creaming stage. Using room-temperature eggs is crucial to prevent the batter from curdling, resulting in a more uniform and tender crumb.
- Prep Time: 15 mins
- Cook Time: 20 mins
- Category: Dessert
- Method: Creaming Method
- Cuisine: British
The Foundation of Finesse

To achieve the signature lightness of a fairy cake, the quality and state of your ingredients are paramount. Each element serves a specific structural purpose in creating that tender, pale crumb we desire.
- Unsalted Butter (125g): This must be softened to room temperature, roughly 65°F (18°C). If the butter is too cold, it will not trap air; if too warm, the structure will collapse. High-quality European-style butter with a higher fat content provides a superior mouthfeel.
- Caster Sugar (125g): The fine crystals of caster sugar are essential for the creaming process. They cut through the butter to create thousands of tiny air pockets without leaving a gritty texture behind.
- Large Eggs (2): Your eggs must be at room temperature to prevent the batter from curdling. They provide the protein structure and the rich golden hue of the sponge.
- Vanilla Extract (1 tsp): Use a pure, oil-based or alcohol-based extract rather than imitation. The aromatic depth of real vanilla beans makes a noticeable difference in such a simple cake.
- Self-Raising Flour (125g): This provides the lift. Sifting the flour is non-negotiable, as it removes clumps and further aerates the dry ingredients for a refined texture.
- Icing Sugar (200g): Also known as powdered sugar, this creates a smooth, melt-in-the-mouth finish for the decoration.
- Whole Milk (1-2 tbsp): A small amount of milk thins the icing to the perfect ‘ribbon’ consistency, allowing it to coat the cake with a glossy sheen.
The Method of Precision
Step 1: Oven Calibration and Mise en Place
Begin by heating your oven to 180C (160C fan/350F). Precision begins with a steady temperature, so allow your oven to preheat for at least twenty minutes. Line a 12-hole cupcake tin with high-quality paper cases. Ensure all your ingredients are measured by weight and have reached room temperature to facilitate a perfect emulsion.
Step 2: The Creaming Stage for Aeration
Place the softened butter and caster sugar into a clean glass bowl. Using a whisk or a stand mixer, beat the mixture until it transitions from a deep yellow to a pale, almost white ivory color. The texture should be soft, fluffy, and significantly increased in volume. This step is where you build the air that will make your cakes light.
Step 3: Integrating the Aromatic Essence
Add the eggs one at a time, beating thoroughly after each addition. If the mixture looks as though it might split, add a spoonful of your measured flour to stabilize the emulsion. Stir in the vanilla extract. The goal is a silky, cohesive batter that holds its shape slightly when the whisk is lifted.
Step 4: Sifting and Folding the Flour
Sift the self-raising flour over the wet ingredients from a height to encourage further aeration. Using a large metal spoon or a silicone spatula, gently fold the flour into the batter using a figure-eight motion. Stop the moment no streaks of white remain; over-mixing at this stage will develop gluten and result in a tough, bread-like cake.
Step 5: The Gentle Bake
Divide the batter equally among the twelve cases, filling them about two-thirds of the way. Bake for exactly 20 minutes. The cakes are finished when they are a pale golden brown and a wooden skewer inserted into the center emerges clean. Transfer them to a wire rack immediately to prevent the bottoms from becoming damp.
Step 6: Crafting the Glossy Glacé Icing
While the cakes cool completely, prepare the icing. Sift the icing sugar into a bowl to remove any lumps. Gradually whisk in the milk, half a tablespoon at a time, until the icing reaches a consistency that slowly drips off the spoon. If you wish to use food coloring, add a single drop now to achieve a delicate pastel shade.
Step 7: The Final Adornment
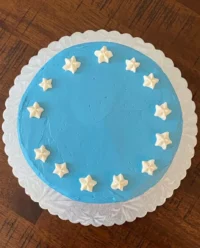
Spoon a small amount of icing onto the center of each cooled cake. Use the back of the spoon to gently guide it toward the edges, allowing it to settle into a smooth, pristine circle. While the icing is still wet, add your chosen decorations, such as silver pearls or dried rose petals, for a refined finish.
Pastry Wisdom for Perfection

The secret to a truly professional fairy cake lies in the temperature of the fat. If your butter is too firm, the sugar will simply slide around it instead of creating those vital air pockets. I recommend taking your butter out of the refrigeration at least two hours before you intend to bake. For more foundational techniques on maintaining ingredient integrity, visit our guide on classic recipes. Another vital tip is to avoid opening the oven door during the first fifteen minutes of baking, as the sudden drop in temperature can cause the delicate structure to fail before it has set.
Refined Twists on a Classic
Once you have mastered the base sponge, you may wish to introduce subtle flavor variations that respect the cake’s heritage. A popular variation is the Butterfly Cake: simply cut a small circle out of the top of each cooled cake, slice the circle in half, and place the ‘wings’ back into a dollop of whipped cream. For a bright, citrus-forward alternative, you might enjoy the techniques used in our lemon rainbow cake, which incorporates fresh zest directly into the sugar. You can also replace the vanilla with almond extract or a splash of orange blossom water for a more floral, French-inspired profile.
Presentation and Tea Service

Presentation is the final step in the art of the patisserie. Serve these cakes on a tiered bone china stand to highlight their delicate nature. They pair beautifully with a light Darjeeling or a floral Earl Grey tea. If you are hosting a more formal gathering, consider looking at our vintage cake styling tips to create a cohesive table setting. The cakes should be served at room temperature to ensure the butter in the sponge is at its most supple and flavorful.
The Art of Small Batches
Perfecting the fairy cake is a journey into the heart of baking fundamentals. By focusing on the precision of your measurements and the temperature of your ingredients, you transform a simple pantry staple into a refined treat that honors tradition. I encourage you to take your time with the creaming stage; it is the heartbeat of this recipe. To continue your education in the beauty of miniature pastries, explore our modern mini collection. Please share your beautiful creations with our community of devoted bakers on Instagram or Pinterest. Happy baking.
