My grandmother always said that a cake wasn’t finished until it told a story. She would sit at her small oak table with a bit of leftover icing, carefully tracing shapes onto waxed paper for our birthday treats. Those little edible decorations felt like magic to a child, a tiny gift perched right on top of the frosting. It was a simple way to show love, and that memory remains etched in my heart as clearly as the sugar designs she made.

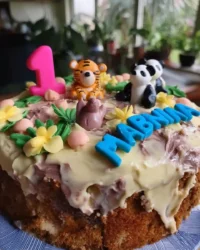
These edible cake toppers are a nod to that simple, heartfelt tradition of decorating by hand. Using just a few melting wafers, you can create custom designs that make even a simple sheet cake feel like a grand celebration. It is a slow, quiet craft that brings so much character to your baking. You don’t need fancy tools or expensive equipment, just a bit of patience and a steady hand to bring these sweet silhouettes to life.
The Magic of a Personal Touch
There is something deeply satisfying about making your own decorations rather than reaching for a plastic box at the store. In our modern world, we are often told that faster is better, but I find that the old way of doing things—with intention and care—still holds the most value. These cake toppers are a perfect example of that philosophy. They allow you to tailor your dessert to the exact person or occasion you are celebrating, making the moment feel truly one-of-a-kind.
You will love this method because it is incredibly forgiving. Unlike working with tempered chocolate, which can be finicky and prone to blooming, melting wafers are designed to stay stable and smooth. This means you can focus on the artistry of your design without worrying about the science of the cocoa butter. It is a wonderful project for a quiet afternoon when you want to get lost in the rhythmic motion of piping and the joy of creating something beautiful from scratch.
Furthermore, these toppers are entirely edible. There is a quiet delight in seeing a child’s eyes light up when they realize they can eat the decoration right off the top of their cupcake. It brings back a sense of wonder that we sometimes lose as adults. Whether you are making simple stars, intricate initials, or whimsical characters, these toppers add a layer of thoughtfulness that guests will notice and cherish. They prove that you don’t need a professional bakery to produce something that looks and tastes extraordinary.
Print
Hand-Piped Chocolate Cake Toppers
- Total Time: 50 mins
- Yield: 12 toppers
- Diet: Vegetarian
Description
Create custom, edible decorations for any occasion with these easy hand-piped chocolate toppers. Using simple melting wafers and a bit of patience, you can transform a basic cake into a personalized masterpiece that guests will love to eat.
Ingredients
- High-quality melting wafers (such as Ghirardelli or Wilton)
- Assorted sprinkles or colorful sugar (optional)
- Wooden skewers or sturdy paper lollipop sticks
- Waxed paper
Instructions
- Prepare your template by drawing or printing your design and placing it on a flat, stable surface.
- Layer a square of waxed paper directly over the design template.
- Melt the wafers in a heat-safe glass bowl using the microwave at 50% power in 30-second increments, stirring until smooth.
- Transfer the melted chocolate to a piping bag or parchment cone and snip a very small hole at the tip.
- Trace the outline of the design on the waxed paper and then fill in the center for a solid, sturdy finish.
- Place a skewer onto the wet chocolate and pipe a small amount of extra wafer over it to lock it in place.
- Add sprinkles or decorative sugar while the chocolate is still wet.
- Allow the toppers to sit undisturbed at room temperature for 20 to 30 minutes until completely firm.
- Gently peel the waxed paper away and insert the skewers into your frosted cake.
Notes
For the best results, work in a cool, dry room to ensure the chocolate sets properly and maintains its shine. If you are new to piping, practice your design on a spare piece of waxed paper first to get a feel for the flow of the melted wafers before starting your final pieces.
- Prep Time: 15 mins
- Cook Time: 5 mins
- Category: Decoration
- Method: Piping
- Cuisine: American
The Simple Pantry Staples

To begin this journey into handmade decorations, you only need a few humble items from your kitchen cupboard. The beauty of this craft lies in its simplicity, using ingredients that are likely already tucked away in your pantry.
- Melting Wafers: I recommend using high-quality options like Ghirardelli or Wilton candy melts. These are specifically formulated to melt smoothly and set firmly at room temperature, which is the secret to a sturdy topper.
- Sprinkles: While optional, a dusting of colorful sugar or tiny pearls can add a wonderful texture and a bit of sparkle to your designs. They catch the light and add a festive cheer to the finished piece.
- Skewers: Choose wooden skewers or sturdy paper lollipop sticks that are long enough to reach deep into your cake. This ensures your topper stands tall and proud without leaning.
- Waxed Paper: This is the traditional baker’s best friend. It provides a non-stick surface that allows the cooled chocolate to lift away without any breakage.
When choosing your melting wafers, think about the flavor as much as the color. While white chocolate wafers are versatile for coloring, dark or milk chocolate wafers provide a rich, nostalgic flavor that pairs beautifully with almost any cake base. Always make sure your workspace is cool and dry, as humidity can sometimes make the chocolate a bit stubborn to work with.
The Baking Process
Step 1: Prepare Your Template
Draw or print your cake topper design onto a piece of paper to use as a guide. It is best to keep your lines relatively thick so the chocolate stays strong once it sets. Place this paper on a flat baking sheet or your kitchen counter where it won’t be disturbed.
Step 2: Set Up Your Station
Cut a square of waxed paper for each character or shape in your design. Lay the waxed paper directly over your printed template. Gather your skewers and have your sprinkles ready in a small bowl, as the chocolate will begin to set fairly quickly once it is piped.
Step 3: Melt the Chocolate Gently
Add your melting wafers to a heat-safe glass bowl. Place it in the microwave on 50% power in 30-second increments. It is vital to stir frequently between each burst. You want the chocolate to be fully melted and smooth, yet still just slightly thick. If it becomes too thin and runny, it will be harder to control while piping.
Step 4: Prepare the Piping Bag
Transfer the warm, melted wafers to a piping bag. Snip just a tiny bit off the end to create a very small hole. If you don’t have a professional bag, a simple parchment cone or even a sturdy plastic sandwich bag with a corner nipped off will work just fine, much like the makeshift tools my mother used to use.
Step 5: Trace Your Design
Place a square of waxed paper over the first character you wish to make. Carefully pipe the melted wafers onto the waxed paper, following the lines of the template underneath. I find it easiest to first create an outline of the entire shape and then fill in the center with more chocolate for a solid, sturdy finish.
Step 6: Attach the Support
While the chocolate is still wet, gently place a skewer onto the piped design. Make sure at least half an inch of the skewer is resting on the chocolate to provide enough support. Pipe a little more melted wafer over the portion of the skewer that touches the topper to lock it securely in place.
Step 7: Add the Finishing Touches
If you are using sprinkles, scatter them over the wet design now. You can gently press them into the chocolate with the back of a spoon if they seem a bit loose. Work quickly here, as once the chocolate starts to dull in color, it is beginning to set and the sprinkles won’t stick as well.
Step 8: Let the Magic Set
Repeat the process for all your characters. Let the toppers sit perfectly flat at room temperature. Depending on the warmth of your kitchen, this usually takes about 20 to 30 minutes. Resist the urge to move them too soon; they need to be completely cold and firm to the touch before you handle them.
Step 9: Final Placement
Once the toppers are firm, carefully peel the waxed paper away from the back of the chocolate. Lift them slowly and push the skewer down into your frosted cake. Position them so the edible portion sits just above the surface of the frosting for a clean and professional look.
Secrets from the Recipe Box

One of the most important things to remember is the consistency of your chocolate. If the wafers are too hot, they will run and lose the crisp edges of your design. If they are too cold, they will be lumpy and difficult to squeeze through the small hole. If you find your chocolate is becoming too firm in the bag, simply squeeze it back into the bowl and give it a quick 5-second warm-up in the microwave. This patience pays off when you see how clean your lines are on a finished vintage cake.
Another trick I learned from years of baking is to use a separate piece of waxed paper for every single topper. This allows you to move each one individually without risking a smudge on the others. If you make a mistake while piping, don’t worry. You can simply let that one dry, eat it as a snack, and start fresh on a new piece of paper. It is also helpful to make a few extra toppers just in case one breaks during the assembly process—accidents happen even to the best of us.
Classic Flavor Twists
While white and dark chocolate are the standard, you can easily change the mood of your toppers by adding a few drops of gel food coloring to white melting wafers. I prefer gel over liquid coloring because it doesn’t change the consistency of the chocolate or cause it to seize. For a more sophisticated look, you could use gold or silver luster dust brushed onto the hardened toppers to give them a metallic sheen that feels very grand. For a lovely romantic occasion, try piping small outlines for a heart cake using a soft pink chocolate.
You might also consider flavoring your wafers with a tiny drop of oil-based extract. A hint of peppermint in the winter or a touch of orange oil in the summer can make the toppers taste as good as they look. Just remember to avoid water-based extracts, as even a single drop of water can cause chocolate to turn into a grainy mess. Keep things simple and classic, and you will never go wrong.
At the Table

When it comes time to present your masterpiece, think about the height and placement of your toppers. These stand tall and proud on any of our celebration cakes, adding a vertical element that draws the eye upward. I like to cluster a few smaller toppers around one large central piece to create a sense of depth and story on top of the cake. It makes the dessert feel more like a centerpiece than just a dish.
For a truly nostalgic experience, serve your decorated cake alongside a pot of hot tea or a cold glass of milk. The snap of the chocolate topper is a delightful contrast to the soft crumb of the cake and the creamy frosting. If you are hosting a larger gathering, you can even make individual toppers for cupcakes, giving each guest their own little piece of handmade art to enjoy. It is these small details that make a meal feel like a memory.
A Final Word
Baking is more than just following a recipe; it is a way to connect with the people we love and the traditions that shaped us. Whether you are making a whimsical car cake for a little one’s birthday or a sophisticated floral design for an anniversary, these hand-piped toppers are a beautiful way to show you care. I hope you find as much peace and joy in the process of making them as I do. When you bring that cake to the table and see the smiles on your family’s faces, you’ll know that the extra time spent was worth every second.
Please share your beautiful creations with our community! I would love to see how you make these your own. You can find more inspiration and share your photos with us on Pinterest, Instagram, and Facebook. Happy baking, and may your kitchen always be filled with warmth and the scent of something sweet.
