I remember many rainy afternoons spent in my grandmother’s attic, surrounded by the scent of old paper and the gentle hum of her kitchen below. She always said that every life is a story, and there is no better way to honor a person’s chapter than with a cake that looks just like a treasured volume. This recipe is a tribute to those quiet moments, combining the sturdy reliability of a classic sponge with the whimsy of an open book.

Creating this cake is a slow, meditative process that rewards the baker with a truly stunning centerpiece. The crumb is dense enough to hold its shape beautifully, yet remains tender and rich with a hint of cocoa that warms the heart. It is the perfect choice for graduations, retirements, or simply celebrating the bibliophile in your life with something handmade and heartfelt.
The Magic of a Handcrafted Story
There is something profoundly special about a cake that tells a story before you even take the first bite. This isn’t just a dessert; it is a conversation piece that brings back memories of library corners and handwritten journals. You will love this recipe because it relies on simple, honest ingredients that most of us keep in our pantries, yet it yields a result that looks like it came from a professional bakeshop. The balance of the buttery sponge against the stiff, sweet frosting provides that classic taste we all crave from a homemade treat.
In an age of fast-paced trends, this cake invites you to slow down. The process of sifting the flour three times and carefully folding in the milk is a nod to the old ways of baking, where patience was the most important ingredient. This cake does not crumble under the weight of decoration, making it a sturdy canvas for your edible art. Whether you are a seasoned baker or someone picking up a spatula for a special occasion, the clear steps and reliable results will make you feel right at home in your kitchen.
Print
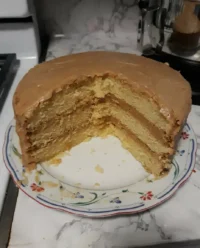
Book Cake
- Total Time: 1 hour 35 mins
- Yield: 12 servings
- Diet: Vegetarian
Description
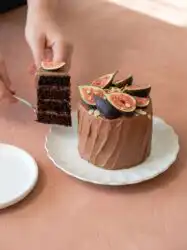
This charming book-shaped cake features a dense yet tender cocoa-infused sponge, designed to mimic the look of a classic hardcover volume. Perfect for bibliophiles and special milestones, it combines vintage baking techniques with a stiff, beautiful vanilla buttercream finish.
Ingredients
- 300 g unsalted butter, softened
- 300 g granulated sugar
- 275 g self-raising flour
- 25 g cocoa powder
- 5 large eggs, room temperature
- 75 ml milk
- 1/4 teaspoon salt
- 2/3 teaspoon baking powder
- 3/4 teaspoon vanilla extract
- 560 g icing sugar, sieved
- Royal icing (for decorative flowers)
Instructions
- Prepare royal icing flowers by piping them onto parchment paper squares and allowing them to dry hard in advance.
- Preheat your oven to 170°C (340°F) and grease a 6-inch by 10-inch rectangular cake tin, lining the bottom with parchment paper.
- Cream the softened butter and granulated sugar together in a large bowl until the mixture is pale, light, and fluffy.
- Add the eggs one at a time, beating well after each addition to ensure a smooth, stable emulsion.
- Sift the self-raising flour, cocoa powder, baking powder, and salt together three times to properly aerate the dry ingredients.
- Gently fold the dry ingredients into the creamed mixture in three stages, alternating with the milk, using a large metal spoon.
- Stir in the vanilla extract, then pour the batter into the prepared tin and level the top with a spatula.
- Bake for 45 to 50 minutes until a skewer inserted into the center comes out clean; allow the cake to cool completely in the tin before decorating.
- Prepare the frosting by beating softened butter with sieved icing sugar and vanilla until it is white, stiff, and holds its shape perfectly.
Notes
To achieve the best results, ensure all refrigerated ingredients like eggs and milk are brought to room temperature before you begin mixing. This prevents the batter from curdling and results in a much finer, more even crumb. When applying the final layer of frosting, use a small palette knife to keep the edges sharp, giving the cake the distinct silhouette of a real book.
- Prep Time: 45 mins
- Cook Time: 50 mins
- Category: Dessert
- Method: Baking
- Cuisine: International
The Pantry Staples for Your Storybook Bake

To begin this journey, gather these simple elements. I always suggest using the best butter you can find, as it truly forms the soul of the cake.
- Butter (300 g / 1.3 cups): Use unsalted butter and make sure it is softened to room temperature so it creams perfectly with the sugar.
- Granulated Sugar (300 g / 1.5 cups): This provides the sweetness and helps create that light, airy texture during the creaming stage.
- Self-Raising Flour (275 g / 2.2 cups): This flour already has the leavening agents mixed in, providing a consistent rise that is essential for a flat-topped book shape.
- Cocoa Powder (25 g / 3 tablespoons): Just enough to add a deep, earthy color and a subtle chocolate undertone without overpowering the vanilla.
- Eggs (5 large): These should be at room temperature to prevent the batter from curdling as you add them.
- Milk (75 ml / 5 tablespoons): A little milk adds moisture and helps create a smooth, pourable batter.
- Salt (1/4 teaspoon): A pinch of salt is vital to balance the sweetness and bring out the depth of the cocoa.
- Baking Powder (2/3 teaspoon): Even with self-raising flour, a tiny bit extra helps the cake stay light and fluffy.
- Vanilla Extract (3/4 teaspoon): Use a pure extract for that nostalgic, comforting aroma that fills the house while the cake bakes.
- Icing Sugar (560 g / 4.5 cups): Also known as powdered sugar, this must be sieved to ensure your frosting is as smooth as a fresh sheet of paper.
The Baking Process
Step 1: Making the Royal Icing Flowers
Before you even turn on the oven, you must prepare your little pink sugar flowers. Following the traditional method for royal icing, pipe these delicate blooms onto small squares of parchment paper. While many modern bakers use buttercream, royal icing dries hard, allowing you to make these several days in advance and store them safely. They represent the beauty of the details, much like a well-placed metaphor in a great novel.
Step 2: Preparing the Oven and Pan
Preheat your oven to 170 degrees Celsius (340 degrees Fahrenheit). Grease a 6-inch by 10-inch rectangular cake tin thoroughly. I like to line the bottom with a bit of parchment paper, just as Grandma did, to make sure the cake releases without a single tear. This specific size is perfect for creating the proportions of a standard hardcover book.
Step 3: Creaming the Butter and Sugar
In a large, worn wooden bowl or with your stand mixer, beat the butter and granulated sugar together. You want to continue until the mixture is soft, creamy, and pale in color. This step is where you build the air that will make the cake light, so do not rush it. It should look like thick, delicious clouds before you move on.
Step 4: Adding the Eggs
Add your eggs one at a time. After each egg, beat the mixture well until it is fully incorporated. If the mixture looks like it might separate, add a spoonful of your flour to bring it back together. Taking your time here makes sure the final crumb is even and strong.
Step 5: The Triple-Sift Technique
In a separate bowl, sift together the self-raising flour, cocoa powder, baking powder, and salt. Then, sift them again. And once more for a total of three times. This is a vintage secret that aerates the dry ingredients and ensures there are no lumps of cocoa, leading to a velvety texture that is simply unmatched.
Step 6: Folding the Batter
Now, gently fold the sifted dry ingredients into the creamed mixture. Do this in three parts, alternating with the milk. Start with the flour and end with the flour. Use a gentle hand and a large metal spoon to keep the air in the batter. This slow movement is what gives the cake its classic, homemade feel.
Step 7: Adding the Final Vanilla
Pour in your vanilla extract and give it one final, gentle stir. The scent should be heavenly at this point. Ensure the batter is smooth and the color is a consistent, light chocolate hue before you prepare to bake.
Step 8: Baking the Masterpiece
Pour the batter into your prepared tin and level the top with a spatula. Bake for 45 to 50 minutes. You will know it is done when the kitchen smells like a dream and a wooden skewer inserted into the center comes out clean. Let the cake cool completely in the tin; a warm cake is too fragile for the detailed decoration we are about to do.
Step 9: Whipping the Stiff Butter Icing
Sieve your icing sugar to break every single lump. In a clean bowl, cream your butter until it is very soft. Add the icing sugar a little at a time, beating continuously until it is stiff and white. Add the vanilla and keep beating. The icing should be stiff enough that it does not stick to your finger when you press it lightly. This stiffness is key to creating the look of stacked pages on the sides of your cake.
Secrets from the Recipe Box

To make the “pages” of your book look truly realistic, use a small serrated knife or even a clean icing comb to drag light lines horizontally along the sides of the cake once the frosting is applied. This creates the illusion of many thin sheets of paper. If you find the frosting is getting too soft to hold these lines, pop the cake in the icebox for ten minutes to firm it up. This is a technique I often use when making a vintage cake that requires precise textures. Also, remember that crumb coating is your friend; a thin layer of icing applied first will lock in all the crumbs so your final layer is pristine and white.
Classic Flavor Twists
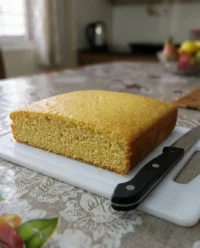
While the cocoa sponge is a timeless choice, you can easily change the flavor to suit the occasion. For a lighter look, omit the cocoa and add the zest of one lemon for a bright, sunny tea cake. If you are celebrating a romantic anniversary, you might consider the techniques used in our heart cake to add a surprise layer of jam in the middle. You can also swap the vanilla extract for almond or even a splash of rosewater for a floral note that pairs beautifully with the royal icing flowers. For more detailed instructions on creating a larger book for a crowd, visit this guide on how to make a book cake.
At the Table

When it comes time to serve this creation, I love to place it on a simple wooden board or a vintage silver platter. It looks beautiful alongside a pot of Earl Grey tea or a fresh carafe of coffee. Since this is a celebration piece, it fits perfectly among our other celebration cakes on a dessert table. For a touch of extra whimsy, scatter a few extra sugar flowers around the base of the cake or place a pair of vintage-style reading glasses nearby for a charming photo opportunity. Always use a sharp, thin knife dipped in hot water to get those perfect, clean slices that show off the beautiful crumb.
A Final Word
Baking a cake like this is more than just following a recipe; it is an act of love and a way to preserve a tradition of slow, thoughtful craft. I hope this Book Cake brings as much joy to your kitchen as it has to mine over the years. Whether it is for a child’s first library card or a grandmother’s 80th birthday, the stories we tell through our baking are the ones that stay with us forever. If you enjoyed this shaped project, you might also want to try your hand at our whimsical car cake for your next big event. Please share your creations with our community and keep the spirit of vintage baking alive!
Find us on Pinterest and Instagram for more daily inspiration from my recipe box.
