I was leaning against my kitchen counter, clutching a mug of black coffee, when I realized that most Halloween desserts are just too “nice.” They’re cute, they’re orange, and they usually taste like a sugar cube had a bad day. I wanted something that felt a bit more rebellious—a cake that looked like it was forged in a midnight cauldron but tasted like a high-end chocolate truffle. That’s when the “What if?” started: what if I used black cocoa to create a darkness so deep it didn’t even need food coloring, then paired it with a stripe of pure vanilla just to keep people on their toes? This Witch Cake is the result of that experimental spark, and it’s about to change how you think about holiday baking forever.

Forget the neon-bright frostings of the past because we are going for total flavor dominance here. We are talking about a moist, dense crumb that stays perfect for days, paired with a buttercream that is rich, dark, and unapologetically bold. It’s small-batch perfection that proves you don’t need a huge crowd to make a massive statement with your dessert. This recipe isn’t about following the rules; it’s about breaking them in the most delicious way possible, using high-quality ingredients to create a sensory experience that is as thrilling as it is beautiful.
The Flavor Gameplan
You’re going to love this recipe because it challenges every convention of a typical holiday cake. Most people reach for bottles of food coloring to get that spooky vibe, but we are building our darkness from the ground up using black cocoa. This doesn’t just give us a stunning visual; it gives us a flavor profile that is earthier, deeper, and far more sophisticated than your average chocolate cake. It tastes like a grown-up version of your favorite childhood cookies, but with the moisture and decadence of a luxury torte.
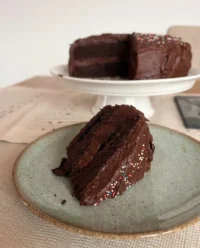
Another reason this cake is a total winner is the texture. By using a combination of buttermilk and vegetable oil, we create a crumb that is incredibly tender and stays moist even after a couple of days in the fridge. This isn’t one of those cakes that dries out the moment you cut it. It’s dense enough to hold up to the rich buttercream but light enough that you’ll find yourself reaching for a second slice. Plus, the contrast between the ink-black cake and the crisp white vanilla stripes creates a jaw-dropping look that will have everyone at your party asking for your secrets.
Finally, this recipe is all about the joy of the process. There is something deeply satisfying about watching a grey frosting transform into a deep, midnight black as it sits. It teaches you the importance of patience in baking and rewards you with a result that looks professional but feels personal. It’s a bold, fearless approach to baking that celebrates flavor and creativity in equal measure. Whether you’re a seasoned baker or a rebel looking for a new challenge, this cake is your new best friend.
Print
Witch Cake
- Total Time: 1 hour 10 mins
- Yield: 12 servings
- Diet: Vegetarian
Description
This sophisticated Witch Cake is a rebellious take on Halloween baking, featuring a deep, midnight-black crumb made with premium black cocoa. Its striking appearance is matched by a rich flavor profile that balances earthy chocolate notes with elegant vanilla stripes.
Ingredients
- All-purpose flour
- Granulated sugar
- Black cocoa powder
- Baking soda
- Salt
- Buttermilk
- Vegetable oil
- Large eggs
- Pure vanilla extract
- Hot coffee or water
- Super black food gel
- Dark chocolate chips or chopped chocolate
- Unsalted butter
- Powdered sugar
- Heavy cream
Instructions
- Preheat your oven to 325 degrees F (163 degrees C) and prepare four 6-inch round cake pans with nonstick spray and parchment paper.
- In a large bowl, whisk together the flour, sugar, black cocoa powder, baking soda, and salt until no large clumps remain.
- In a separate bowl, whisk together the buttermilk, vegetable oil, eggs, vanilla, and hot coffee or water.
- Slowly combine the wet ingredients with the dry, mixing until just incorporated, then fold in the black food gel until the batter is glossy and dark.
- Divide the batter evenly among the pans and bake for 20 to 25 minutes, or until a toothpick comes out with only a few moist crumbs.
- Cool the cakes in their pans for 15 minutes before transferring to a wire rack to cool completely, then wrap and chill them in the fridge.
- To make the black frosting, mix hot water and black cocoa into a thick paste and melt the dark chocolate in the microwave.
- Cream the chilled butter for two minutes until light and fluffy, then gradually beat in the melted chocolate, cocoa paste, vanilla, and salt.
- Slowly add the powdered sugar and black food gel, beating for two minutes, and allow the frosting to rest so the color can deepen.
- Prepare the vanilla buttercream by creaming butter for 2 minutes, then adding powdered sugar, heavy cream, vanilla, and salt, beating until cloud-like.
- Assemble the cake by layering the chilled rounds with black buttercream.
- Coat the outside in black frosting, pipe vanilla buttercream stripes on top, and use a bench scraper to smooth the sides for a clean finish.
Notes
For the deepest color possible, prepare your black buttercream a full day in advance to allow the cocoa and food gel to fully develop. Using hot coffee instead of water is highly recommended as the heat blooms the cocoa powder, unlocking a more intense chocolate flavor without adding a coffee taste.
- Prep Time: 45 mins
- Cook Time: 25 mins
- Category: Dessert
- Method: Baking
- Cuisine: American
The Flavor Arsenal

When we’re building something as bold as this Witch Cake, we can’t just throw things in a bowl and hope for the best. We need to understand why these players are on the team. Every single item here serves a purpose in our quest for the ultimate dark dessert. This isn’t just about making a cake; it’s about engineering a flavor experience that hits every part of your palate.
- All-Purpose Flour: This is our foundation. I prefer a high-quality all-purpose flour because it provides the perfect middle ground between the lightness of cake flour and the toughness of bread flour. It gives our cake the structural integrity to hold up those beautiful layers without being heavy or dry.
- Granulated Sugar: Beyond just making things sweet, sugar is a liquid ingredient once it hits the oven. It attracts moisture and helps create that incredibly soft, tender crumb we’re after. It also helps the cake brown, though with the black cocoa, you’ll mostly notice the texture improvements.
- Black Cocoa Powder: This is the MVP. Unlike regular Dutch-processed cocoa, black cocoa is processed even further to neutralize its acidity. This gives it a dark, coal-like color and a flavor profile that’s closer to an Oreo cookie than a traditional chocolate bar. It’s earthy, deep, and remarkably bold.
- Baking Soda: Since we’re using buttermilk, which is acidic, baking soda is the perfect leavening agent. It reacts with the acid to create bubbles, making sure our dark-as-night cake isn’t as heavy as a lead brick.
- Buttermilk: This is the secret to a moist cake. The acidity breaks down the gluten in the flour, resulting in a much more tender crumb. It also adds a very subtle tang that balances out the richness of the cocoa.
- Vegetable Oil: I’m a firm believer in oil-based cakes for chocolate. Oil stays liquid at room temperature, which means your cake will stay moist for days. It lets that chocolate shine through without making the cake feel greasy.
- Large Eggs: These are our binders. They provide structure and help the cake rise. Make sure they’re at room temperature so they emulsify properly into the batter.
- Pure Vanilla Extract: Even in a chocolate-heavy cake, vanilla is essential. It acts like salt for sweet things—it rounds out the flavors and makes the chocolate taste more like “itself.”
- Hot Coffee: This is a classic Riley move. The heat from the coffee blooms the cocoa powder, releasing all those hidden flavor notes. The coffee deepens the chocolate flavor without making the cake taste like a latte.
- Super Black Food Gel: While the black cocoa does most of the heavy lifting, a touch of high-quality gel makes sure we get that true, ink-black color.
Let’s Build This
Step 1: Prep Your Space and Pans
First things first, preheat your oven to 325 degrees F (163 degrees C). We’re going low and slow here to keep that moisture locked in. Spray four 6-inch round cake pans with nonstick spray. If you only have 8-inch pans, three will work too. Line the bottom of each pan with parchment paper, then give them another quick spray. This double-layer of protection means your cake won’t stay stuck in the pan when it’s time for the big reveal.
Step 2: Whisk the Dry Ingredients
In a large mixing bowl, grab your whisk and combine the flour, granulated sugar, black cocoa powder, baking soda, and salt. Make sure there are no large clumps of cocoa powder; sifting it beforehand is a smart move if your cocoa is looking a bit chunky. You want a uniform, dark grey powder before you even think about adding the wet stuff.
Step 3: Mix the Wet Components
In a separate bowl, whisk together the buttermilk, vegetable oil, eggs, vanilla, and your hot water or coffee. If you’re using coffee, make sure it’s hot but not boiling—you don’t want to scramble your eggs! The heat is going to start working on that cocoa the moment they touch, so be ready for the aroma to hit you like a chocolate-covered freight train.
Step 4: Combine and Color
Slowly add the wet ingredients to the dry ingredients. Whisk them together until the dry ingredients are just incorporated. Don’t overwork it! Scrape down the sides of the bowl with a spatula to make sure no pockets of flour are hiding at the bottom. Add your Super Black food gel now and mix for another 20 seconds until the batter is glossy and midnight-dark.
Step 5: The Bake
Divide the batter evenly among your prepared pans. If you’re using 6-inch pans, you’re looking at about 11-12 ounces per pan. Slide them into the oven and bake for 20 to 25 minutes. You’re looking for a toothpick to come out with just a few moist crumbs. These cakes bake fast, so keep an eye on them!
Step 6: Cool Down and Chill
Let the cakes cool in their pans for about 15 minutes. This lets the structure set before you try to move them. Turn them out onto a wire cooling rack and let them reach room temperature. Once they are cool, level the tops with a serrated knife, wrap them tightly in plastic wrap, and pop them in the fridge. Chilled cakes are much easier to frost and result in fewer crumbs in your buttercream.
Step 7: The Cocoa Paste Secret
While the cakes chill, let’s start the black buttercream. In a small bowl, mix your hot water and black cocoa powder. It’s going to turn into a thick, dark paste. This is how we get that intense flavor and color without making the frosting grainy. Set that aside to cool while you work on the butter.
Step 8: Melting the Dark Chocolate
Melt your dark chocolate chips or chopped chocolate in a microwave-safe bowl in 30-second increments. Stir until it’s silky smooth. Let it cool slightly—if it’s too hot, it will melt your butter, and we’ll have a soupy mess on our hands.
Step 9: Cream the Butter
Using a stand mixer with the paddle attachment, beat your chilled butter on medium-high speed for about two minutes. You want it light, fluffy, and pale. This is the foundation of our frosting’s texture, so don’t rush it. Scrape the bowl to make sure every bit of butter is getting some air.
Step 10: Building the Black Frosting
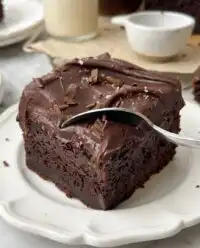
Reduce the speed to medium and slowly pour in the melted chocolate. Once that’s mixed, add your cocoa paste, vanilla, and salt. Gradually add the powdered sugar, one cup at a time, on low speed. Finally, add the black food gel and beat for two minutes. It will look grey at first—don’t panic! Let it sit for a few hours (or even a day) and the color will deepen into a beautiful black.
Step 11: The Vanilla Contrast
For the vanilla buttercream, cream the butter for 2 minutes. Gradually add the powdered sugar, then the heavy cream, vanilla, and salt. Beat on medium-high for 5-7 minutes until it’s white and cloud-like. Mix it by hand with a wooden spoon for a minute before using to push out any air bubbles.
Step 12: Assembly and Stripes
Layer your chilled cakes with the black buttercream. For the outside, use the black frosting as a base, then use a piping bag to add stripes of the vanilla buttercream. Use a bench scraper to smooth it all out, creating that iconic striped look. Take your time—this is where the magic happens!
Riley’s Hacks

One of my biggest secrets for a deep, dark cake is the temperature of your ingredients. Make sure your buttermilk and eggs are at room temperature so the batter emulsifies perfectly, but keep your butter slightly chilled for the frosting to maintain its structure. If you find your black frosting is still looking a bit grey after resting, try adding just a tiny bit more gel, but remember that the color will continue to develop over time.
Another pro move is to use high-quality chocolate for the melting step. Don’t just grab the cheapest bag of chips; a premium dark chocolate with a high cocoa percentage will give the frosting a complexity that store-bought versions just can’t match. If you’re looking for more tips on achieving that perfect crumb, check out my guide on the rich chocolate fudge cake for some deep dives into chocolate science. Also, for a great visual on how to get those perfect stripes, I highly recommend checking out this striped witch cake guide to see the technique in action.
Flavor Experiments
If you want to push the boundaries even further, why not try a “Boozy Witch” version? Replace half of the hot coffee in the cake batter with a high-quality bourbon. The smoky notes of the bourbon play beautifully with the black cocoa and the dark chocolate in the frosting. It adds a layer of sophistication that will definitely surprise your guests.
For those who want a bit of a kick, a pinch of cayenne pepper in the chocolate batter can create a “Spicy Witch” cake. It doesn’t make the cake hot, but it provides a subtle warmth that makes the chocolate flavor explode. If you’re not a fan of black and white, you could even swap the vanilla stripes for a vibrant purple by looking at my purple carrot cake for inspiration on how to use natural or gel colors to make a statement. The possibilities are endless when you stop worrying about the rules and start focusing on the flavor.
Showtime

When it comes to serving this Witch Cake, you want to lean into the drama. I love placing this cake on a silver or matte black cake stand to make the colors really pop. If you’re serving this at a party, consider using dry ice in a secondary container around the base of the stand to create a literal smoky effect that will have people reaching for their phones before they reach for their forks. It’s all about the experience!
For a truly bold pairing, serve a slice of this cake with a glass of dark red wine or a robust espresso. The tannins in the wine and the bitterness of the coffee work in harmony with the dark chocolate and black cocoa. If you’re looking for more ideas on how to present your bakes for big events, take a look at my tips for celebration cakes. Always slice the cake while it’s slightly chilled to get those perfectly clean stripes, but let the individual slices come to room temperature before eating so the buttercream is at its silkiest.
The Final Bite
This Witch Cake is more than just a recipe; it’s a manifesto for the bold baker. It’s about taking the dark, the mysterious, and the unconventional and turning them into something that is undeniably delicious. I hope you take this recipe and make it your own—play with the flavors, experiment with the colors, and don’t be afraid to make a mess. If you enjoyed this journey into the dark side of baking, you might also love my take on a classic vintage cake for a different kind of aesthetic challenge.
Don’t forget to share your creations with me! I love seeing how you all push the boundaries of flavor in your own kitchens. Follow me and tag your photos on Instagram, Pinterest, or TikTok so I can see your masterpieces. Now go out there and bake something fearless!
