In my early years studying at a small patisserie near the Luxembourg Gardens, I learned that the most profound joy often comes in the smallest packages. There is a specific, quiet satisfaction in creating a dessert that is perfectly portioned for one or two people, treated with the same reverence as a grand wedding gateau. This tradition of miniature mastery is what makes the modern trend of the bento cake so appealing to those of us who value precision and intimacy in our baking.

The beauty of this specific recipe lies in its approachable foundation, which we will refine with classic French techniques. By incorporating a delicate soaking syrup and a stabilized Chantilly cream, we transform a simple base into a sophisticated treat. These small-batch cakes allow you to focus on the fine details of assembly and finishing, making them a perfect project for a quiet afternoon in the kitchen.
The Quiet Elegance of the Bento Cake
There is a reason these petite creations have captured the hearts of home bakers worldwide. Beyond their charming appearance, they represent a shift toward mindful consumption and the beauty of the personal gift. When you bake on such a small scale, you have the luxury of focusing on every single crumb, making certain that each bite is as perfect as the last.
This recipe is particularly wonderful because it bridges the gap between convenience and professional technique. We use a high-quality cake mix as our canvas, but we apply the principles of moisture control and structural integrity that I practiced in professional kitchens. The result is a cake that feels substantial yet light, with a balanced sweetness that never overwhelms the palate.
Furthermore, the versatility of this format is unmatched. Whether you are celebrating a small milestone or simply wishing to brighten someone’s day, these cakes provide the perfect medium for artistic expression. They are stable enough to travel in their signature clamshell boxes, yet delicate enough to melt away on the tongue. Mastering this method means you will always have a thoughtful, handmade gift ready for any occasion.
Print
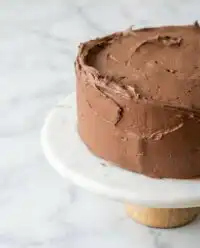
Lunch Box Cake
- Total Time: 55 mins
- Yield: 3 mini cakes
- Diet: Vegetarian
Description
Elevate the trending bento cake with professional French techniques, featuring a moist vanilla sponge infused with simple syrup and topped with a stabilized Chantilly cream. These perfectly portioned miniature treats are as delightful to look at as they are to eat, making them the ultimate handmade gift for any special occasion.
Ingredients
- 1 box high-quality vanilla cake mix
- Whole milk (to replace water in cake mix instructions)
- Unsalted butter (to replace oil in cake mix instructions)
- 1 extra egg yolk
- 1/2 cup granulated sugar
- 1/2 cup water
- 1 tablespoon pure vanilla extract, divided
- 2 cups cold heavy whipping cream (36% fat or higher)
- 1/4 cup powdered sugar
- 1 pinch fine sea salt
Instructions
- Preheat your oven to 350°F (180°C) and line a 9×13-inch baking pan with parchment paper.
- Prepare the vanilla cake mix according to package instructions, substituting milk for water and melted butter for oil, while adding one extra egg yolk for structure.
- Pour the batter into the pan, smooth with a spatula, and bake until a skewer inserted in the center comes out clean; let the cake cool completely in the pan.
- Make the soaking syrup by dissolving granulated sugar in water over medium heat, then stir in half of the vanilla extract once the liquid reaches room temperature.
- Whip the cold heavy cream in a chilled bowl for one minute, then add powdered sugar, salt, and the remaining vanilla, beating until stiff peaks form.
- Remove the cooled cake from the pan and use a 3-inch round cutter to punch out six identical circles.
- Place a cake round on a small parchment square, brush with syrup, add a layer of whipped cream, and top with a second cake round.
- Apply a thin crumb coat of cream, chill for 10 minutes, then apply a final smooth layer of frosting and decorate before placing into a clamshell box.
Notes
For the cleanest professional finish, ensure the cake is completely cold before cutting the rounds to prevent crumbling. If you need the cakes to stay stable for a longer period at room temperature, you can fold a tablespoon of mascarpone into the whipped cream for added structure.
- Prep Time: 25 mins
- Cook Time: 30 mins
- Category: Dessert
- Method: Baking
- Cuisine: French-American
The Foundation of Quality Ingredients

To achieve a professional result with a small-batch approach, the quality of your base components is paramount. Even when working with a pre-mixed foundation, your additions and the temperature of your ingredients will dictate the final texture of the sponge. Every element in this list serves a specific structural or sensory purpose.
- Vanilla Cake Mix: This provides a consistent crumb and a reliable rise. When selecting a brand, look for one that lists real vanilla or natural flavors to provide a clean starting point for our refinements.
- Cold Heavy Whipping Cream: For a true Chantilly-style frosting, your cream must have a high fat content—ideally 36% or higher. This fat content is what allows the cream to hold its shape after being whipped.
- Granulated Sugar and Water: These form the base of our soaking syrup. This is a classic patisserie technique used to maintain moisture in the sponge, especially when the cake is cut into smaller rounds and exposed to air.
- Pure Vanilla Extract: Avoid imitation flavorings. The floral, complex notes of a high-quality Madagascar or Tahitian vanilla will permeate both the syrup and the cream, providing a cohesive flavor profile.
- Pinch of Fine Sea Salt: A small amount of salt is essential in the whipped cream to balance the sugar and highlight the richness of the dairy.
By treating these ingredients with care—measuring them by weight where possible and maintaining correct temperatures—you set the stage for a cake that transcends its humble origins.
The Method of Refined Assembly
Step 1: Bake the Foundation
Begin by preheating your oven to 350 °F (180 °C). Prepare a 9 × 13-inch baking pan by greasing the sides and lining the bottom with a sheet of parchment paper. Prepare the vanilla cake mix according to the instructions on the box, but consider substituting the water for whole milk to achieve a richer flavor. Pour the batter into the prepared pan and use an offset spatula to smooth the surface, making certain it reaches every corner. Bake until a wooden skewer inserted into the center comes out clean. Allow the cake to cool completely in the pan to prevent the delicate structure from collapsing.
Step 2: Prepare the Infusion Syrup
While the cake cools, create your simple syrup. Combine the water and white sugar in a small saucepan over medium heat. Stir the mixture gently just until the sugar crystals have fully dissolved. Remove the pan from the heat and allow the liquid to reach room temperature before stirring in the vanilla extract. This syrup is a secret of professional bakers; it acts as a barrier against dryness and adds a subtle layer of flavor.
Step 3: Create the Stabilized Chantilly
For the frosting, place a clean glass or metal mixing bowl and your beaters in the freezer for fifteen minutes. Pour the cold heavy whipping cream into the chilled bowl and beat on high speed for one minute. As the cream begins to thicken, add the powdered sugar, vanilla, and a pinch of salt. Continue to whip the mixture only until it reaches stiff peaks. Be careful not to over-mix, or the cream will become grainy and lose its silky mouthfeel. Store this in the refrigerator until you are ready to assemble.
Step 4: Precision Cutting of the Sponge
Once the cake is entirely cold, lift the parchment paper to remove the sponge from the pan. Use a 3-inch round stainless steel cookie cutter to punch out six identical circles. This requires a firm, downward pressure and a slight twist to ensure a clean edge. Pair these circles into three sets of two layers. The remaining scraps are excellent for sampling or for creating smaller cake truffles later.
Step 5: Layering and Crumb Coating
Place a 5 × 5-inch square of parchment paper on your work surface. Apply a small dab of whipped cream to the center to act as an anchor. Place your first cake round on the parchment and lightly brush the top with your prepared vanilla syrup. Spread a generous, even layer of whipped cream over the sponge. Place the second cake round on top and apply more syrup. Use an offset spatula to apply a very thin ‘crumb coat’ of cream to the top and sides, then chill the cakes for ten minutes to set this layer.
Step 6: The Final Presentation
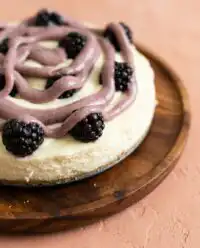
Apply the final coat of whipped cream to the chilled cakes. By turning the parchment square as you work the spatula, you can achieve smooth, sharp sides. Once the surface is pristine, you may add delicate decorations such as fresh berries or a light dusting of sprinkles. Carefully lift the parchment square and place the finished cake into a small clamshell container. Keep these chilled until the moment you intend to serve them.
Precision Secrets for Flawless Results

To achieve the most refined texture, I recommend substituting the oil in the cake mix for an equal amount of melted, unsalted butter. This change creates a more traditional ‘bakery’ crumb that is easier to cut without tearing. Additionally, adding one extra egg yolk to the batter provides a tighter structure, which is helpful when you are aiming for clean vertical sides on a miniature scale.
Temperature control is your most significant ally in the kitchen. If your cream is not cold enough, the fat globules will not trap air efficiently, resulting in a frosting that weeps or slumps. For those who need their cakes to remain stable for several hours, you might consider adding a tablespoon of mascarpone cheese to the cream; this is a classic Italian technique that provides incredible stability without changing the flavor profile significantly. For more guidance on small-scale baking techniques, you may find our article on modern-mini desserts quite helpful. You can also refer to this excellent lunch box cakes guide for further inspiration on decorative styles.
Building on a Classic Foundation
Once you have mastered the basic vanilla version, you can adapt this recipe to suit many different tastes. A favorite variation of mine is the ‘Zeste d’Orange’ cake, where I add the finely grated zest of one orange to the cake batter and replace the vanilla in the soaking syrup with a splash of orange blossom water. This creates a bright, floral profile that is perfect for a spring afternoon.
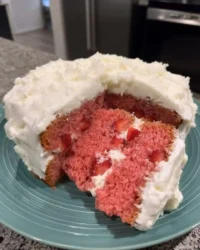
For a more decadent approach, you might fold crushed freeze-dried raspberries into your whipped cream. This provides a natural, vibrant pink hue and a tart contrast to the sweet vanilla sponge. If you enjoy a more nostalgic aesthetic, you might appreciate our guide on the vintage-cake style, which uses similar small-batch principles but focuses on intricate piping techniques. You could even incorporate a layer of high-quality lemon curd between the cake rounds for a surprising citrus burst.
Presentation and Final Touches

The presentation of a bento cake is just as important as the flavor. To maintain the elegant French aesthetic, I prefer to keep decorations minimalist. A single fresh pansy or a small sprig of mint can speak volumes about the care put into the bake. When placing the cake in its box, make certain the parchment paper is slightly ruffled at the edges; this adds a rustic yet refined charm to the final look.
If you are preparing these for a romantic occasion, you might consider cutting your sponge into a different shape, as we discuss in our tutorial for the heart-cake. These cakes are best served with a light beverage that does not compete with the delicate vanilla notes. A chilled glass of Champagne or a cup of high-quality Darjeeling tea provides a sophisticated accompaniment that allows the creaminess of the Chantilly to shine through beautifully.
The Art of Small Batch Mastery
Mastering the lunch box cake is about more than just baking; it is about the attention to detail that turns a simple dessert into a memorable experience. By using professional techniques like soaking syrups and stabilized creams, you elevate your home baking to a level of true craftsmanship. I hope you find as much peace and joy in the assembly of these cakes as I do.
For more ideas on how to mark your special moments with precision and grace, please visit our collection of celebration-cakes. I invite you to share your creations with our community of dedicated bakers. You can find us and share your progress on Instagram, Pinterest, and Facebook. Happy baking, and remember that perfection is found in the smallest details.

