I remember standing in my kitchen staring at a plain vanilla sponge and thinking, “What if the cake itself was the art, rather than just a vehicle for frosting?” That one rebellious thought sparked a week of messy experiments that finally led to this Cake Draw technique. It is a fearless way to bake your personality directly into the crumb, turning a simple dessert into a personalized masterpiece that tastes as good as it looks.

This isn’t about perfection; it is about the thrill of the creative process and the jaw-dropping moment when you peel back the parchment to reveal your design. By using a precise egg-rich batter, we create a canvas that is velvety, flexible, and ready for whatever bold patterns your heart desires. Let’s push the boundaries of what a small-batch cake can be and start drawing with our flavors.
The Flavor Gameplan
Why settle for a basic cake when you can create a revolutionary dessert that doubles as a conversation piece? This Cake Draw method is a total breakthrough for home bakers who crave a bit of drama in their kitchen. We are taking the classic, airy structure of a Japanese-style sponge and giving it a modern, playful twist that is strictly for the adventurous.
What makes this recipe a total fire addition to your repertoire is the contrast between the delicate, melt-in-your-mouth texture and the bold, graphic visual appeal. Because we are working with individual 4-inch molds, you have the freedom to experiment with dozens of different designs without the pressure of a massive tiered cake. It is the ultimate playground for flavor and art to marry in a way that is uniquely yours.
Trust me, the first time you serve these, the reaction will be nothing short of explosive. People expect a cake to be topped with something; they don’t expect the cake to *be* the something. It is a unique, remarkable way to show off your skills while keeping the portion sizes perfectly manageable for a small-batch triumph.
Print
Cake Draw Sponge Cakes
- Total Time: 1 hour 5 mins
- Yield: 12 mini cakes
- Diet: Vegetarian
Description
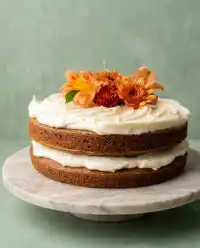
Transform your baking into a stunning art project with this innovative Cake Draw technique. These light, Japanese-style mini sponge cakes feature intricate designs baked directly into the crumb, paired with a cloud-like whipped cream filling for a dessert that is as beautiful as it is delicious.
Ingredients
- 12 large egg yolks
- 12 large egg whites
- 1 cup granulated sugar, divided
- 1/2 cup vegetable oil
- 1/2 cup whole milk
- 2 teaspoons vanilla extract, divided
- 1 1/2 cups all-purpose flour
- 1/4 cup cornstarch
- 1 teaspoon white vinegar
- Gel food coloring
- 1 cup heavy whipping cream
- 1/4 cup confectioners sugar
- Pinch of salt
Instructions
- Preheat your oven to 375°F (190°C) and prepare 24 parchment paper circles by tracing 4-inch molds; draw your desired patterns on half of the circles using edible markers.
- In a large bowl, whisk together the 12 egg yolks, half of the sugar, vegetable oil, whole milk, and 1 teaspoon of vanilla extract until emulsified and pale.
- Sift the all-purpose flour and cornstarch into the yolk mixture, whisking until the batter is thick and smooth.
- In a stand mixer, whisk the egg whites until frothy, then gradually add the remaining sugar and white vinegar, beating until stiff peaks form.
- Gently fold the whipped egg whites into the yolk batter in three separate additions, being careful not to deflate the mixture.
- Divide small portions of the batter into bowls and tint with gel food coloring, then transfer each color into a tipless piping bag.
- Grease your silicone molds, place the designed parchment circles at the bottom, and trace your patterns with the colored batter before chilling in the fridge for 5 minutes to set.
- Pipe the remaining uncolored batter over the chilled designs and bake for 8 to 10 minutes until the sponge bounces back when touched.
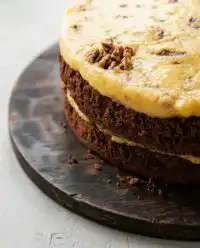
- Immediately run a knife around the edges, flip onto parchment, and peel back the circles while warm to reveal the artwork; repeat the baking process for the plain base layers.
- Whisk the heavy cream, confectioners sugar, salt, and remaining vanilla until stiff peaks form, then assemble by piping cream between a plain base and a designed top layer.
Notes
For the best visual results, ensure your parchment paper is laid flat in the molds to prevent the batter from seeping underneath your design. If you are new to the folding technique, take your time with the egg whites; maintaining that aeration is what gives these cakes their signature flexible texture and prevents the colors from bleeding into the base batter.
- Prep Time: 45 mins
- Cook Time: 20 mins
- Category: Dessert
- Method: Baking
- Cuisine: Modern Japanese
The Artistic Arsenal

To pull off a successful Cake Draw, you need more than just flour and sugar; you need a lineup of ingredients that work together with scientific precision. This isn’t the time to swap things out on a whim—the balance of fats, proteins, and starches is what keeps your designs sharp and your crumb spectacular.
- The Power of Twelve Yolks: We are using 12 egg yolks to provide a rich, sturdy base. This high fat content ensures the batter is thick enough to hold its shape when piped, giving you those clean lines you need for a stunning design.
- Egg Whites and Vinegar: This is where the magic happens. The egg whites provide the lift, and a touch of white vinegar stabilizes the proteins, ensuring your stiff peaks don’t collapse when you start folding in the heavier yolk mixture.
- Cornstarch for Silkiness: By replacing a portion of the flour with cornstarch, we weaken the gluten just enough to create a tender, tight crumb that is easy to draw on and even easier to eat.
- Gel Food Dye (The Non-Negotiable): Forget liquid dyes; they will ruin the consistency of your batter and make your designs bleed. Gel dyes provide a powerful, vibrant color without adding unnecessary moisture.
- The Whipped Cream Filling: We are keeping it classic with heavy whipping cream, confectioners sugar, and vanilla. It is the light, airy counterpart to the rich sponge, and a dash of salt keeps the sweetness from becoming overwhelming.
Let’s Build This Canvas
Step 1: Prep the Design Templates
Begin by tracing your 4-inch cake molds onto parchment paper and cutting out 24 circles. This is your chance to get creative—on half of the circles, use your edible markers to draw whatever patterns, characters, or words you want to see on your final cakes. Set these aside along with your silicone molds and preheat your oven to 375 degrees F (190 degrees C).
Step 2: Separate and Whisk the Yolks
Separate your 12 eggs, placing the whites in your stand mixer bowl and the yolks in a large mixing bowl. Whisk the egg yolks with the sugar, vegetable oil, whole milk, and vanilla extract until the mixture is smooth and pale. This yolk base is the foundation for all your colors, so make sure it is perfectly emulsified.
Step 3: Sift and Marry the Dry Ingredients
Sift the all-purpose flour and cornstarch directly into the yolk mixture. Whisk this together until the batter is thick and free of lumps. It should feel substantial—this thickness is exactly what we need to prevent our colors from running into each other later.
Step 4: Achieve the Perfect Stiff Peaks
In your stand mixer, whisk the egg whites until they become frothy. Gradually add the second portion of sugar and the white vinegar. Continue whisking until you hit those elusive stiff peaks; when you lift the whisk, the meringue should stand straight up like a mountain peak. This is the secret to a cake that bounces back when touched.
Step 5: The Gentle Fold
Carefully fold the egg whites into the yolk batter in three additions. Do not rush this—use a wide spatula and a gentle hand to keep the air inside. If you over-mix here, the batter will turn runny, and your Cake Draw designs will look like a watercolor blur instead of a sharp masterpiece.
Step 6: Color Your World
Divide small portions of the batter into separate bowls and add your gel food dye. Use a light hand to fold the color in so you don’t deflate the batter. Transfer each color into a tipless piping bag. This is where your flavor gameplan turns into a visual reality.
Step 7: Tracing the Art
Grease your molds and place them on a cookie sheet. Put your designed parchment circles in the bottom (marker side down for words!). Carefully pipe your colored batter over the designs, tracing the lines you drew earlier. Once the designs are finished, pop the tray into the fridge for 3-5 minutes to set the artwork.
Step 8: The Final Pour and Bake
Pipe a layer of the remaining uncolored batter over your chilled designs. Bake for 8-10 minutes. You are looking for a slight bounce when you tap the top and a very light golden hue around the edges. This quick bake keeps the sponge flexible.
Step 9: The Big Reveal
Run a butter knife around the edges immediately after removing them from the oven. Flip the molds onto parchment paper and peel away the circles while the cake is still warm. This is the most thrilling part—seeing your designs come to life! Bake the remaining plain layers to serve as your bottom bases.
Step 10: Whip and Assemble
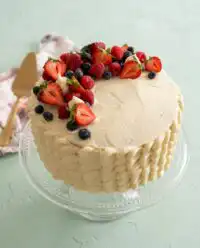
Once the cakes are cool, whisk your heavy cream, sugar, and vanilla until stiff. Place a plain cake layer down, pipe a generous amount of whipped cream (and maybe some fresh fruit), then top with your stunning designed cake. Your masterpiece is ready for showtime.
Riley’s Secret Hacks

To get the most spectacular results with your Cake Draw, consistency is everything. If your batter feels a little too thin after coloring, let it sit for a minute to tighten up before you start piping. Also, when tracing intricate designs, keep your piping tip close to the parchment to avoid air bubbles that can create gaps in your artwork. For a deeper dive into the technical side of these creations, check out this complete guide to mini designed sponge cakes which offers some great technical perspective.
Don’t be afraid to go bold with your color choices; the sponge can handle it! If you find yourself struggling with the tiny details, try cooling your piping bags in the fridge for five minutes to give the batter a firmer texture. If you want to see how these techniques translate to larger, more structured designs, you might find inspiration in my guide for building a car cake. Always remember that the quality of your edible markers matters—cheaper ones can sometimes bleed into the batter, so invest in a professional set for the cleanest lines.
Twist the Design
Once you have mastered the basic Cake Draw, the possibilities are truly endless. For a romantic vibe, you could pipe delicate lace patterns or try creating a heart cake design using shades of pink and red. Why not try a cocoa-infused version? Replace two tablespoons of the flour with dark Dutch-processed cocoa powder for a rich chocolate canvas that looks incredible with white or gold piping.
For those who want a bit more texture, you can sprinkle crushed freeze-dried strawberries into the whipped cream filling for a tart, explosive flavor contrast. You can even try a “savory-sweet” experiment by adding a tiny pinch of smoked sea salt to the batter, which makes the vanilla notes sing. If you are feeling extra brave, try layering different colors of batter for a marble effect inside the sponge itself—it is a mind-blowing surprise for anyone who takes a bite.
Showtime and Plating

When it comes to serving these mini marvels, the presentation should be just as bold as the cake itself. I love placing each individual cake on a minimalist white plate to let the designs really pop. If you are hosting a party, these are perfect for celebration cakes because they are pre-portioned and require no messy slicing at the table.
To take the experience to the next level, pair these sponge cakes with a crisp sparkling wine or a light floral tea. The bubbles in the wine cut through the richness of the egg yolks perfectly, making every bite feel like a fresh start. If you are serving them at a brunch, a side of fresh passion fruit or macerated berries adds a bright acidity that complements the creamy filling. These cakes aren’t just food; they are an event, so give them the spotlight they deserve.
The Final Bite
Baking should always feel like an adventure, and this Cake Draw recipe is the ultimate map to a new creative territory. Whether you are sketching simple polka dots or intricate character art, the joy is in the process of making something that is entirely your own. If you find yourself falling in love with these artistic flourishes, you should definitely take a look at my tips for creating a vintage cake to see how old-school styles can meet modern innovation.
I can’t wait to see what you create with this method! Make sure to share your masterpieces with the community and keep pushing those baking boundaries. You can find more of my flavor experiments and behind-the-scenes chaos on Pinterest, Instagram, and TikTok. Now, go grab those piping bags and let your imagination run wild!
