In the quiet ateliers of Paris, I learned that pastry is as much a visual art as it is a culinary one. There is a profound stillness in the moment before the first brushstroke of colored buttercream meets a pristine surface. This technique of cake painting requires a steady hand and a patient heart, transforming a simple dessert into a canvas for your creative expression.

This particular recipe pairs a structured graham cracker sponge with a remarkably stable Swiss meringue buttercream. The subtle warmth of cinnamon and allspice provides a sophisticated foundation for the artistry that follows. By mastering these two components, you gain the ability to create edible masterpieces that are as pleasing to the palate as they are to the eye.
Mastering the Art of Cake Painting
There is a certain grace found in the intersection of traditional baking and fine art. This recipe is cherished because it moves beyond the simple act of frosting; it invites you to become a cake artist in your own kitchen. The small-batch nature of this cake allows you to focus on the fine details, making certain that every crumb is tender and every stroke of color is purposeful.
Choosing to engage with cake painting means you value the time spent in preparation. The graham cracker sponge offers a unique, slightly textured crumb that stands up beautifully to the weight of the buttercream. It is a refined departure from standard vanilla, offering a depth of flavor that feels both nostalgic and professional. You will find that the Swiss meringue buttercream is the superior medium for this work, as its silky texture allows for a level of detail that American buttercream simply cannot match.
Ultimately, this recipe is a devotion to the craft. It is for the baker who finds joy in the quiet precision of the kitchen. When you present a hand-painted cake, you are offering more than just a treat; you are sharing a piece of your artistic journey. The pride that comes from perfecting the smooth finish of the canvas and the delicate application of the “paint” is a reward in itself.
Print
Cake Painting
- Total Time: 2 hours
- Yield: 12 servings
- Diet: Vegetarian
Description
This artisanal recipe combines a structured graham cracker sponge with a silky Swiss meringue buttercream to create the perfect edible canvas. Designed for the creative baker, it offers a sophisticated flavor profile of warm spices and honeyed crumbs, providing a stable foundation for intricate hand-painted designs.
Ingredients
- Unsalted butter, room temperature
- Finely ground graham cracker crumbs
- All-purpose flour
- Baking powder
- Baking soda
- Ground cinnamon
- Ground allspice
- Granulated sugar
- Light brown sugar
- 3 large eggs
- 1 additional egg white (for cake)
- Buttermilk
- Sour cream
- Vanilla extract
- 5 egg whites (for buttercream)
- Granulated sugar (for buttercream)
- Pinch of salt
- Gel food coloring
Instructions
- Preheat oven to 350°F (175°C) and prepare four 6-inch cake pans with butter, flour, and cake strips for even baking.
- Whisk together the flour, graham cracker crumbs, baking powder, baking soda, cinnamon, and allspice in a medium bowl.
- In a separate vessel, whisk together the buttermilk, vanilla extract, and sour cream until uniform.
- Using a stand mixer with a paddle attachment, cream the butter with granulated and light brown sugars until light and fluffy.
- Add three eggs and one egg white one at a time, ensuring each is fully incorporated before adding the next.
- Lower the speed and alternate adding the dry flour mixture and the liquid buttermilk mixture, beginning and ending with the dry ingredients.
- Divide batter into pans and bake for 30 minutes or until a skewer comes out clean; cool in pans for 10 minutes then transfer to a wire rack.
- For the buttercream, whisk five egg whites, sugar, and salt over a double boiler until the mixture reaches 160°F and sugar is dissolved.
- Whip the egg white mixture on high speed until thick, glossy, stiff peaks form and the bowl feels cool.
- Switch to the paddle attachment and slowly add room-temperature butter one tablespoon at a time, followed by vanilla, until the emulsion is smooth.
Notes
For the best painting results, ensure your base coat of buttercream is thoroughly chilled in the refrigerator until firm before applying your colored ‘paints.’ This prevents the colors from bleeding into the base layer and allows for cleaner brushstrokes. If your Swiss meringue buttercream begins to separate while adding butter, simply keep mixing; the fats will eventually emulsify into a perfectly smooth frosting.
- Prep Time: 45 mins
- Cook Time: 30 mins
- Category: Dessert
- Method: Baking
- Cuisine: French-inspired
The Foundation of Edible Art

To achieve a result that is truly extraordinary, one must begin with ingredients of the highest caliber. In this small-batch preparation, the quality of your butter and the freshness of your spices will be the defining factors of the final profile.
- Unsalted Butter (Room Temperature): Use a premium European-style butter if possible. The higher fat content provides a richer mouthfeel and a more stable emulsion in both the cake and the buttercream.
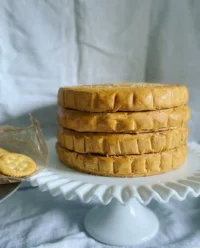
- Graham Cracker Crumbs: These add a lovely, toasted honey note and a specific structural integrity to the sponge. Ensure they are finely ground to maintain a refined texture.
- Large Eggs and Egg White: The extra egg white in the cake batter helps to create a sturdy yet light structure, while the yolks provide the necessary richness.
- Buttermilk and Sour Cream: This combination is the secret to a moist, tender crumb. The acidity reacts with the leavening agents to produce a beautiful lift.
- Warm Spices: Cinnamon and allspice should be freshly opened to provide the most aromatic experience. They ground the sweetness of the sugars with a subtle, earthy depth.
- Gel Food Coloring: For the painting process, high-quality gel colors are essential. They provide vibrant hues without thinning the buttercream, allowing your artistic vision to remain sharp and defined.
The Method of Precision
Step 1: Preparing the Workspace and Pans
Begin by setting your oven to 350°F (175°C). Prepare four 6-inch cake pans by buttering them generously and dusting with flour. For the most even layers, I recommend applying cake strips to the exterior of the pans; this prevents the edges from over-baking before the center is set.
Step 2: The Dry Ingredient Sift
In a medium bowl, whisk together the all-purpose flour, graham cracker crumbs, baking powder, baking soda, cinnamon, and allspice. This ensures an even distribution of the leavening agents and spices, which is vital for a consistent rise and flavor profile throughout the sponge.
Step 3: Emulsifying the Liquids
In a separate vessel, combine the buttermilk, vanilla extract, and sour cream. Stir these until the mixture is uniform. This liquid phase will be responsible for the hydration of the flour and the activation of the baking soda.
Step 4: The Creaming Stage
Using a stand mixer fitted with the paddle attachment, cream the unsalted butter until it is smooth. Add the granulated and light brown sugars, mixing on medium-high speed until the mixture is light and fluffy. This process incorporates air, which is the first step in achieving a delicate crumb.
Step 5: Incorporating the Eggs
Add the three large eggs and the single egg white one at a time. It is crucial to let each egg fully incorporate before adding the next. This patience prevents the emulsion from breaking, keeping the batter silky and stable.
Step 6: Alternating the Additions
Lower the mixer speed and add the flour mixture and the buttermilk mixture in alternating batches. Always begin and end with the dry ingredients. Mix only until just combined; over-mixing at this stage will develop the gluten and result in a tough cake rather than a tender one. Give the bowl a final scrape with a spatula to ensure no pockets of flour remain at the bottom.
Step 7: The Bake and Cool
Divide the batter equally among the four prepared pans. Bake for approximately 30 minutes. You will know they are ready when a wooden skewer inserted into the center comes out clean. Allow the cakes to cool in the pans for ten minutes before transferring them to a wire rack to cool completely. The cakes must be entirely cold before you begin the assembly.
Step 8: Preparing the Swiss Meringue
For the buttercream, combine the five egg whites, granulated sugar, and salt in the bowl of your stand mixer. Place the bowl over a saucepan of simmering water, making certain the water does not touch the bottom of the bowl. Whisk constantly until the mixture reaches 160°F (71°C) and the sugar crystals have completely dissolved. The mixture should feel smooth when rubbed between your fingers.
Step 9: Creating the Glossy Peaks
Transfer the bowl to the stand mixer and whisk on high speed. You are looking for thick, glossy, stiff peaks. The bowl should feel cool to the touch before you proceed to the next step. This cooling period is essential to prevent the butter from melting upon contact.
Step 10: The Butter Emulsion
Switch to the paddle attachment. With the mixer running on low, add the room-temperature butter one tablespoon-sized dollop at a time. Once all the butter is incorporated and the frosting is smooth and silky, add the vanilla extract. If the mixture appears curdled, simply continue mixing; the emulsion will eventually come together into a pristine, spreadable consistency.
Secrets of the Master Pastry Chef

Achieving a perfectly smooth canvas for your Cake Painting begins with temperature control. If your Swiss meringue buttercream feels too soft, place the entire bowl in the refrigerator for fifteen minutes before whipping it again. This helps the fats solidify just enough to create that professional, stable texture. For those looking to master older styles, understanding these textures is as vital as the techniques found in our vintage cake guide.
When you begin the painting process, treat your buttercream like oil paint. Use a palette knife or a clean, food-safe brush to apply small amounts of colored frosting. You can find excellent inspiration for color blending by viewing this guide on painted cake techniques. Remember that the cake must be chilled until the base coat is firm before you start painting; this prevents the “canvas” from moving as you work.
Refined Twists on a Classic Foundation
While the graham cracker and spice combination is exquisite, you can adapt this canvas to suit any season. For a lighter, more vibrant approach, consider adding lemon zest to the batter and filling the layers with a tart fruit curd. This technique is similar to the bright profiles found in our lemon rainbow cake, where citrus notes provide a beautiful contrast to the sweet buttercream.
Another sophisticated variation involves the use of palette knife textures rather than flat painting. You can create a textured, “impasto” style by applying thicker layers of colored buttercream in bold, sweeping motions. This adds a three-dimensional quality to the cake that is truly breathtaking. You can also experiment with metallic luster dusts mixed with a drop of clear vanilla extract to add gold or silver accents to your painted floral designs.
The Final Touch of Presentation

When serving your hand-painted masterpiece, the presentation should reflect the care you took in its creation. Use a simple, elegant cake stand that does not distract from the artwork on the sides of the cake. For grand events, these techniques are often the highlight of our most cherished celebration cakes.
Slice the cake while it is slightly chilled to ensure clean lines through the spice-scented layers, but allow the individual slices to sit for ten minutes before serving. This brings the buttercream to the ideal temperature for the best flavor release. Pair a slice with a dry Champagne or a delicate Earl Grey tea to complement the warmth of the graham cracker and the richness of the Swiss meringue.
The Art of Small Batches
Mastering the technique of Cake Painting is a journey that rewards patience and attention to detail. By focusing on a small-batch approach, you have the luxury of using the finest ingredients and giving each step the focus it deserves. Whether you are recreating a floral scene or a modern abstract design, the result is a testament to your dedication to the craft of pastry. For more specialized shapes and techniques, you might also enjoy our tutorial on the car cake.
I invite you to share your artistic creations with our community of dedicated bakers. Please connect with us on Instagram, Pinterest, and Facebook to show us your beautiful work. Continue to practice your brushstrokes and your whisking, for in the world of French pastry, mastery is a lifelong and beautiful pursuit.

