I recall a quiet autumn in a Parisian patisserie where my mentor taught me that the most profound gestures of affection are often found in the simplest of bakes. It is a common misconception that love requires a complicated croquembouche or a multi-layered gateau to be felt. In truth, the devotion we pour into a humble cake, ensuring every crumb is moist and every texture is intentional, speaks far louder than any intricate sugar work.

This recipe takes the familiar comfort of a chocolate base and transforms it through precise enrichments, such as an extra egg yolk and the replacement of water with whole milk. It is a decadent, moist, and deeply satisfying dessert that honors the tradition of the American poke cake while applying the refined standards of a French kitchen. By focusing on the quality of the soak and the chill time, you create a dessert that is far more than the sum of its parts.
The Art of This Heartfelt Technique
There is a specific joy in mastering a recipe that feels both nostalgic and professional. This cake is often referred to by many names, including the playful ‘Better Than a Boyfriend’ cake, but I prefer to see it as an exercise in texture and balance. When we bake for someone we care for, we are not just providing sustenance; we are offering a moment of quiet indulgence. This particular method is a favorite because it bridges the gap between approachable home baking and the high-quality results expected in a professional setting.
What makes this recipe truly remarkable is the moisture management. By introducing a rich soak of sweetened condensed milk and dark chocolate syrup while the cake is still warm, we are utilizing the principles of osmosis to ensure the crumb remains tender for days. The addition of an extra yolk provides a fat content that standard mixes lack, resulting in a mouthfeel that is velvety and substantial. It is a reliable, tested method that guarantees success, even if you are new to the kitchen.
Furthermore, the contrast between the chilled, whipped topping and the dense, chocolatey base provides a sensory experience that is rarely found in simpler desserts. The crunch of the Snickers bites and the delicate nature of shaved chocolate offer a complexity that keeps each bite interesting. It is a testament to the idea that with the right techniques, even a convenient base can be turned into a masterpiece of confectionery art. Choosing this bake means choosing a reliable path to a memorable celebration.
Print
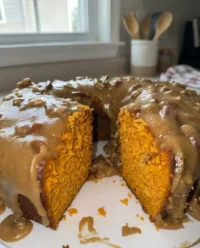
Cake For Boyfriend
- Total Time: 3 hours 45 mins
- Yield: 12 servings
- Diet: Vegetarian
Description
Elevate a classic chocolate poke cake with artisanal French techniques, featuring a rich, milk-soaked crumb and a decadent whipped topping. This indulgent dessert is finished with crunchy Snickers bites and delicate chocolate shavings for a truly heartfelt gesture.
Ingredients
- 1 box milk chocolate cake mix
- 3 whole eggs
- 1 extra egg yolk
- 1 cup whole milk
- 1/2 cup vegetable oil
- Dutch-processed cocoa powder (for dusting pan)
- 1 can (14 oz) sweetened condensed milk
- Dark chocolate syrup (such as Hershey’s Special Dark)
- 8 oz whipped topping, chilled
- Snickers baking bites, halved
- Shaved chocolate bar
Instructions
- Preheat oven to 350°F (175°C) and grease a 9×13 glass baking dish with butter, then dust evenly with Dutch-processed cocoa powder.
- In a large glass bowl, whisk together the cake mix, three whole eggs, one extra egg yolk, milk, and oil until just combined and glossy.
- Pour the batter into the prepared pan and bake for approximately 30 minutes, or until a toothpick inserted into the center comes out clean.
- Let the cake cool on a wire rack for exactly 10 minutes, then use the handle of a wooden spoon to poke holes across the entire surface in a grid pattern.
- Slowly drizzle the sweetened condensed milk followed by the dark chocolate syrup over the warm cake, ensuring the liquid fills the holes.
- Cover the pan tightly and refrigerate for at least 2 to 3 hours to allow the soak to set and the flavors to meld.
- Spread the chilled whipped topping over the cake and garnish with halved Snickers bites and chocolate curls before serving cold.
Notes
For the cleanest presentation, ensure the cake is thoroughly chilled before slicing, and use a knife dipped in warm water between each cut. If you prefer a more intense chocolate flavor, use a high-cocoa percentage dark chocolate bar for the shavings to balance the sweetness of the condensed milk.
- Prep Time: 15 mins
- Cook Time: 30 mins
- Category: Dessert
- Method: Baking
- Cuisine: American
The Foundation of Quality Ingredients

To achieve a result that feels truly artisanal, one must look closely at the components of the bake. While we utilize a convenient base, the additions we choose are what define the final character of the cake. Here is a look at the essential elements:
- Milk Chocolate Cake Mix: This provides the structural framework. Using a high-quality brand ensures a consistent rise and a predictable crumb.
- Fresh Eggs and One Extra Yolk: The extra yolk is a secret of the trade. It adds lecithin and fat, which creates a more tender, less crumbly texture that feels expensive on the tongue.
- Whole Milk: Replacing the standard water with milk introduces proteins and sugars that improve browning and create a richer flavor profile.
- Vegetable Oil: This provides the necessary moisture that remains stable even when the cake is served cold from the refrigerator.
- Dutch-Processed Cocoa Powder: We use this to dust the pan. It offers a darker color and a smoother, less acidic chocolate flavor than natural cocoa.
- Sweetened Condensed Milk: This serves as our primary soaking liquid, providing a milky sweetness that binds the crumb together.
- Dark Chocolate Syrup: A high-quality syrup, like Hershey’s Special Dark, adds depth and prevents the cake from being overly cloying.
- Whipped Topping: This acts as a light, stabilized cream layer that carries the garnishes without weighing down the cake.
- Snickers Baking Bites and Shaved Chocolate: These provide the necessary textural contrast, moving the cake from soft to satisfyingly crunchy.
The Method of Precision
Step 1: Preparing the Vessel and Oven
Begin by preheating your oven to 350 degrees Fahrenheit (175 degrees Celsius). The preparation of the pan is a vital step in French baking; we do not simply grease it. Instead, coat a 9×13 glass baking dish with a thin, even layer of softened butter. Once buttered, sprinkle a generous amount of Dutch-processed cocoa powder over the surface, tapping the pan to ensure every corner is covered. This prevents the cake from sticking and ensures that any residue left on the cake is a beautiful, dark chocolate color rather than a white, floury dust.
Step 2: Mixing the Enriched Batter
In a large glass bowl, combine the milk chocolate cake mix with your three whole eggs and the additional yolk. Pour in the cup of milk and the half-cup of oil. Using a balloon whisk, stir the ingredients until they are just incorporated. Do not overmix; we want to avoid developing too much gluten, which would make the cake tough. The batter should be glossy and smooth, representing a perfect emulsion of fats and liquids. The additional yolk will make the batter appear slightly more yellow and rich than a standard preparation.
Step 3: The Baking Process
Pour the batter into your prepared pan, using an offset spatula to ensure it is level. Place the pan on the center rack of the oven and bake for approximately 30 minutes. Precision is key here; use a wooden toothpick to test the center. It should come out clean or with just a few moist crumbs attached. If the cake is overbaked, it will not absorb the soaking liquid as effectively. Remove the cake from the oven and place it on a wire rack to cool for no more than five to ten minutes.
Step 4: The Poke and Soak Technique
While the cake is still warm and the crumb is receptive, take the handle of a wooden spoon and poke holes across the entire surface. Space them approximately one inch apart in a grid pattern. This creates channels for our liquids to travel deep into the heart of the bake. Drizzle the entire can of sweetened condensed milk over the top, ensuring it falls into the holes. Follow this immediately with a generous drizzle of the dark chocolate syrup. This process requires patience; allow the cake to sit as the liquids are slowly drawn in.
Step 5: Chilling and Setting
Cover the pan tightly with plastic wrap and place it in the refrigerator for at least two to three hours. This period of rest is essential for the flavors to meld and for the structure of the cake to stabilize under the weight of the soak. A cold cake is also much easier to top. Once the cake is thoroughly chilled, run a thin knife or a small offset spatula around the edges of the pan to ensure the sides are free from the glass.
Step 6: Finishing the Presentation
Spread the chilled whipped topping over the surface in an even, smooth layer. It should look like a pristine blanket of snow. Distribute the halved Snickers baking bites across the top, pressing them slightly into the cream so they stay in place. For the final touch, use a vegetable peeler to create delicate curls of shaved chocolate over the top. Recover the cake and keep it refrigerated until the moment you are ready to serve.
Precision Secrets for the Perfect Bake

Temperature is your most important tool when making a poke cake. If the cake is too cold when you add the liquids, they will simply sit on top rather than being absorbed. Conversely, if the cake is too hot, the sweetened condensed milk can make the crumb feel soggy rather than moist. Aim for that ‘sweet spot’ of ten minutes post-oven. Also, when shaving chocolate, ensure your chocolate bar is at room temperature; if it is too cold, it will splinter rather than curl gracefully. For more details on maintaining texture in chocolate desserts, you might find our guide on the snickers-cake particularly helpful. Lastly, always use a glass pan if possible, as it allows you to see how far the soak has traveled down the sides of the cake. For another perspective on this style of dessert, see this helpful context on the boyfriend cake tradition.
Refined Twists on a Classic Foundation
While the milk chocolate version is a crowd-pleaser, you can easily adjust the flavor profile to suit different preferences. For a deeper, more sophisticated palate, try using a dark chocolate cake mix and adding a teaspoon of espresso powder to the dry ingredients. The coffee will not make the cake taste like mocha; instead, it will strengthen the chocolate notes. You can also experiment with the topping by folding in a small amount of peanut butter or hazelnut spread into the whipped cream before spreading it. If you enjoy cakes that feature distinct nut profiles, you should see our recipe for ferrero-rocher-cake, which masters the art of the chocolate-hazelnut balance. For a seasonal variation, consider adding orange zest to the batter for a bright, citrusy finish that cuts through the richness of the condensed milk.
Presentation and the Final Touch

When it comes time to serve, remember that presentation is the final ingredient in any recipe. I recommend slicing the cake into neat squares while it is still very cold to ensure clean edges. Place each slice on a chilled dessert plate. To truly honor the effort you’ve put in, drizzle each individual piece with a little extra dark chocolate syrup just before it hits the table. This creates a fresh, glossy look that is very inviting. If you are serving this for a romantic occasion, you might consider pairing it with a glass of cold milk or a robust espresso. For those looking to create a more themed presentation, our heart-cake offers wonderful inspiration for romantic plating and decor that can be applied here as well.
The Art of the Small Batch Gesture
Baking this cake is an exercise in thoughtfulness. By taking the time to refine a simple base with quality ingredients and patient techniques, you create something that feels deeply personal and professional. Whether you are celebrating a milestone or simply want to brighten someone’s day, this dessert is a proven success. The beauty of this bake is that it actually improves with time; as it sits in the refrigerator, the flavors continue to deepen and the crumb becomes even more luxurious. If you find yourself enjoying the process of creating joy through baking, you may also want to try our whimsical car-cake for your next celebration.
I invite you to share your results with our community of bakers. Please follow us and tag your creations on Instagram, Pinterest, and Facebook. Happy baking, and may your kitchen always be filled with the scent of good chocolate.


