I was staring at a standard round pan and a 3D ball pan when the ‘what if’ hit me like a bolt of lightning. Why settle for flat, sheet-pan ghosts when we can build a spectral monument that actually has some height and presence? This Ghost Cake is my answer to every boring Halloween party I have ever attended—a structural triumph that looks like it is about to float right off the cake circle.

We are breaking away from the usual spooky tropes here and leaning into some serious 3D architecture. By marrying a traditional round layer with a spherical top, we create a silhouette that is both eerie and incredibly impressive. It is bold, it is playful, and it is exactly the kind of flavor experiment that proves small-batch thinking can lead to massive results.
A Revolutionary Spectral Silhouette
This is not just another dessert; it is a total reinvention of how we approach Halloween aesthetics. Most people are content with a few sprinkles or some orange food coloring, but we are going for a full 3D build that challenges the norms of the dessert table. The beauty of this Ghost Cake lies in its unapologetic height and the way the buttercream creates a flowing, ethereal movement that you just cannot get from a flat surface. It is a fearless approach to baking that prioritizes the ‘wow’ factor without sacrificing the structural integrity of the cake itself.
You will love the way the light hits the ridges of the white buttercream, creating shadows that make the ghost look like it is truly in motion. It is a thrilling process to watch this figure emerge from two different pan shapes, proving that you do not need a degree in engineering to pull off a spectacular build. This project is all about the joy of the build—the excitement of stacking layers and realizing you have created something that looks professional but carries the soul of a creative home baker who is not afraid to take risks. Plus, the contrast of the pitch-black eyes against the snow-white body is a visual explosion that grabs attention from across the room. It is a viral-ready masterpiece that tastes just as good as it looks.
Print
Ghost Cake
- Total Time: 1 hour 30 mins
- Yield: 12 servings
- Diet: Vegetarian
Description
Create a towering, three-dimensional spectral masterpiece using a combination of round and spherical cake layers. This impressive Halloween centerpiece features smooth buttercream sculpting and striking black accents for a professional, haunting finish that is sure to be the star of any spooky celebration.
Ingredients
- 6 cups cake batter (vanilla or chocolate)
- 5 cups high-stability white buttercream frosting
- Black icing tint
- Cornstarch (for smoothing)
Instructions
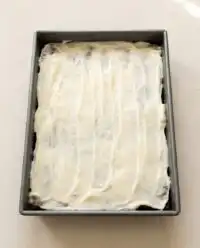
- Preheat oven and grease and flour a 6-inch round pan and a 3D ball pan.
- Divide the batter evenly between the two pans (3 cups each) and bake until a tester comes out clean; let the cakes cool completely before handling.
- Use a cake leveler to remove the crown from the 6-inch round layer to create a perfectly flat surface.
- Tint approximately 1/2 cup of the buttercream with black icing color and prepare piping bags with tips 2A and 12.
- Anchor the 6-inch cake to an 8-inch cake circle with a dab of frosting, spread a layer of white buttercream on top, and carefully stack the ball cake.
- Mound white icing at the junction of the two cakes using an angled spatula, blending them into one continuous, flowing shape with vertical strokes.
- Pipe two large pull-out arms on the sides using the 2A tip, then add oval eyes and a surprised mouth using the black icing and tip 12.
Notes
To ensure a pristine white finish, consider applying a thin crumb coat and chilling the stacked cake for 20 minutes before performing the final sculpt. If the black icing develops small peaks when piping the face, a light touch with a finger dipped in cornstarch will flatten them perfectly without smearing the color.
- Prep Time: 45 mins
- Cook Time: 45 mins
- Category: Dessert
- Method: Baking
- Cuisine: American
The Ghost Cake Flavor Arsenal

To build this spirit, we need a foundation that can handle the weight of a 3D structure while maintaining a moist, tender crumb. We are using six cups of your favorite batter—whether that is a rich vanilla or a deep chocolate—to ensure the pans are filled to the perfect level for stacking. This is the moment to choose a recipe that has some backbone; we need a crumb that is sturdy enough to be leveled and stacked without crumbling under the pressure of the buttercream. Quality matters here because the cake itself provides the physical support for our ghostly shape.
- The Foundation Batter: Six cups of batter divided between a 6-inch round and a ball pan for that iconic height.
- High-Stability Buttercream: This is our mortar and our paint. We need a frosting that is stiff enough to hold its shape but smooth enough to blend.
- Black Icing Tint: For that void-like darkness in the eyes and mouth that creates a stunning contrast.
- Structural Tools: An 8-inch cake circle for stability and a 9-inch angled spatula for sculpting the curves.
- Decorating Tips: The 2A large round tip for those thick, pull-out arms and the Tip 12 for the precision work on the face.
The chemistry of this cake depends on the buttercream being the right temperature. If it is too soft, our ghost will look like it is melting; if it is too hard, you won’t get that smooth, ghostly flow. We are looking for that perfect ‘medium’ consistency that allows for both structural stacking and artistic smoothing.
How to Build the Ghost
Step 1: Prep and Bake the Foundations
Start by heating your oven and prepping your pans with plenty of grease and flour. Pour three cups of your chosen batter into the 6-inch round pan and the other three cups into the 3D ball pan. Baking these separately ensures they cook evenly. Once they are out of the oven, let them cool completely—if there is even a hint of heat left, your buttercream will slide right off, and your ghost will lose its haunting shape.
Step 2: Leveling for Stability
Once the cakes are cold, use your cake leveler to take the crown off the 6-inch layer. We need a perfectly flat surface for the ball cake to sit on. If the base is wonky, the whole ghost will lean, and while a leaning ghost might seem ‘spooky,’ it is not the structural triumph we are after. Take your time here; precision in the leveling phase makes the stacking phase a breeze.
Step 3: Tinting and Prepping the Palette
Take about half a cup of your buttercream and tint it with that deep black icing color. You want it to look like midnight. Keep the rest of the icing a bright, crisp white. Prepare your decorating bags with Tip 2A for the arms and Tip 12 for the facial features. Having these ready before you start stacking prevents you from having to stop and start, which keeps the buttercream consistency uniform.
Step 4: The Structural Stack
Place your leveled 6-inch cake onto the 8-inch cake circle. Spread a healthy layer of white buttercream over the top—this acts as the glue. Carefully position the 3D ball cake on top of the round layer. You now have the basic silhouette of your ghost. It looks a bit like a snowman right now, but trust the process; the sculpting phase is where the magic happens.
Step 5: Sculpting the Spectral Form
Using your angled spatula, mound white icing at the junction where the two cakes meet. You want to blend the round base and the spherical top into one continuous, flowing shape. Don’t worry about it being perfectly smooth yet; focus on the silhouette. Work from the top down, dragging the spatula in long, vertical strokes to mimic the look of a sheet or a floating spirit. The goal is to make the two cakes look like one single entity.
Step 6: Adding Personality and Life
With your 2A tip, pipe two large ‘pull-out balls’ on the sides to create the ghost’s arms. Start with a heavy squeeze and pull away as you release pressure to give them a tapered look. Finally, use the black icing and Tip 12 to pipe two oval eyes and a surprised mouth. If the black icing has any peaks, dip your finger in a tiny bit of cornstarch and gently pat it smooth for a professional, clean finish.
Riley’s Secret Haunts

One of the most powerful moves you can make when building a 3D cake is the crumb coat. Before you go in with your heavy sculpting icing, apply a very thin layer of buttercream over the entire stacked cake and pop it in the fridge for 20 minutes. This traps all the loose crumbs and gives you a solid, non-slip surface for your final decorative layer. If you want a really deep flavor profile for your base, consider using my chocolate-fudge-cake as the foundation—the dark crumb looks amazing when someone cuts into the white ghost. Also, make sure your black icing is tinted at least an hour before use; the color deepens over time, giving you a much more dramatic contrast. For more inspiration on structural builds, you can check out the techniques used in this Wilton ghost guide.
Possess Your Cake
If you want to take this experiment even further, why not try a ‘Neon Spirit’ variation? Instead of white icing, use a bright electric green or a shocking purple. This gives the ghost a more radioactive, modern vibe that stands out at a late-night bash. Another daring move is to hollow out a small portion of the 6-inch layer before stacking and fill it with red fruit filling or sprinkles for a ‘gory’ or ‘festive’ surprise when the first slice is served. For those who love a more classic aesthetic, you could use the piping techniques from my vintage-cake to add ruffles to the bottom of the ghost, making it look like a Victorian spirit. You could even add a little edible glitter to the white icing to give it a shimmering, ethereal glow under party lights.
Showtime for the Spirits

To truly capture the ‘explosive’ visual potential of this cake, serve it on a dark slate board or a matte black cake stand. This makes the white ghost practically pop out of the darkness. If you are feeling extra adventurous, place some dry ice in a bowl of warm water behind the cake just before guests arrive to create a low-crawling fog effect. This cake is quite tall, so when it comes to slicing, treat it like one of my heart-cake designs—slice horizontal layers from the top down rather than traditional wedges. Pair this with a dark roast coffee or even a smokey bourbon to complement the sweetness of the buttercream and the richness of the cake. It is the ultimate centerpiece for a party where you want the food to be the main event.
The Final Disappearing Act
Building this Ghost Cake is a triumph of imagination over tradition. It proves that with just two simple pans and a bit of structural daring, you can create something that is truly spectacular. Don’t be afraid to let your ghost have a little personality—maybe its mouth is wide in a scream, or maybe it has a mischievous wink. That is the beauty of small-batch baking; every creation is a unique experiment. If you had a blast with this build, check out my other celebration-cakes for more ways to push your baking boundaries. Be sure to share your spectral creations with the community and let’s keep the flavor revolution going!
Find more inspiration and share your results on Pinterest, Instagram, Facebook, and TikTok.
