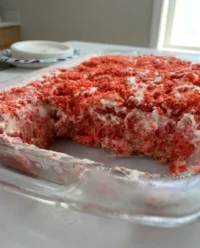
I was vibing to a classic Frank Ocean track when the light hit my kitchen counter just right, and suddenly I knew I had to bake something that felt like a summer sunset in Malibu. This Frank Ocean Cake isn’t just a dessert; it’s a fearless experiment in texture and atmosphere that challenges every boring baking rule you’ve ever heard. We are talking about a literal beach scene captured in sugar and gelatin, designed for those of us who think a cake should be as much of a statement piece as a vinyl record collection. It is a bold, jaw-dropping project that proves small-batch artistry can be revolutionary if you have the patience to build a masterpiece layer by layer.

This recipe is a four-day marathon of creativity that results in a stunning visual triumph, combining soft cake with a structural gummy ocean that defies gravity. If you’ve been looking for a way to break out of the standard buttercream box, this architectural wonder is your ticket to flavor rebellion. We are marrying tropical melon notes with a salty-sweet aesthetic that will leave your guests absolutely speechless. Get ready to dive into a baking challenge that is as much about engineering as it is about taste, because we are creating something truly unique today.
A Masterpiece for the Flavor Rebels
Why settle for a plain vanilla slab when you can build a literal coastline on a cake board? This Frank Ocean Cake is the ultimate flex for any home baker who wants to prove their technical chops while staying true to a modern, aesthetic vibe. First off, the visual impact is simply explosive. The contrast between the sandy graham cracker crumbs and the translucent, deep blue gummy ocean creates a sensory experience that most people only see in professional food photography. It is a daring piece of art that invites people to look closer and wonder how the heck you pulled it off without the whole thing collapsing into a blue puddle.
Beyond the looks, the flavor profile is a brilliant surprise that keeps people guessing. We are using a hint of mermaid and melon flavoring that perfectly complements the creamy vanilla base, giving the whole cake a tropical, breezy feel that matches the beach theme. The cake itself is incredibly moist thanks to the addition of Greek yogurt, providing a rich, dense crumb that can hold up under the weight of our ambitious decorations. It is a spectacular balance of traditional baking science and modern flavor innovation. When you serve this, you aren’t just giving people a slice of cake; you are giving them a story of a four-day creative journey that resulted in something remarkable.
Finally, this recipe celebrates the joy of the slow build. In a world of ‘instant’ everything, there is something deeply satisfying about a project that takes time. From the modeling chocolate palm trees that need to set overnight to the double-wrapped acetate mold for the ocean, every step is an act of intentionality. It is a powerful reminder that the best things—whether they are albums or cakes—take time to perfect. This is for the baker who loves the process as much as the result, the one who finds peace in the meticulous indents of a chocolate leaf or the careful crumbling of gelatin chunks.
Print
Frank Ocean Cake
- Total Time: 4 days
- Yield: 12 servings
- Diet: Vegetarian
Description
This architectural masterpiece captures a serene beach scene with a structural gummy ocean and edible modeling chocolate palm trees. Perfect for advanced bakers, this four-day project combines tropical melon flavors with a striking visual aesthetic that pushes the boundaries of traditional cake design.
Ingredients
- Dark and white chocolate chips
- Corn syrup
- All-purpose flour
- Granulated sugar
- Unsalted butter
- Large eggs
- Full-cream milk
- Vegetable oil
- Greek yogurt
- Vanilla bean paste
- Melon or mermaid flavoring
- Fine salt
- Blue, teal, and lime food gel colors
- Unflavored gelatin powder
- Graham crackers, crushed
- Vanilla frosting
- Cake pop sticks
Instructions
- Combine melted chocolate with corn syrup to create modeling chocolate and let it firm up at room temperature.
- Whisk dry ingredients with butter, then incorporate eggs, milk, oil, yogurt, and flavorings before dividing and coloring the batter.
- Bake layers at 275°F (140°C) for 50-60 minutes and chill overnight.
- Slice cakes into thin layers and stack with rings of colored frosting, then apply a crumb coat and chill for two hours.
- Carve a slope into the side of the cake, frost smoothly, and chill until firm.
- Prepare multi-toned blue gelatin chunks by blooming and dissolving gelatin in sweetened water, then mashing once set.
- Wrap the cake twice with acetate and pack the gelatin chunks onto the slope before pouring a final batch of liquid gelatin over them.
- Chill for at least six hours until the gummy ocean is solid.
- Construct modeling chocolate palm trees using cake pop sticks and attach them to the cake.
- Remove acetate and finish by decorating with graham cracker sand and paper beach chairs.
Notes
For the most realistic sand texture, pulse your graham crackers until they are fine but still have a few larger pieces for variety. If you find the gelatin is leaking through the acetate, quickly press some thick buttercream around the base of the wrap to create an emergency seal before it sets.
- Prep Time: 4 hours
- Cook Time: 1 hour
- Category: Dessert
- Method: Baking
- Cuisine: American
The Flavor Arsenal

To build this coastal wonder, you need a specific set of tools and ingredients that go beyond the basic pantry staples. We are playing with structural components here, so quality is everything when you are aiming for a result this bold. The foundation is a high-moisture cake batter that uses full-cream milk and vegetable oil to guarantee a soft texture that stays fresh even after a few days in the fridge. We also bring in Greek yogurt for that slight tang and incredible crumb structure that makes the cake feel substantial enough to support our gummy sea.
- The Modeling Chocolate Components: We use both dark and white chocolate chips combined with corn syrup to create a pliable, clay-like material. This is the secret to those realistic palm trees; it is much more stable and flavorful than standard fondant.
- The Gummy Ocean Gelatin: You will notice a massive amount of gelatin in the Gummy Ocean Jelly section—this is not a mistake. We need a gummy bear-like consistency to prevent the ocean from collapsing when we remove the acetate wrap.
- The Sand and Surf: Graham crackers provide the perfect golden ‘sand’ texture, while blue and teal food gels allow us to create a gradient of ocean depths, from the dark deep sea to the light shallows near the shore.
- The Flavor Enhancers: Vanilla bean paste and that optional mermaid or melon flavoring add a layer of complexity that makes the cake taste as blue as it looks. Don’t skip the fine salt in the cake batter; it is crucial for balancing the sweetness of the sugar and the frosting.
Working with these ingredients requires a bit of a ‘what if’ mindset. What if we used enough gelatin to make the water structural? What if we used craft paper for the chairs to add a tactile element? This is where the magic happens. By choosing ingredients that serve both a flavor and a functional purpose, we create a cake that is as sturdy as it is delicious.
Let’s Build This
Step 1: Crafting the Edible Architecture
Start by making your modeling chocolate. Melt your chocolate in the microwave in short bursts, then fold in your room-temperature corn syrup. Do not overmix or it will split and become an oily mess! Wrap it tightly and let it sit at room temperature until it is firm but pliable. This creates the ‘clay’ we will use later for our trees.
Step 2: Baking the Multi-Colored Layers
Whisk your dry ingredients, then mix in the butter until you have a sandy texture. Add your wet ingredients—eggs, milk, oil, yogurt, and flavorings—and mix until smooth. Divide the batter into three bowls, coloring one teal, one blue, and leaving one plain. Bake these in your lined tins at 275°F (140°C) for about 50-60 minutes. Let them chill overnight; cold cakes are much easier to handle!
Step 3: Leveling and Layering
Once chilled, trim the tops off your cakes and slice each in half to create six thin layers. Pipe rings of teal, blue, and white frosting between each layer to create a hidden pattern inside. Give the whole thing a thin crumb coat of frosting and chill it again for at least two hours to trap those crumbs.
Step 4: Carving the Coastline
Use a sharp knife to cut a gentle slope into one side of the cake. This is where your ocean will live! Frost the entire cake again, including the slope, making it as smooth as possible. Chill this until the frosting is rock hard. This stability is vital for the next step.
Step 5: Preparing the Gummy Crumble
Mix your first batch of gelatin with cold water, let it bloom, then dissolve it in boiling water and sugar. Split this into three bowls with varying shades of blue. Once set, use a fork to mash it into ‘chunks.’ This creates the look of turbulent, crashing water beneath the surface.
Step 6: The Great Ocean Pour
Wrap your cake tightly with acetate, going around twice to make a waterproof seal. Pack your blue gelatin crumbles onto the slope. Now, make the final ‘Gummy Ocean Jelly’ batch. Carefully pour this over the crumbles inside your acetate mold. Refrigerate for at least six hours until the gummy portion is completely firm.
Step 7: Sculpting the Palms
Roll out your dark modeling chocolate and wrap it around bent cake pop sticks to make trunks. For the leaves, cut leaf shapes out of your lime-colored modeling chocolate, indent them with a knife for realism, and let them dry over a curved surface so they look like they are blowing in the wind.
Step 8: Final Beach Assembly
Carefully peel away the acetate. Press crushed graham crackers around the base and on top to create your beach. Melt a little chocolate to ‘glue’ your palm tree leaves to the trunks, then anchor the trees into the cake. Add your paper beach chairs, and you have a literal island paradise on a plate.
Riley’s Hacks for a Perfect Beach

If your modeling chocolate starts acting like a spoiled brat and becomes crumbly or impossible to knead, don’t panic. Gently warm it in the microwave for five seconds at a time until it regains its stretch. If it gets too oily, let it cool down and try again with cooler hands. Another pro move is to use a double layer of acetate and then wrap the whole thing in plastic wrap like a mummy before you pour the jelly. This guarantees you won’t have blue liquid leaking all over your fridge.
When you are working on high-concept designs like this, having the right inspiration is key. If you are looking for more playful shapes, check out my guide on the aesthetic-dog-cake to see how I handle complex carving. Also, remember that the gummy ocean is very firm—it is designed for structural integrity rather than a soft mouthfeel. Warn your guests that the ‘water’ is more like a giant gummy bear so they know what to expect when they take a bite!
Flavor Experiments to Try
You can easily twist this recipe to fit different moods. For a ‘Channel Orange’ vibe, try swapping the blue food gel for vibrant orange and yellow tones, and use a citrus-based flavoring like blood orange or tangerine in the cake layers. You could even use crushed gingersnaps instead of graham crackers for a darker, spicier ‘volcanic’ sand. If you want something even more classic, you could apply these beach techniques to a more traditional base like my vintage-cake for a mash-up of old-school textures and modern coastal aesthetics.
For a boozy version that Frank Ocean might appreciate, replace a portion of the milk in the cake batter with a splash of coconut rum. This will amplify the tropical melon notes and give the whole experience a more ‘vacation in a glass’ feel. Just make sure you don’t add too much liquid, or you will mess with the structural integrity of the cake layers. Experimenting with the ‘water’ colors is also fun—imagine a deep purple ‘midnight’ ocean for a more moody, late-night aesthetic.
Showtime and Plating

When it is time to serve this spectacular creation, the lighting is everything. Place the cake where the light can hit the gummy ocean, making it glow from within like a real tropical sea. I love serving this on a minimalist white platter to let the colors pop, perhaps with a few extra graham cracker ‘sand’ dunes scattered around the base for effect. If you are throwing a larger party, you can check out my other celebration-cakes for ideas on how to build a full dessert table around this coastal centerpiece.
For the ultimate experience, pair a slice of this cake with a cold glass of coconut water or a light, fizzy prosecco to cut through the richness of the buttercream. If you want to see another take on the ‘beach cake’ aesthetic, you can find some fantastic inspiration over at The Scran Line which really pushes the boundaries of themed baking. This cake is a conversation starter, so be prepared to explain the gummy ocean physics to every single person who takes a bite!
Keep Experimenting
Building this Frank Ocean Cake is a marathon, but the look on people’s faces when they see that gummy ocean is worth every single minute of effort. It is a powerful testament to what happens when you decide to be fearless in the kitchen and ignore the ‘easy’ route. Whether you are a die-hard fan of the music or just a fan of bold, modern design, this cake is a triumph of small-batch creativity. If you loved this technical challenge, you might also enjoy my heart-cake which uses similar carving techniques for a totally different vibe. Don’t forget to share your creations with me and the rest of the flavor-rebel community!
Follow my latest experiments and join the conversation on Instagram, Pinterest, and TikTok. Keep pushing those boundaries and never be afraid to bake something that people said was impossible.

