In French pâtisserie, we often speak of *trompe-l’œil*—the art of deceiving the eye. While traditionally reserved for realistic fruit sculptures, this concept has found a playful, graphic resurgence in the modern kitchen. By applying precise black outlines to a dimensional dessert, we create a living illustration, blurring the line between a sketch and a slice.

This cartoon cake relies on a stable vanilla foundation and a crusting buttercream to achieve that essential matte, paper-like finish. The technique requires a steady hand and a bit of patience, but the result is a whimsical centerpiece that looks as though it has been plucked directly from a comic book page.
A Masterpiece of Illusion
Unlike traditional cakes that strive for soft, organic edges, this design celebrates high contrast and graphic definition. It creates a stunning visual trick that delights both children and adults, making it a perfect conversation piece for celebrations.
Beyond its look, this recipe offers a masterclass in buttercream smoothing. To achieve the 2D effect, the base frosting must be impeccably flat, providing the perfect canvas for your piping work. It is an excellent way to refine your bench scraper skills while creating something genuinely joyful.
Print
Cartoon Cake
- Total Time: 1 hour 20 mins
- Yield: 12 servings
- Diet: Vegetarian
Description
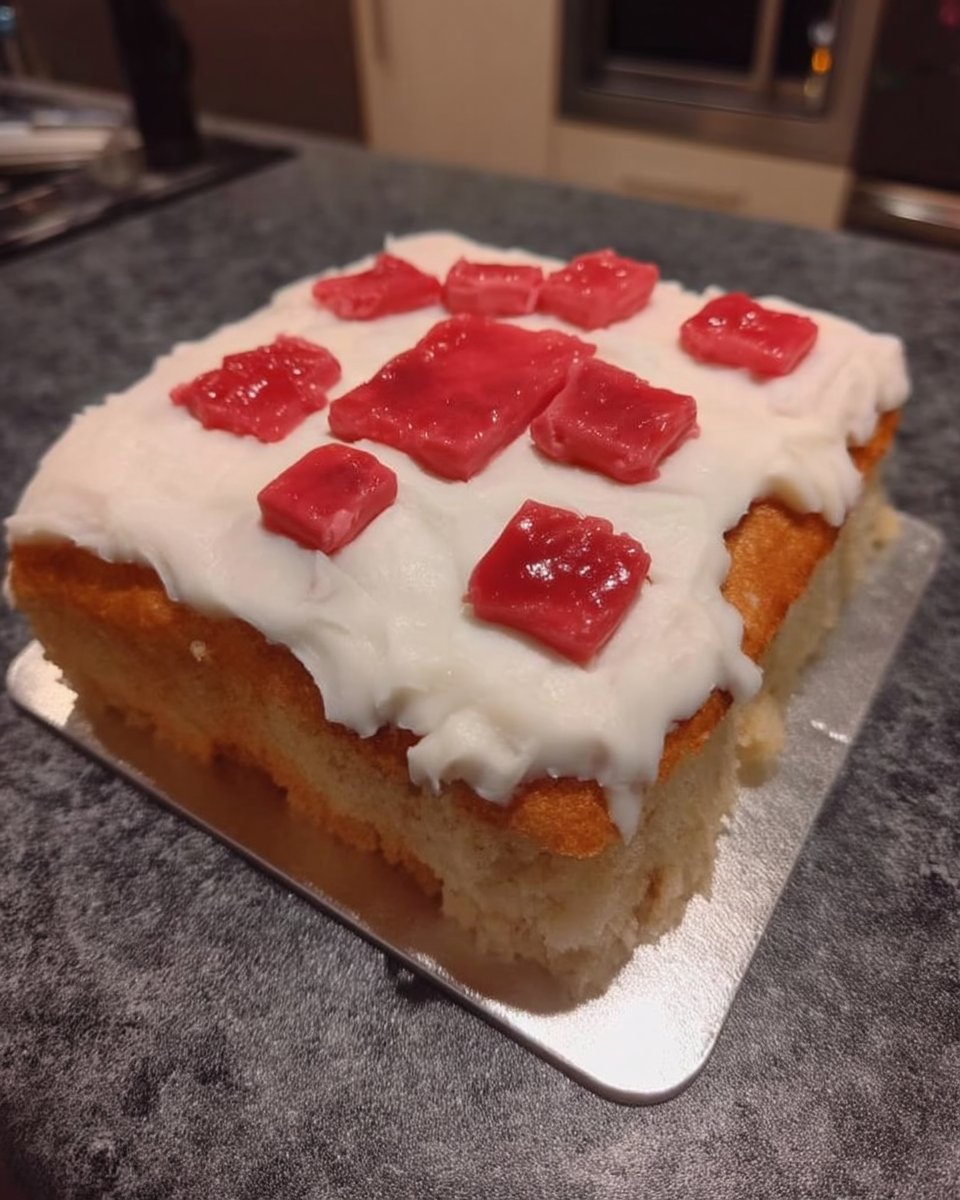
Bring a comic book to life with this stunning 2D Cartoon Cake featuring bold black outlines and a vibrant matte finish. This recipe guides you through the technical steps of smoothing frosting and precision piping to create a mind-bending edible illusion.
Ingredients
- 8-inch vanilla buttermilk cake rounds
- American buttercream frosting
- Gel food coloring (Electric Green, Deep Pink, Super Black)
- Pink candy coating melts
- Black candy coating melts
Instructions
- Pipe black candy coating heart outlines onto parchment paper, fill the centers with melted pink coating, and refrigerate until set.
- Fill and crumb coat the cake layers, then apply a thick layer of green frosting and smooth the surface using a heated metal bench scraper.
- Pipe a pink scalloped border around the top edge and use black buttercream with a Size 3 round tip to outline every major edge and curve of the cake.
- Add black-outlined frosting dollops to the top and insert the prepared candy hearts to complete the graphic 2D effect.
Notes
For the cleanest lines, keep a damp cloth nearby to wipe your piping tip frequently, preventing any buildup of dried frosting. If your kitchen is warm, pop the cake back in the freezer for 5 minutes if the black outlines start to sag or lose their crispness.
- Prep Time: 45 mins
- Cook Time: 35 mins
- Category: Dessert
- Method: Baking
- Cuisine: American
Essentials for the Graphic Look

To achieve the clean lines required for this effect, ingredient consistency is paramount. We are building a structure, not just a dessert.
- Vanilla Buttermilk Cake: You will need a sturdy cake that can withstand handling. I recommend a dense, moist vanilla buttermilk sponge (8-inch rounds work best for this scale).
- American Buttercream: While I often prefer Swiss Meringue, a classic American buttercream creates a “crusting” finish that is easier to smooth into a matte surface, essential for the paper-like aesthetic.
- Gel Food Coloring: Liquid dyes will alter the texture of your frosting. Use high-quality gels in Electric Green, Deep Pink, and Super Black to maintain stability.
- Candy Coating (Melts): For the decorative hearts, we use pre-colored pink and black coating. It provides a structural element that stands upright, adding to the pop-up book effect.
- Specialized Tools: A metal bench scraper is non-negotiable for smooth sides. You will also need piping tips (Size 3 for outlines, Size 2 for details) and a turntable for steady rotation.
Executing the 2D Technique
Step 1: Crafting the Candy Hearts
Start with the decorative elements so they have time to set. Melt your black candy coating in small increments until smooth. Using a piping bag with a small tip, pipe the outlines of hearts onto a parchment-lined sheet. If the coating is too fluid, allow it to cool for a minute to thicken. Once the outline sets, fill the centers with melted pink coating. Chill these in the refrigerator until firm.
Step 2: The Base Canvas
After baking and cooling your cake layers, fill and crumb coat them with vanilla buttercream. For the final coat, apply the green frosting generously. The secret to a glass-like finish is temperature: chill the frosted cake for 10 minutes, then glide a hot metal bench scraper (dipped in hot water and dried) over the surface. This melts the outer microlayer of fat, creating a perfectly smooth, cartoon-like surface.
Step 3: Piping the Illusion
Pipe a scalloped border around the top edge using pink frosting and a large round tip (like a Tip 12), smoothing it flat with an offset spatula. Then, fit a piping bag with black buttercream and a Tip 3. This is where the magic happens: outline every major edge—the top rim, the bottom base, and the curves of the pink scallops. The black lines act as the “ink” of your drawing.
Step 4: Final Graphic Details
Pipe small black circles on the pink frosting to mimic sprinkles, filling them with various colors. Finally, pipe six large dollops of frosting on top, outline them in black, and insert your chilled candy hearts. These vertical elements complete the 3D-to-2D transformation.
Precision in Piping

- The Hot Scraper Technique: I cannot stress this enough—the illusion fails if the frosting is textured. Using a heated metal scraper ensures the base looks like a flat sheet of paper rather than whipped frosting.
- Chill Before Outlining: Before you begin the black piping work, chill the cake for at least 20 minutes. A firm canvas prevents the black line from sinking into the green or pink frosting, keeping the lines crisp and “ink-like.”
- Correct Consistency: Your black buttercream must be soft enough to flow without breaking but stiff enough to hold a round shape. If your hand shakes or the line breaks, stop, scrape off that small section with a chilled knife, and retry. For more complex structural designs, you might look at our celebration cakes for inspiration on stability.
Artistic Interpretations
- Monochrome Sketch: For a starker, more mature look, use a white base with black outlines only. It resembles a pen-and-ink drawing and looks incredibly chic.
- The Slice: Instead of a whole cake, apply this technique to a single slice placed on a plate. Outline the cut edges of the layers and filling for a surreal “piece of cake” effect.
- Flavor Infusions: While the exterior requires American buttercream, the interior layers can be anything you desire. A lemon curd filling or a dark chocolate ganache adds a lovely surprise behind the playful exterior. If you enjoy shaping cakes, you can apply this same outlining method to our heart cake for a romantic comic book vibe.
Presenting the Illusion

To maximize the optical illusion, serve this cake on a simple, solid-colored plate—white is usually best. A busy pattern on the serving platter can distract from the black outlines.
When slicing, wipe your knife clean between every cut to keep the interior layers distinct. For a fun contrast, you might serve this alongside a very traditional, rustic dessert, or perhaps browse chocolaty.in for other whimsical character ideas to accompany your table. If you prefer a more nostalgic presentation, compare this modern style with our vintage cake recipes.
The Final Stroke
Baking is usually about taste and texture, but the Cartoon Cake reminds us that it is also a visual art. There is a profound satisfaction in stepping back and seeing a physical object that looks like a drawing. It captures the imagination and proves that with a little precision, we can bend reality—at least until dessert is served.
For another project that plays with structure and form, try your hand at our car cake.
