I remember sitting on a tall wooden stool in Grandma’s kitchen, my legs swinging as she pulled a tattered blue recipe card from her box. She always said that the best treats were the ones that made you smile before you even took a bite. This Cookie Monster Cake reminds me of those simple, joyful afternoons spent waiting for the oven timer to ding and the scent of sweet chocolate filling the air.

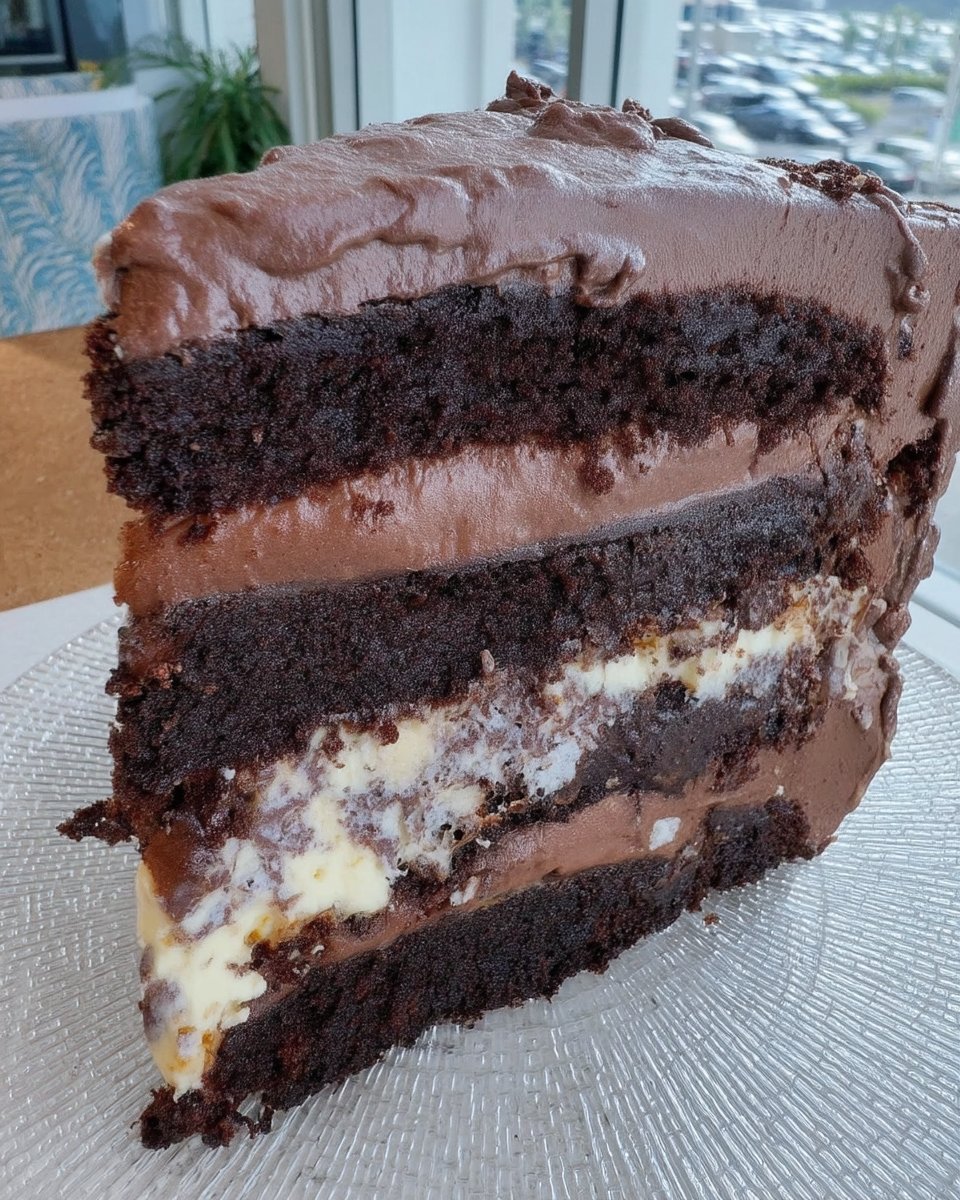
This cake is a playful celebration of everything we loved as children, brought to life with a tender chocolate crumb and layers of whimsical frosting. It combines the nostalgia of raw cookie dough with the timeless crunch of Oreos, all wrapped in a vibrant blue buttercream. It is a heartfelt centerpiece that proves baking doesn’t always have to be serious to be absolutely delicious.
The Magic of This Playful Creation
There is something truly special about a dessert that captures the imagination while satisfying a deep craving for classic flavors. This cake is a double-decker delight that honors the simple joy of a cookie jar. By using a triple chocolate base, we create a deep, rich foundation that stands up beautifully to the sweet, nostalgic frostings tucked inside.
The magic lies in the contrast of textures. You have the soft, moist chocolate cake paired with a dense, buttery cookie dough frosting that tastes just like the spoonfuls we used to sneak from the mixing bowl. Then, the whole thing is balanced by a light, airy Oreo buttercream and a decadent chocolate ganache drip. It is a heritage recipe updated for modern celebrations, ensuring that every slice brings a bit of wonder to the table.
We focus on small-batch quality even when the cake looks grand. This isn’t just about the bright blue color; it’s about the quality of the whole milk in the batter and the way we cream the butter until it’s just the right consistency. It is a reliable, tested recipe that feels like a warm hug from the past, designed to be shared with the people you love most. It reminds us that the best memories are often baked right into the layers of a homemade cake.
Print
Cookie Monster Cake
- Total Time: 1 hour 15 mins
- Yield: 12 servings
- Diet: Vegetarian
Description
This vibrant Cookie Monster Cake features layers of moist triple chocolate sponge separated by a rich, edible cookie dough filling. Wrapped in a bright blue Oreo-studded buttercream and topped with a decadent chocolate drip, it is the ultimate whimsical treat for any celebration.
Ingredients
- 2 boxes triple chocolate cake mix
- Whole milk
- Unsalted butter, softened
- Farm-fresh eggs
- Light brown sugar
- Vanilla extract
- Salt
- Heat-treated flour
- Powdered sugar
- Mini chocolate chips
- Heavy cream
- Oreo cookies
- Blue gel food coloring
- Semi-sweet chocolate chips
- Mini Chips Ahoy cookies
Instructions
- Preheat your oven to 350 degrees Fahrenheit and grease three 9-inch round cake pans, lining the bottoms with parchment paper for easy removal.
- In a large glass bowl, combine the cake mixes, whole milk, softened butter, and eggs, mixing until the batter is smooth and luscious.
- Divide the batter evenly among the three pans and bake for 25 to 30 minutes, or until a toothpick inserted into the center comes out clean.
- Allow the cakes to rest in the pans for ten minutes before transferring them to wire racks to cool completely.
- Prepare the cookie dough frosting by creaming softened butter and brown sugar, then stirring in vanilla, salt, heat-treated flour, powdered sugar, and mini chocolate chips.
- Whip the Oreo buttercream by beating butter and powdered sugar with heavy cream and vanilla, then folding in crushed Oreos and blue gel food coloring.
- Create the chocolate ganache by pouring heated heavy cream over chocolate chips, letting it sit for a minute, and whisking until glossy.
- Assemble the cake by layering the chocolate sponges with the cookie dough filling in between.
- Frost the entire cake with blue Oreo buttercream, add the chocolate ganache drip around the edges, and decorate with cookies to create the monster face.
Notes
For the best structural integrity, ensure your cake layers are completely cold before you begin the assembly process. You can heat-treat your flour easily by spreading it on a baking sheet and heating it in the oven at 350°F for about 5-7 minutes to make it safe for the cookie dough filling. If your blue frosting is too soft, refrigerate it for 15 minutes to help it hold its shape during piping.
- Prep Time: 45 mins
- Cook Time: 30 mins
- Category: Dessert
- Method: Baking
- Cuisine: American
What You’ll Need From the Pantry

Baking a cake like this starts with honest, simple ingredients found in most heritage kitchens. We rely on the staples that have served home bakers for generations, focusing on quality to bring out the best in every bite. When you gather these items, imagine you are preparing for a quiet Sunday afternoon of baking, where time slows down and the kitchen becomes the heart of the home.
- Triple Chocolate Cake Mix: We use two boxes to ensure a tall, impressive height. The richness of the chocolate provides a smoky depth that pairs perfectly with the sweet frostings.
- Whole Milk: Grandma always insisted on whole milk for its fat content, which yields a much more tender and moist crumb than water ever could.
- Unsalted Butter: Using softened butter instead of oil gives the cake a traditional, pound-cake-like weight and a flavor that is unmistakably homemade.
- Farm-Fresh Eggs: Bringing your eggs to room temperature before you begin allows them to emulsify more smoothly into the batter, creating a uniform texture.
- Blue Gel Food Coloring: To achieve that iconic Cookie Monster hue, gel coloring is best because it provides a vibrant shade without changing the consistency of your buttercream.
- Heat-Treated Flour: For the cookie dough frosting, we gently warm the flour to ensure it is safe to eat, maintaining that authentic raw dough taste we all cherish.
- Mini Chocolate Chips: These small morsels provide a better “mouthfeel” in the frosting, ensuring you get a bit of chocolate in every single forkful without overwhelming the creamy base.
- Heavy Cream: This is the secret to both the fluffy Oreo frosting and the silky smooth ganache that drips down the sides like a work of art.
The Baking Process
Step 1: Prep Your Kitchen
Begin by preheating your oven to 350 degrees Fahrenheit. This allows the heat to stabilize so your cakes rise evenly. Take three 9-inch round cake pans and coat them generously with baking spray. For a perfect release every time, I recommend lining the bottoms with a circle of parchment paper—an old-fashioned trick that never fails.
Step 2: Mix the Chocolate Batter
In a large glass bowl, combine the cake mixes, whole milk, softened butter, and eggs. Use a hand mixer or a sturdy wooden spoon to stir until the batter is smooth and luscious. You want to make sure there are no dry pockets of flour hiding at the bottom of the bowl. Divide the batter evenly between your three prepared pans.
Step 3: The Golden Bake
Place the pans in the center of the oven and bake for 25 to 30 minutes. You will know they are done when a wooden toothpick inserted into the center comes out clean. Once baked, let the cakes rest in their pans for ten minutes before turning them out onto wire racks to cool completely. Patience is a virtue here; a warm cake will simply melt your beautiful frosting.
Step 4: Craft the Cookie Dough Frosting
While the cakes cool, we will make the first filling. Cream together the softened butter and brown sugar until the mixture is pale and fluffy. Stir in a splash of vanilla and a pinch of salt. Gradually add the heat-treated flour and powdered sugar, adding a tablespoon of milk at a time until it reaches a thick, spreadable consistency. Finally, fold in those mini chocolate chips by hand.
Step 5: Whip the Oreo Buttercream
In a clean bowl, beat the remaining butter until it is smooth. Add the powdered sugar slowly to avoid a cloud of sugar in your kitchen. Pour in the heavy cream and vanilla, whisking until the frosting is light and airy. Fold in the crushed Oreo cookies and add your blue gel food coloring drop by drop until you reach the perfect “monster” blue.
Step 6: Prepare the Chocolate Ganache
Heat your heavy cream in a small saucepan over medium heat until it just begins to simmer—do not let it boil. Place your chocolate chips in a heat-safe bowl and pour the warm cream over them. Let it sit for a minute, then whisk gently until you have a glossy, smooth chocolate sauce. Let this cool for about ten minutes so it thickens slightly.
Step 7: Assemble the Layers
Place your first cake layer on a stand. Spread about one cup of the cookie dough frosting evenly across the top. Place the second cake layer on top and repeat the process. Finally, set the third cake layer on top. This creates a wonderful surprise of “dough” between the rich chocolate layers.
Step 8: The Finishing Touches
Frost the top and sides of the entire cake with the blue Oreo buttercream. Use an offset spatula to smooth it out. Carefully drip the cooled ganache around the top edges, letting it run down the sides. Press mini Chips Ahoy cookies around the bottom border. Pipe swirls of blue frosting on top, tucking in whole Oreos and creating the monster’s eyes with a halved Oreo and a chocolate chip.
Secrets from the Recipe Box

One of the most important lessons I learned in a vintage kitchen is the value of patience. When making the ganache, let it cool for at least five to ten minutes before you start the drip. If it is too warm, it will run right off the cake and pool at the bottom. I always like to do a “test drip” on the side of a glass to make sure the consistency is just right.
Another tip for a professional look is to use a cake turntable. It allows you to keep your spatula steady while the cake moves, resulting in those smooth, bakery-style sides we all admire. If you find your frosting is getting too soft in a warm kitchen, don’t be afraid to pop the cake in the refrigerator for twenty minutes to firm everything up. For more ideas on handling delicate layers, you might enjoy reading about our cookies-and-cream-cake which uses similar techniques.
Classic Flavor Twists
While this recipe is a cherished favorite, there are many ways to make it your own while keeping that nostalgic spirit alive. For a slightly more sophisticated palate, you might try using dark chocolate cake mixes to give the base a more intense, less sweet profile. You can also swap the mini chocolate chips in the filling for peanut butter chips if you have a family of peanut butter lovers.
If you prefer a lighter look, you can leave the blue food coloring out and keep the frosting a beautiful, natural cream color, perhaps adding a dash of cinnamon to the cookie dough filling for a “snickerdoodle” twist. For those planning a larger party with multiple themes, this recipe pairs wonderfully with our other celebration-cakes on a dessert table.
At the Table

When it comes time to serve this masterpiece, I suggest keeping things simple and heartfelt. This cake is quite rich, so a small slice goes a long way. It is best enjoyed with a tall glass of cold whole milk or a steaming cup of black coffee to balance the sweetness of the frostings. I love to serve it on vintage floral china to create a beautiful contrast between the modern, bright blue cake and the timeless elegance of the plates.
For a children’s birthday party, you could even create a themed dessert spread by including treats inspired by our minecraft-cake to give the little ones a variety of playful options. Always remember to add the cookies around the bottom of the cake just before you bring it to the table; this keeps them perfectly crisp and prevents them from softening against the moist frosting.
A Final Word
Baking this Cookie Monster Cake is about more than just following a recipe; it is about creating a moment of pure, nostalgic happiness for yourself and those you love. Whether you are celebrating a milestone or simply making a Tuesday afternoon a little brighter, this cake stands as a testament to the enduring power of homemade sweets. It honors the traditions of the past while embracing the playful creativity of the present. If you find yourself looking for more digital-inspired bakes, do take a look at our roblox-cake for your next gathering. I hope this recipe finds a permanent home in your recipe box, just as it has in mine. For more inspiration and a look at the original version of this delightful treat, visit Baking Beauty. We would love to see your creations, so please share them with us on Pinterest, Instagram, or Facebook.
