In the quiet mornings of my early training in Paris, I learned that the most enchanting creations often begin with a simple, reliable foundation. A Frozen Cake is not merely a dessert; it is a meticulous architecture of flavor and artistry, capturing a winter’s breath in sugar and sponge. To master such a piece is to balance the sturdiness of the cake with the delicate nature of hand-sculpted details.

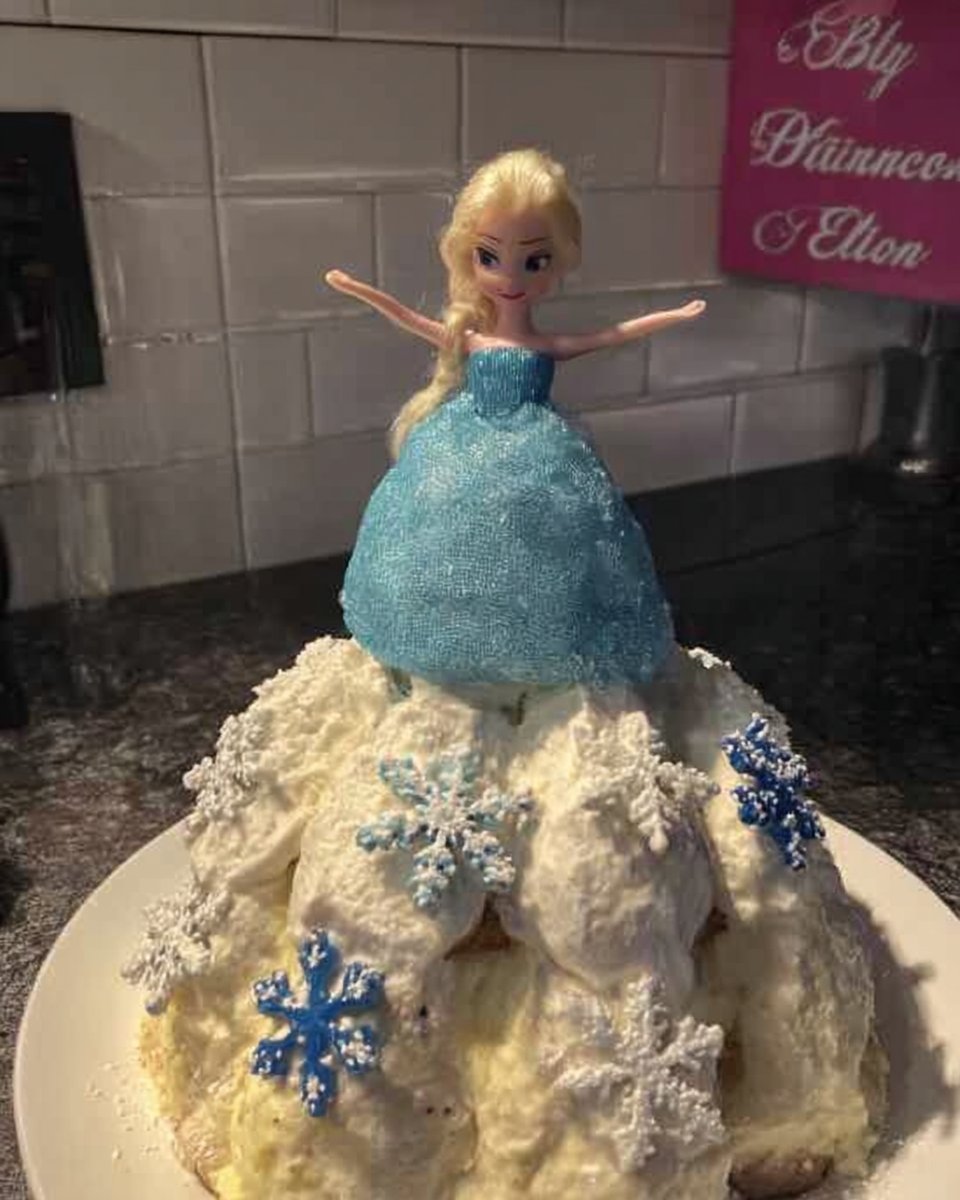
This particular creation brings the beloved characters of Elsa and Olaf to life through refined fondant work and a striking sugar-glass castle. We begin with a moist yoghurt cake base, chosen for its structural integrity when chilled, providing a stable canvas for our intricate decorations. Patience and precision are your primary tools as we build this miniature winter wonderland together.
Mastering the Winter Wonderland
There is a profound satisfaction in creating a centerpiece that feels both grand and intimate. This Frozen Cake allows you to practice several essential pastry skills: cake carving, fondant sculpting, and the high-heat precision of sugar work. Unlike larger, commercial cakes, a small-batch approach allows you to focus on the fine details of Elsa’s silhouette or the whimsical expression on Olaf’s face.
The yoghurt cake base provides a tender crumb that holds its shape beautifully under the weight of the decorations. By freezing the layers before assembly, we achieve a level of stability that makes crumb coating and fondant application far more manageable for the home baker. It is a project that rewards the meticulous, transforming simple ingredients into a narrative-driven masterpiece that will be cherished at any celebration.
Print
Frozen Cake
- Total Time: 4 hours
- Yield: 12 servings
- Diet: Vegetarian
Description
This masterfully designed Frozen Cake features a sturdy yoghurt cake base and intricate hand-sculpted fondant figures of Elsa and Olaf. Complemented by a brittle blue sugar-glass castle and a shimmering coconut snow finish, it is the perfect centerpiece for a winter-themed celebration.
Ingredients
- 1 9-inch (23 cm) yoghurt cake
- 2 4-inch (10 cm) yoghurt cakes
- White fondant
- Blue fondant
- Flesh-toned fondant
- Yellow fondant
- Green fondant
- Black fondant
- Blue gel food coloring
- Granulated sugar
- Glucose syrup
- Water
- Royal icing
- Fine coconut powder
- Edible ink
- Vodka
- Cornstarch
Instructions
- Bake the yoghurt cakes in advance, cool completely, and store in the freezer to ensure a stable, crumb-free surface for carving.
- Sculpt Elsa’s head and torso from flesh-toned fondant, attach a blue fondant skirt, and add details like yellow hair and a fabric cape.
- Create Olaf by stacking three white fondant balls on a toothpick and sculpt green fondant teardrops into trees using scissors to snip branches.
- Combine sugar, water, and glucose syrup in a saucepan and heat to 150°C (302°F), then stir in blue coloring and pour into moulds to create the sugar-glass castle.
- Level the frozen cakes with a serrated knife, apply a thin crumb coat of icing to the 9-inch base and the stacked 4-inch tiers, and chill until firm.
- Cover the tiers in white and marbled blue fondant, stack them carefully, and arrange the fondant figures and sugar-glass castle on top.
- Sprinkle fine coconut powder over the entire cake and board to create a realistic, shimmering snow effect.
Notes
For the most professional results, use a high-quality candy thermometer when boiling the sugar to ensure it reaches the hard-crack stage for the castle. When assembling the fondant figures, allow them to air-dry for several hours before placing them on the cake to prevent any structural sagging.
- Prep Time: 3 hours
- Cook Time: 1 hour
- Category: Dessert
- Method: Baking and Sculpting
- Cuisine: French-inspired
The Elements of a Frosted Realm

To achieve a professional finish, we must start with a foundation of high-quality components. Each element serves a specific purpose in the final presentation.
- Yoghurt Cake Base: Three cakes are prepared in advance. The yoghurt provides moisture and a dense enough structure to support the height of the stacked tiers.
- Fondant and Gel Colors: Use professional-grade fondant for a smooth finish. Gel colors are preferred over liquid ones as they do not alter the consistency of the sugar paste.
- Sugar, Glucose Syrup, and Blue Color: These form the ‘hard crack’ sugar glass for the castle. Glucose syrup prevents crystallization, making certain the castle remains clear and brilliant.
- Royal Icing: This acts as our edible ‘glue’ and creates the appearance of fresh snow on the trees and castle.
- Coconut Powder: A final dusting of fine coconut provides a realistic, shimmering snow texture that is much more sophisticated than simple icing sugar.
- Edible Ink and Vodka: For painting the facial features, gel colors thinned with a drop of vodka allow for fine, watercolor-like control.
The Method of Artful Construction
Step 1: Preparing the Foundation
Bake your yoghurt cakes well in advance. For this design, you will need one 9-inch (23 cm) cake and two 4-inch (10 cm) cakes. Once cooled, wrap them tightly and place them in the freezer. Working with frozen cakes is a professional secret; it prevents crumbs from tearing and makes leveling much more precise.
Step 2: Sculpting Elsa
Begin with the head. Roll a small ball of flesh-toned fondant, gently pressing with your thumbs to create eye sockets and a forehead. Use a small modeling tool to define the nose and chin. For the torso, roll a teardrop shape and flatten the narrow end for the waist. Attach the blue fondant skirt to a wooden support stick, then secure the torso above it. Add the arms and the yellow fondant hair, finishing with a delicate fabric cape.
Step 3: Crafting Olaf and the Trees
Olaf is built from three distinct white fondant balls, stacked and secured with a toothpick. His head requires a slightly indented mouth area where a small piece of black fondant and a white tooth can be placed. For the trees, roll green fondant into a teardrop and use small, sharp scissors to snip ‘branches’ into the sides. A light piping of Royal Icing on the tips suggests a fresh snowfall.
Step 4: The Sugar Glass Castle
In a heavy-bottomed saucepan, combine the sugar, water, and glucose syrup. Heat until the mixture reaches 150°C (302°F), the hard crack stage. Remove from heat immediately, stir in a drop of blue coloring, and pour into your prepared moulds. Once set, these clear, brittle pieces will form the translucent walls of the castle. Handle with care, as sugar glass is incredibly fragile.
Step 5: Assembly and Crumb Coating
Remove your cakes from the freezer and level the tops with a serrated knife. Place the 9-inch cake on your board and apply a thin, smooth layer of icing. This crumb coat traps any loose particles. Stack the two 4-inch cakes with icing between them and coat them similarly. Chill until the icing is firm to the touch before proceeding with the final fondant covering.
Step 6: The Final Presentation
Cover the larger cake in white fondant, perhaps adding a marble of light blue at the base for an icy effect. Cover the smaller tier in white and stack it centered on the large base. Arrange your sculpted figures and the sugar castle. For the final touch, sprinkle coconut powder over the board and tiers to mimic the soft texture of fallen snow.
Precision Secrets for Fondant Mastery

Temperature control is everything when working with a Frozen Cake. If your kitchen is too warm, the fondant may begin to ‘sweat’ as the cake thaws underneath. Work in a cool environment and avoid touching the fondant too much with warm hands. If the fondant becomes sticky, a light dusting of cornstarch is your best ally.
When sculpting the figures, allow the components to dry slightly before assembly. This prevents Elsa’s head from deforming the neck or Olaf’s body from sagging. For more complex structural advice on themed bakes, you might find our guide on building a car cake quite helpful in understanding internal supports. Remember, the beauty of a small-batch bake is the ability to take your time with these refinements.
Refined Twists on a Cold Classic
While the yoghurt cake is a classic foundation, you can adapt the flavors to suit the season. A touch of lavender steeped into the yoghurt or a hint of orange zest in the batter can add a sophisticated floral or citrus note. For those who prefer a more indulgent base, a dense strawberry tres leches cake can be adapted for carving, provided it is properly chilled.
You might also consider replacing the coconut snow with edible silver leaf for a more avant-garde, crystalline appearance. If you choose to use different flavors, make certain the crumb remains tight and stable, as light sponges will not support the weight of the sugar glass castle.
Presentation of a Winter Masterpiece

To honor the effort put into the Frozen Cake, serve it on a chilled silver or white marble platter. The cold surface complements the theme and keeps the cake stable during the party. For a truly magical effect, place a small LED light behind the sugar castle to make the blue ‘ice’ glow from within.
Pair each slice with a delicate white tea or a glass of chilled dessert wine to balance the sweetness of the fondant. For more inspiration on setting a beautiful table for special occasions, view our collection of celebration cakes. You may also find wonderful plating ideas through resources like Manus Menu which celebrates the art of the home baker.
The Art of Small-Batch Magic
Creating a themed cake like this requires a transition from baker to artist. Each step, from the boiling of the sugar to the final dusting of coconut snow, is an act of devotion to the craft. While it may seem daunting, approaching each component as a small, manageable task makes certain the result is nothing short of extraordinary. For your next project, you might consider the delicate balance of our raspberry white chocolate cake. Please share your creations with our community of devoted bakers on Instagram, Pinterest, or Facebook.
