I remember the quiet hum of my aunt’s old refrigerator during those long, golden summers by the lake. Sitting right there on the middle shelf, tucked under a vintage wire mesh dome, was always a simple Strawberry Cheesecake 3. She believed that the finest desserts didn’t need an oven, just the freshest berries from the local patch and a bit of patience. That first cool bite always signaled that June had truly arrived in our family kitchen.

This recipe is a gentle nod to those uncomplicated afternoons where the focus was on the fruit and the fellowship. It features a crisp, buttery biscuit base and a filling so light it feels like a soft summer cloud. By skipping the bake time, we let the natural brightness of the strawberries take center stage, exactly how a heritage dessert should.
The Magic of This Simple Summer Treat
There is something deeply comforting about a recipe that requires no heat, especially when the humidity begins to sit heavy in the air. This cheesecake captures the very essence of a sun-drenched garden. It is a humble dessert, yet it feels like a true celebration of the season’s bounty. You will find that the balance of the rich cream and the tart berries creates a harmony that modern, over-complicated sweets often miss.
I love how this cake comes together without any fuss or worry about cracks and water baths. It is a reliable friend in the kitchen, one that trusts the quality of your ingredients to do the heavy lifting. The texture is velvety and smooth, providing a perfect backdrop for the burst of fresh strawberry in every mouthful. It is the kind of treat that invites you to slow down and savor the moment.
Preparing this for your family feels like sharing a piece of history. It reminds us that dessert doesn’t have to be a grand performance to be memorable. Sometimes, the most cherished memories are made over a simple plate of cream and fruit, shared around a worn wooden table. This cheesecake is a reminder of those simpler times when the quality of the conversation was just as important as the food on the table.
Because it is made in a smaller batch, it feels more like a gift than a chore. There is an intimacy in a dessert that is meant to be finished in one or two sittings while the berries are at their peak. It encourages us to live in the present and appreciate what the earth provides right now. You will love how it brings a touch of vintage charm to your modern kitchen without requiring hours of labor.
Print
Strawberry Cheesecake
- Total Time: 4 hours 20 mins
- Yield: 8 servings
- Diet: Vegetarian
Description
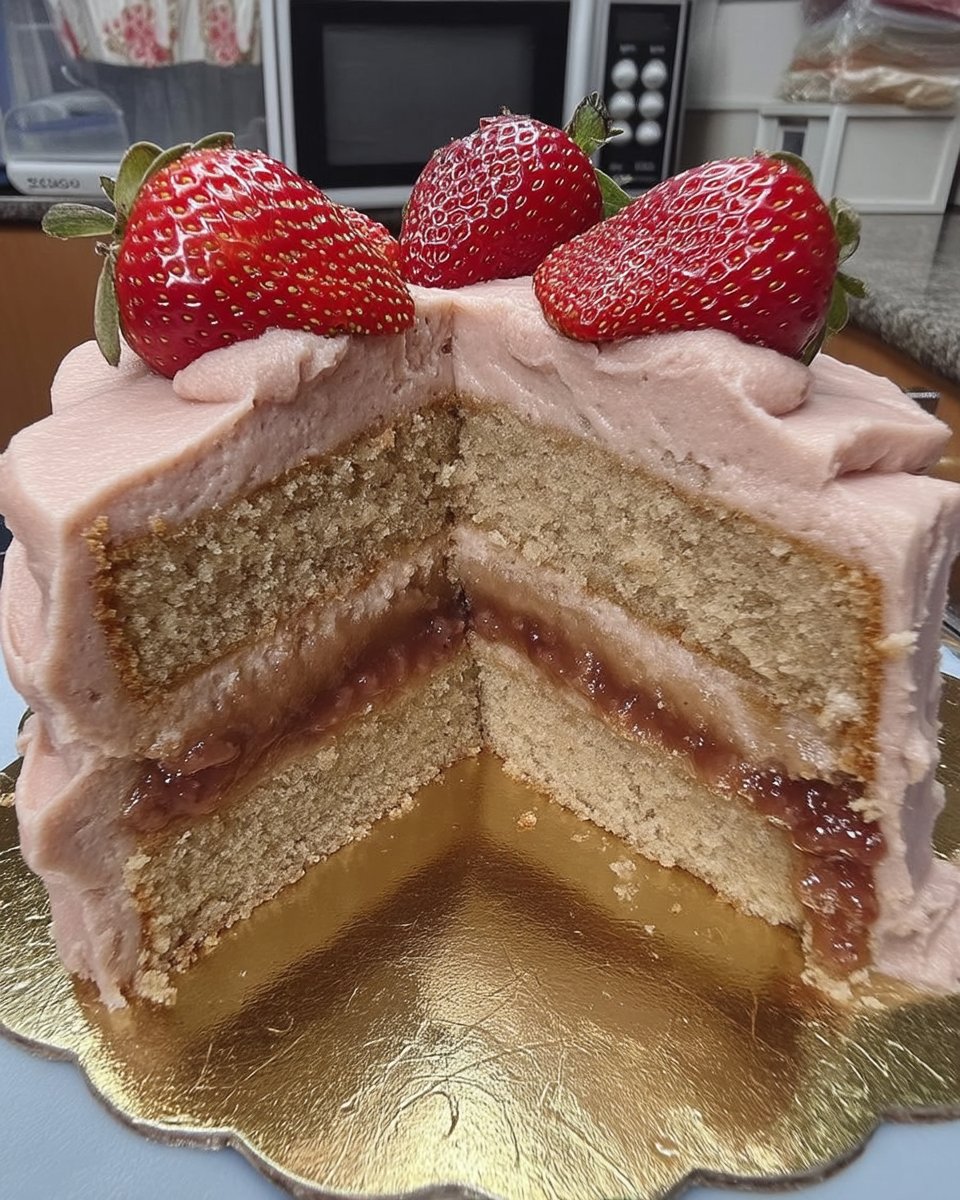
This luscious no-bake strawberry cheesecake features a buttery digestive biscuit crust and a velvety filling folded with fresh, sun-ripened berries. It is a simple yet elegant dessert that captures the essence of summer without ever needing to turn on the oven.
Ingredients
- 250g digestive biscuits, crushed
- 100g unsalted butter, melted
- 600g full-fat cream cheese, softened
- 300ml double cream, cold
- 100g icing sugar, sifted
- 400g fresh strawberries, hulled and divided
Instructions
- Combine crushed digestive biscuits with melted butter and press firmly into the base of a cake tin; chill in the refrigerator.
- Finely chop half of the strawberries and let them drain in a sieve over a bowl to remove excess moisture.
- In a large chilled bowl, whisk together the cream cheese, double cream, and icing sugar until the mixture is very thick and holds its shape.
- Gently fold the chopped, drained strawberries into the cream mixture using a spatula.
- Spread the filling over the chilled biscuit base and smooth the top with an offset spatula.
- Refrigerate for at least 4 hours or overnight to set completely.
- Before serving, carefully remove from the tin and decorate the top with the remaining whole or halved strawberries.
Notes
For the cleanest slices, dip your knife in hot water and wipe it dry before each cut. To ensure a perfect set, always use full-fat cream cheese and make sure your double cream is chilled thoroughly before whisking.
- Prep Time: 20 mins
- Cook Time: 0 mins
- Category: Dessert
- Method: No-Bake
- Cuisine: American
The Pantry Staples for a Perfect Base

Every good cheesecake begins with a foundation that offers a satisfying crunch to contrast the soft filling. For this recipe, we look to the humble digestive biscuit, a classic choice that has graced recipe boxes for decades. These biscuits provide a subtle, malty sweetness that pairs beautifully with the richness of the butter. I always suggest using unsalted butter so you can control the delicate balance of flavors yourself.
- Digestive Biscuits: These are the backbone of our crust, providing a sturdy yet crumbly texture that holds up well under the cream.
- Unsalted Butter: When melted and mixed with the crumbs, it acts as the glue that transforms simple biscuits into a golden, buttery base.
- Full-Fat Cream Cheese: This is where the heart of the dessert lies. I always insist on full-fat versions because they provide the necessary structure and that signature tangy depth.
- Double Cream: This adds a luxurious, airy quality to the filling. It must be cold when you start to ensure it whips up into those beautiful, stiff peaks.
- Icing Sugar: Sifting this is a small but vital step. It keeps the filling perfectly smooth and free of any tiny lumps that might mar the texture.
- Fresh Strawberries: These are the stars of the show. Chopping them finely for the filling allows their juice to mingle with the cream, while the halved berries on top provide a beautiful, rustic finish.
Choosing the right berries makes all the difference in a recipe like this. Look for strawberries that are fragrant and red all the way to the stem. When you chop them, you are releasing their sweetness, so taking the time to drain the excess juice is a little secret that keeps your cheesecake from becoming too soft. It is these small acts of care that turn a simple list of ingredients into something truly special.
The Baking Process
Step 1: Prepare the Biscuit Foundation
Begin by crushing your digestive biscuits into fine crumbs. You can use a food processor, but I often find a bit of satisfaction in placing them in a sturdy bag and using an old rolling pin—it feels more like the old way. Once you have a sandy texture, stir in your melted unsalted butter until every crumb is coated. Press this mixture firmly into the bottom of your tin using the back of a spoon, making sure it is even and tight. Pop this into the fridge to chill; this helps it stand firm when you eventually slice it.
Step 2: Prep the Fresh Berries
Wash your strawberries and pat them dry with a soft towel. Take the portion meant for the filling and chop them into small, dainty pieces. Place these chopped berries into a fine-mesh sieve over a bowl and let them sit for a few minutes. This allows any extra juice to drip away so the filling stays thick and creamy. Do not throw that juice away; it is lovely stirred into a glass of cold water or poured over a bit of morning yogurt.
Step 3: Whisk the Cream and Cheese
In a large, chilled bowl, combine your double cream, the softened cream cheese, and your sifted icing sugar. Use an electric whisk to beat the mixture together. You are looking for it to become very thick and hold its shape well, much like the consistency of soft-serve ice cream. Be careful not to over-mix, but you want it sturdy enough to support the fruit. The scent of the sweet cream and tangy cheese at this stage is absolutely heavenly.
Step 4: Fold in the Fruit
Take your drained, chopped strawberries and gently fold them into the cream mixture using a spatula. Use a light hand here; you want to distribute the fruit evenly without deflating all the lovely air you just whipped into the cream. This creates those beautiful pink ribbons and pockets of fruit that make every bite a surprise. It reminds me of how Grandma used to fold her egg whites into her famous sponges—slow and steady.
Step 5: Fill and Smooth
Retrieve your chilled base from the refrigerator. Spoon the cheesecake mixture over the crumbs, spreading it out to the edges. Use the back of your spatula or an offset spatula to smooth the top into a level surface. It doesn’t have to be perfect; a few gentle swirls can add a nice homemade touch. Cover the tin loosely and place it back into the fridge. Patience is your best friend here, as it needs at least four hours, though leaving it overnight is the secret to a perfect set.
Step 6: The Final Flourish
When you are ready to serve, carefully remove the cheesecake from the tin. A small knife run around the inside edge can help it release cleanly. Take your remaining strawberries—leaving some whole for height and halving others for a varied look—and arrange them across the top. This is your chance to be a bit artistic, creating a crown of red fruit that celebrates the simple beauty of the strawberry.
Secrets from the Recipe Box

One of the most important things to remember with a no-bake dessert is the temperature of your ingredients. Your cream cheese should be at room temperature to avoid any tiny lumps, but your double cream must be very cold to whip properly. If the cream is too warm, the filling will never reach that sturdy, ice-cream-like consistency we are looking for. Taking that extra moment to plan ahead makes the whole process much smoother.
Another little trick I learned over the years is about keeping fruit fresh while you work. If your berries are looking a bit dull, a tiny splash of lemon juice can brighten them right up. Also, when you are pressing your base, don’t be afraid to really pack it down. A loose base will crumble away when you try to serve it, and we want those neat, clean slices that show off the layers. For more inspiration on fruit-based desserts, you might find the techniques at Taming Twins Strawberry Cheesecake quite helpful for your next kitchen session.
Classic Variations to Try
While the strawberry is a classic for a reason, you can easily adapt this recipe to suit whatever is growing in your garden or available at the local market. If you find yourself with a surplus of raspberries, they make a wonderful substitute. Their slight tartness cuts through the rich cream beautifully. You might even consider a raspberry white chocolate cake approach by folding in a few white chocolate shavings for a bit of extra decadence.
For a different textural experience, try using gingersnap biscuits for the base instead of digestives. The warm spice of the ginger provides a lovely contrast to the cool strawberry filling. You could also add a teaspoon of vanilla bean paste to the cream mixture to give it those beautiful little black flecks and a deeper aroma. Whatever path you choose, remember that the heart of the recipe remains the same: simple ingredients treated with a bit of love and care.
At the Table with Friends

When it comes time to serve this lovely creation, I find that a bit of simple elegance goes a long way. Use a sharp knife dipped in hot water and wiped dry between each cut to get those perfectly clean slices. Serving this on a vintage floral plate adds to that nostalgic feel, making it feel like a special occasion even on a Tuesday afternoon. It pairs wonderfully with a cup of light roast coffee or a delicate herbal tea.
If you are hosting a larger gathering, you might consider offering a variety of treats. This cheesecake sits beautifully alongside a strawberry tres leches cake for a themed berry party. Adding a small dollop of extra whipped cream on the side of each plate never hurts, and a sprig of fresh mint can add a lovely pop of green to the presentation. It is all about creating a moment where your guests feel truly cared for.
A Final Word on Baking Memories
This Strawberry Cheesecake 3 is more than just a recipe; it is a way to bring a bit of the past into the present. Every time I prepare this, I am reminded of the hands that taught me, the kitchens that felt like home, and the simple joy of sharing something handmade. I hope this cake finds a special place in your own recipe box and that it brings as much comfort to your table as it has to mine over the years. If you enjoy this style of fruit-forward dessert, you might also like to try our blueberry coffee cake for your next brunch.
I would love to see your beautiful creations and hear about the memories you make while baking. Please feel free to share your photos and stories with our community. You can find us and follow along for more vintage-inspired recipes on Pinterest, Instagram, and Facebook. Happy baking, and may your kitchen always be filled with warmth and the scent of something sweet.
