Tucked inside the weathered pages of my grandmother’s favorite cookbook, a hand-drawn diagram of piped roses caught my eye.

This timeless Chocolate Rosette Cake reminds us that the kitchen is a sanctuary where patience yields beautiful rewards. The deep aroma of cocoa always brings me back to quiet Sunday afternoons where we baked for the love of the craft. It is a dessert that looks like a masterpiece but carries the soul of a rustic, homemade heirloom.
Every layer of this cake is infused with history, from the rich crumb to the velvety chocolate mousse that holds everything together. I still remember the weight of the old tin measuring cups as we measured out the flour and cocoa. Baking this today is a quiet way to keep those cherished memories alive in our modern kitchens.
Sharing this cake with your loved ones is more than serving a dessert; it is an offering of time and care. When you present this table centerpiece, you are sharing a piece of baking history that speaks of comfort and slow, purposeful craft. Let us step back into that quiet space and create something truly memorable together.
What Makes This Chocolate Rosette Cake Special
Prep: 45 min · Serves: 14 · Difficulty: Medium
There is a quiet elegance in a cake decorated with piped flowers, especially when it is coated in deep chocolate. Finding this recipe card among my grandmother’s handwritten notes felt like uncovering a forgotten map to a happier, slower time. It proves that we do not need modern shortcuts to create something that takes your breath away.
- Rich cocoa layers bake beautifully every time.
- Velvety chocolate mousse filling adds elegant moisture.
- Stunning rose piped decorations capture classic beauty.
- Old-fashioned buttermilk ensures a delicate crumb.
- Simple ingredients yield an extraordinary family dessert.
This is the cake that transforms any quiet afternoon into a celebration of love.
For those who appreciate classic chocolate bakes, pairing this with a slice of chocolate mousse cake brings back the comforting flavors of childhood. Gathering around the table with a cake like this feels like a warm embrace from the past, reminding us of the simple joy found in sharing home-baked goods.
Get The Full Cake Recipe
Print
Chocolate Rosette Cake
- Total Time: 1 hour 20 mins
- Yield: 14 servings
Description
This elegant Chocolate Rosette Cake features moist cocoa-buttermilk layers filled with velvety chocolate mousse. Finished with delicate hand-piped roses, it is a timeless dessert that celebrates the beauty of slow, rustic baking.
Ingredients
- 2 cups all-purpose flour
- 2 cups granulated sugar
- 3/4 cup unsweetened cocoa powder
- 2 teaspoons baking soda
- 1 teaspoon salt
- 1 cup buttermilk
- 2 large eggs
- 1/2 cup vegetable oil
- 1 tablespoon vanilla extract
- 1 cup hot coffee
- 1 cup semisweet chocolate pieces
- 2 cups heavy whipping cream
- 1 teaspoon gelatin powder
- 2 tablespoons cold water
Instructions
- Prep pans and oven. Preheat oven to 350°F. Grease and flour two nine-inch round cake pans.
- Combine dry ingredients. Whisk together the flour, cocoa powder, baking soda, and salt in a large bowl.
- Mix wet components. Beat sugar, eggs, vegetable oil, buttermilk, and vanilla in a separate bowl until smooth.
- Blend the batter. Gradually stir the dry mixture into the wet ingredients until just combined.
- Add hot coffee. Slowly whisk in the hot coffee until the batter is glossy and thin.
- Bake the layers. Pour batter into pans and bake for 30 to 35 minutes until a toothpick comes out clean.
- Cool cake layers. Cool in pans for fifteen minutes before inverting onto a wire rack to cool completely.
- Melt chocolate base. Melt chocolate with a portion of the cream over low heat and whisk in cocoa powder.
- Stabilize with gelatin. Stir dissolved gelatin into the chocolate base and let cool to room temperature.
- Assemble and decorate. Fold the chocolate base into whipped cream, fill the cake layers, and pipe rosettes over the exterior.
Notes
- Chill your metal mixing bowl and beaters in the freezer to ensure the cream reaches maximum volume.
- If the frosting appears grainy, let it rest at room temperature rather than using a mixer.
- Always level your cake layers with a serrated knife for a professional and stable finished appearance.
- Test your piping pressure on parchment paper to perfect your technique before decorating the cake.
- Keep your hands cool or use a damp cloth around the piping bag to prevent the mousse from melting.
- Prep Time: 45 mins
- Cook Time: 35 mins
- Category: Dessert
- Method: Baking
- Cuisine: American
What You’ll Need

To begin this journey, we gather simple, honest pantry staples from the cupboard shelves. Measuring each ingredient with care sets a quiet rhythm that prepares us for the baking ahead. Here is what you will need to recreate this classic dessert in your own kitchen.
- All-purpose flour: This simple flour provides the gentle structure needed to support the rich cocoa crumb without making the layers heavy or dense.
- Unsweetened cocoa powder: Selecting a high-quality cocoa guarantees a deep, nostalgic chocolate flavor reminiscent of the old-fashioned bakeries of my youth.
- Buttermilk: This traditional dairy ingredient reacts beautifully with the baking soda to create an incredibly tender, soft crumb that melts in your mouth.
- Hot coffee: Pouring hot liquid into the chocolate batter blooms the cocoa, releasing a rich aroma that warms the entire room while deepening the flavor.
- Semisweet chocolate: Real chocolate melted into the frosting forms the luxurious, stable foundation needed to pipe our elegant roses.
- Heavy whipping cream: Whipped to stiff peaks, this cream gives the rosette frosting its light, cloud-like consistency while remaining firm enough to hold its shape.
- Gelatin powder: A touch of gelatin acts as a gentle stabilizer so the piped roses maintain their beautiful shape on the cake.
- Vanilla extract: A splash of pure vanilla adds a subtle warmth that balances the intense chocolate flavor beautifully, bringing all the elements together.
| Ingredient | Why It Matters |
|---|---|
| Cocoa Powder | Creates the deep, nostalgic chocolate flavor profile. |
| Buttermilk | Keeps the cake crumb tender, soft, and moist. |
| Hot Coffee | Blooms the cocoa to release its fullest aroma. |
| Gelatin | Stabilizes the chocolate mousse for perfect piping. |
| Whipping Cream | Provides a light, airy texture to the frosting. |
Bringing It Together

Step 1: Prep Your Pans and Oven
Preheat your oven to 350°F (180°C) before you begin gathering your ingredients on the counter. Take a moment to grease two nine-inch round cake pans with softened butter, making sure you coat every corner of the tins. Dust them gently with all-purpose flour, tapping out the excess over the sink so only a fine, pale veil remains. This easy step guarantees your delicate baked layers will slide out easily without sticking.
Step 2: Whisk the Dry Foundations
Select a large glass mixing bowl to combine the all-purpose flour, unsweetened cocoa powder, baking soda, and salt. Whisk these dry ingredients together slowly, watching the dark cocoa blend into the pale flour until the mixture is uniform. This thorough mixing makes sure the rising agents are evenly distributed, preventing any uneven pockets from forming during baking. The dry, rich scent of chocolate will begin to warm the air around your workspace.
Step 3: Combine Your Wet Ingredients
In a separate bowl, mix the granulated sugar, fresh eggs, and vegetable oil together until the mixture is light and well combined. Pour in the rich buttermilk and pure vanilla extract, whisking gently to incorporate the liquids without rushing. This mixture should look pale gold and have a beautiful, sweet fragrance that promises comfort. Take your time during this step to make sure the sugar is fully dissolved into the eggs.
Step 4: Incorporate the Flour Mixture
Gradually add the whisked dry ingredients to your wet sugar mixture, stirring gently with a wooden spoon or spatula. Blend the components only until the flour disappears, being careful not to overwork the delicate batter. Overmixing can develop the gluten too much, resulting in a dense and heavy crumb rather than a tender one. The batter will be thick, dark, and beautifully fragrant at this stage of the process.
Step 5: Pour the Hot Coffee
Slowly pour the hot coffee into the thick chocolate batter while whisking continuously to avoid cooking the eggs. Do not worry if the batter becomes very thin and runny, as this liquid consistency is exactly what we want. The hot liquid blooms the cocoa powder, releasing a rich aroma that signals the start of something special. Whisk until the batter is smooth, glossy, and completely free of dry lumps.
Step 6: Bake Your Chocolate Rosette Cake
Divide the runny batter evenly between your two prepared baking pans, pouring slowly to avoid trapping large air bubbles. Slide the pans onto the middle rack of your preheated oven and bake for 30 to 35 minutes. Keep an eye on them without opening the oven door too early, letting the gentle heat do its work. Your kitchen will fill with the comforting scent of chocolate cake baking the old way.
Step 7: Cool the Baked Layers
Test the center of each cake with a wooden toothpick to make sure it comes out clean or with a few moist crumbs. Remove the pans from the oven and set them on a wire rack to cool for fifteen minutes. Run a thin butter knife gently around the edges of the pans to release the sides of the cake. Turn the layers out onto the racks to cool completely before you begin decorating.
Step 8: Melt the Chocolate Base
Combine the semisweet chocolate pieces and a portion of the heavy cream in a small saucepan over low heat. Stir the mixture continuously with a wooden spoon until the chocolate is completely melted and glossy. Remove the pan from the heat immediately to prevent the chocolate from scorching or becoming grainy. Whisk in the unsweetened cocoa powder until the base is beautifully smooth and dark.
Step 9: Dissolve and Combine Gelatin
Dissolve the gelatin powder in cold water and let it sit for five minutes until it swells and softens. Warm the gelatin over very low heat only until it melts, then stir it gently into your chocolate base. Let this mixture cool to room temperature on the counter before combining it with the cream. This step is crucial for giving the mousse frosting the stability needed for piping.
Step 10: Whip the Cream and Assemble
Whip the remaining chilled heavy cream in a cold bowl until stiff, elegant peaks form under your beaters. Gently fold the cooled chocolate mixture into the whipped cream using a rubber spatula to preserve the airy volume. Place one cake layer on your serving plate, spread it with chocolate mousse, and top with the second layer. Coat the entire cake with a thin crumb coat before piping your beautiful rosettes.
Teresa’s Tips

To achieve the most beautiful results when whipping your cream, always chill your mixing bowl and metal beaters in the freezer for fifteen minutes before you begin. Cold tools keep the fat in the heavy cream stable, allowing it to reach its maximum volume and maintain its structure. This classic technique is equally useful when preparing a traditional chocolate ganache cake or any other delicate whipped frosting. Taking this extra moment of preparation guarantees your rosettes will stand tall and beautiful.
If your chocolate mousse frosting begins to separate or look grainy, it is likely because the melted chocolate base was still too warm when you folded it into the cold whipped cream. To fix this common issue, let the mixture rest at room temperature for ten minutes, then gently fold it with a rubber spatula until it becomes smooth again. Do not attempt to save a separated mousse with an electric mixer, as the high speed will only cause the cream to churn into butter and ruin the delicate texture.
If you want to view a wonderful visual reference of this technique, check out this original rose cake inspiration which showcases the delicate movements of the piping bag. Observing another baker’s hands can help clarify the slow, sweeping motion needed to form the petals. It is a wonderful way to build confidence before you begin decorating your own creation.
Keep your hands cool when holding the piping bag, as the warmth from your skin can quickly melt the stabilized mousse inside the bag. You can wrap a cold, damp cloth around the piping bag or wear a thin cotton glove to create a barrier of insulation. If you notice the frosting becoming too soft or running out of the tip, place the filled piping bag in the refrigerator for five minutes to restore its firm consistency. Patience in these small details makes all the difference in the final presentation.
Always level your cake layers with a long serrated knife before you begin assembling the dessert. Removing the domed tops from your cooled layers guarantees that your cake stands completely straight and does not slide under the weight of the frosting. Save the delicious trimmed cake crumbs in a small jar to sprinkle over morning yogurt or enjoy as a quiet kitchen snack with your afternoon tea. A level foundation makes the piping process much easier and more satisfying.
Test your piping pressure on a piece of parchment paper before applying the rosettes directly to your cake. This practice run helps you find your rhythm and guarantees each rose is consistent in size and shape before you commit to the actual dessert. You can easily scrape the test frosting off the parchment paper and place it back into your piping bag, so nothing goes to waste. It is a wonderful way to build your confidence before decorating.
Frequently Asked Questions
How do you make rosettes on a cake?
To pipe a rosette, hold your piping bag perpendicular to the cake surface, keeping your hand steady. Start in the center of where you want the flower to be, squeeze gently, and move the tip in a steady circle around that starting point. Stop squeezing before you lift the tip away to create a clean, seamless finish that hides the seam. With a little practice, your hands will find a natural rhythm that feels like second nature.
What is the best piping tip for rosettes?
An open star tip, such as a Wilton 1M or 2D, is the classic choice for creating beautiful roses. The deep ridges in these tips create the delicate, petal-like folds that make the chocolate rosettes look realistic and elegant. Always make sure your tip is clean and free of any dried frosting before starting each flower. Using the correct tip makes the decorating process a joyful, artistic experience.
Why are my buttercream rosettes melting?
Buttercream and mousse rosettes melt when the cake layers are still warm or when the kitchen is too hot. Always make sure your baked layers are completely cool to the touch before you begin decorating. If your hands warm the bag too much, rest the piping bag in the refrigerator for five minutes to firm up. Keeping your workspace cool is the key to preserving your beautiful handiwork.
What frosting works best for a chocolate rosette cake?
A stabilized chocolate mousse or a firm Swiss meringue buttercream works best for piping defined floral shapes. These frostings hold their structure beautifully without being overly heavy or cloyingly sweet. Avoid soft glazes or whipped creams without stabilizers, as they will run and lose their petal definition quickly. A stable frosting guarantees your cake looks beautiful from the moment it is finished until it is served.
Can you make an ombre design with rosettes?
Yes, you can create a beautiful ombre effect by dividing your frosting into three bowls and adding varying amounts of cocoa powder. Start with the darkest shade at the bottom of the cake, use the medium shade for the center, and finish with the lightest shade on top. This technique adds a lovely depth and visual interest to your cake, reminiscent of wild roses in the twilight. It is a simple way to add an artistic touch to your dessert.
How should I store this decorated cake?
Keep this finished cake in a tightly sealed cake dome in the refrigerator until you are ready to serve it. Because the mousse frosting contains real whipping cream, it must be kept cold to stay fresh and maintain its firm shape. Bring the cake out about fifteen minutes before slicing so the chocolate softens slightly for the best texture. This brief rest allows the deep flavors of the cocoa to fully bloom.
Can I freeze the cake layers before frosting?
Yes, you can wrap the cooled cake layers tightly in plastic wrap and freeze them for up to three months. Thaw them in the refrigerator overnight before assembling and decorating your finished masterpiece. Baking the layers ahead of time is a wonderful way to divide the kitchen work and reduce stress before a big gathering. Frozen layers are also slightly firmer, making them much easier to frost.
How do I prevent my cake layers from doming during baking?
To prevent heavy doming, avoid overmixing your batter and make sure your oven temperature is accurate. You can also use wet fabric cake strips wrapped around the outside of the pans to make sure the layers bake evenly from edge to center. If your cakes still dome slightly, gently slice the tops off with a long serrated knife once they are cool. This creates a completely flat surface for a beautiful presentation.
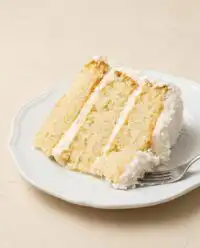
Classic Variations
For a gentle contrast in flavor, you can replace the chocolate mousse with a speckled vanilla bean frosting. The dark chocolate layers look incredibly stunning against the white frosting, reminiscent of winter snow clinging to tree branches. To expand your repertoire of classic chocolate bases, you might also enjoy studying the steps for a rich chocolate truffle cake from our collection. This easy swap offers a beautiful visual contrast that always delights guests at the table.
If you wish to deepen the espresso notes in this dessert, add a teaspoon of instant espresso powder to the warm chocolate base. The coffee highlights the dark cocoa, giving the piped rosettes a sophisticated, robust flavor that lingers beautifully on the tongue. This variation is especially wonderful for quiet autumn gatherings when the air is crisp and a warm cup of coffee is never far from hand. It is a subtle change that honors the traditional chocolate-coffee pairing.
Adding a thin layer of organic raspberry preserve between the cake layers before spreading the mousse offers a lovely fruit contrast. The bright tartness of the berries cuts through the deep chocolate, creating a delightful surprise with every forkful. This simple addition brings a touch of summer sweetness to your table, proving that subtle variations can make a familiar favorite feel entirely new. It is a beautiful way to mark the changing seasons with your baking.
The Perfect Occasion
This elegant dessert is best served on a vintage glass cake stand, surrounded by the laughter of your family. Slicing through the piped rosettes reveals the beautiful layers hidden inside, a moment that always brings a quiet hush of anticipation over the table. If you are hosting a smaller, more casual gathering, you might pair this with our delicate chocolate cake recipe for a simpler option that still carries that homemade touch. Every slice is a testament to the care you put into your baking.
Serve each slice alongside a warm cup of black tea or a dark roast coffee to balance the sweetness of the mousse. The warm beverage gently melts the rich chocolate on the tongue, making each bite feel like a quiet moment of comfort. It is the ideal accompaniment for a rainy Sunday afternoon when you have nowhere to be and all the time in the world. Sharing this simple pleasure with a friend is one of life’s greatest gifts.
For special holiday celebrations, decorate the serving platter with a few fresh edible flowers or a light dusting of powdered sugar. The contrast of the snowy sugar against the dark chocolate rosettes is incredibly beautiful and festive. This simple presentation honors the old ways of making desserts feel truly special without relying on modern decorations. It reminds us that beautiful things are often the most simple.

Baking Memories
Baking is a silent conversation between the past and the present, a beautiful way to share love through honest ingredients. When you master the art of the rose cake, you carry forward a timeless tradition of kitchen craftsmanship that honors the bakers who came before us. I hope this recipe brings a sense of peace and nostalgia to your home, filling your kitchen with warmth and sweetness.
Take your time with the piping process, letting go of any desire for modern perfection. Every rose you pipe has its own unique character, much like the handwritten cards in our old tin recipe boxes. Share your beautiful creations with our community on Pinterest or join our vintage baking family on Facebook to share your stories. We would love to see how you bring this classic recipe to life in your own kitchen.
As you blow out the oven light and wipe the flour from your apron, take a moment to appreciate the quiet beauty of a finished bake. The kitchen may be messy, but the memory of creating something beautiful from scratch will linger long after the last crumb is gone. Until we meet again over a warm oven, keep baking with love and taking things slow. Your hands are keeping a beautiful tradition alive.


