To master the classic white cake emulsion is to honor the delicate balance of protein and fat, a disciplined technique that rewards the patient baker with a crumb of unmatched tenderness.

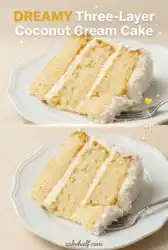
This Three-Layer Coconut Cream Cake represents the pinnacle of structured yet tender cake design. Every element, from the whipped egg whites to the unsweetened canned coconut milk, must be carefully prepared to create a harmonious dessert. Unlike dense, oily variations that rely on heavy artificial extracts, this recipe builds its profile through pristine fats and proper aeration. By understanding the mechanical role of each ingredient, you will transform basic pantry staples into an extraordinary masterpiece of French-inspired pastry craft.
The Craft Behind This Three-Layer Coconut Cream Cake
Prep: 35 min · Serves: 12 · Difficulty: Advanced
- Perfect emulsion yields a velvety, uniform crumb.
- True coconut milk delivers deep, natural flavor.
- Fluffy egg whites create a light structure.
- Stable buttercream offers a refined sweet balance.
- Patient cooling guarantees sharp, clean cake slices.
This cake represents the quiet discipline of baking that turns simple moments into elegant family traditions. As with our signature coconut cake, precision at the mixing bowl guarantees an exceptional result.
Get The Full Cake Recipe
Print
Three-Layer Coconut Cream Cake
- Total Time: 2 hours
- Yield: 12 servings
- Diet: Vegetarian
Description
This exquisite three-layer coconut cake features a tender, cloud-like crumb infused with authentic coconut milk and a rich, tangy cream cheese frosting. It is a sophisticated masterpiece of pastry craft that balances delicate tropical flavors with a velvety, structured finish.
Ingredients
- 285 grams cake flour
- 2 teaspoons baking powder
- 1/2 teaspoon baking soda
- 1 teaspoon fine salt
- 170 grams unsalted butter, softened
- 330 grams granulated sugar
- 5 large egg whites, room temperature
- 120 grams sour cream
- 2 teaspoons pure vanilla extract
- 1 teaspoon coconut extract
- 240 milliliters unsweetened canned coconut milk
- 80 grams sweetened shredded coconut (plus 160 grams for topping)
- 226 grams unsalted butter, softened (for frosting)
- 226 grams brick cream cheese, softened
- 600 grams confectioners’ sugar
- 2 tablespoons canned coconut milk (for frosting)
- 1/2 teaspoon vanilla extract (for frosting)
- 1/2 teaspoon coconut extract (for frosting)
- Pinch of salt
Instructions
- Prepare the equipment. Preheat oven to 350°F (177°C), butter three 8-inch round pans, and line bottoms with parchment paper.
- Sift dry ingredients. Whisk and sift together the cake flour, baking powder, baking soda, and salt, then set aside.
- Cream butter base. Beat 170g butter and sugar until pale, then incorporate egg whites, sour cream, and extracts.
- Mix the batter. Alternate adding dry ingredients and coconut milk, finishing with a gentle fold of the shredded coconut.
- Bake the layers. Divide batter evenly into pans and bake for 21 to 24 minutes until a skewer emerges clean.
- Cool the cakes. Rest pans on a wire rack for one hour before unmolding and cooling completely to room temperature.
- Whip the frosting. Beat 226g butter, cream cheese, confectioners’ sugar, and flavorings until light and cloud-like.
- Assemble and decorate. Level the cake layers, fill with buttercream, crumb coat, finish frosting, and press coconut onto the exterior.
Notes
- Ensure all dairy and egg components are at room temperature to prevent the batter from curdling during mixing.
- Use an independent oven thermometer to verify the 350°F temperature, as standard oven dials are often inaccurate.
- Always use brick-style cream cheese rather than tub-style to ensure the frosting maintains its structural integrity.
- Chill the cake after applying the crumb coat to make the final application of frosting significantly smoother and easier.
- Prep Time: 35 mins
- Cook Time: 24 mins
- Category: Dessert
- Method: Baking
- Cuisine: French-inspired
The Mise en Place

A pristine bake begins with a meticulous assembly of your components, each measured by weight and tempered to the room. In pastry, ingredients are not merely ingredients; they are structural agents that react under precise thermal and physical conditions. Understanding how these elements interact is the first step toward a flawless finish.
- Cake Flour: Essential for its low protein content, which prevents excess gluten development and guarantees a tender, melt-in-the-mouth texture.
- Egg Whites: They provide structural lift without the heavy fat of yolks, ensuring a pale, cloud-like crumb that holds its shape beautifully.
- Unsweetened Canned Coconut Milk: This brings a rich, natural fat profile that normal dairy cannot match, infusing the crumb with authentic tropical essence.
- Sour Cream: Its high acidity softens the gluten strands while adding essential moisture, preventing the crumb from drying out during the bake.
- Sweetened Shredded Coconut: Pulse this lightly in a food processor to achieve uniform pieces that distribute evenly without sinking to the bottom.
- Brick Cream Cheese: Crucial for providing the structural stability and tangy counterbalance to the sweet sugar in the frosting.
| Ingredient | Why It Matters |
|---|---|
| Cake Flour | Low gluten potential ensures an exceptionally soft, delicate crumb structure. |
| Egg Whites | Create a stable foam that lifts the cake naturally during baking. |
| Canned Coconut Milk | Adds essential fats and genuine flavor without thinning the batter. |
| Sour Cream | Introduces acidity to tenderize gluten and maintain long-lasting moisture. |
The Technique Laid Out

Step 1: Prepare Your Equipment and Pans
Before measuring a single gram of flour, you must prepare the environment for your three layers. Preheat your oven to exactly 350°F (177°C), verifying the temperature with an independent oven thermometer to ensure absolute accuracy. Lightly butter three 8-inch round cake pans, line the bottom of each with a parchment paper round, and butter the paper itself to allow a flawless release. This physical barrier guarantees that the delicate crust remains completely intact when inverted. Let your pans sit on the counter, ready to receive the batter without delay once mixed.
Step 2: Sift and Whisk the Dry Components
Sift together 285 grams of cake flour, 2 teaspoons of baking powder, 1/2 teaspoon of baking soda, and 1 teaspoon of fine salt into a clean bowl. Sifting is not an optional refinement; it disperses the leaveners evenly and aerates the flour to prevent dense pockets in the finished crumb. Whisk these dry ingredients for a full thirty seconds to guarantee uniform distribution throughout the mixture. Set this bowl aside, positioned next to your stand mixer for efficient access during assembly.
Step 3: Establish the Emulsion Base
In the bowl of a stand mixer fitted with the paddle attachment, combine 170 grams of softened, room-temperature unsalted butter and 330 grams of granulated sugar. Beat on medium-high speed for exactly two minutes until the mixture transforms into a pale, aerated paste. Slowly add the 5 large room-temperature egg whites one at a time, allowing each to fully integrate before adding the next. Follow this by incorporating the 120 grams of sour cream, 2 teaspoons of pure vanilla extract, and 1 teaspoon of coconut extract, beating until unified. You will notice the batter looks slightly separated or curdled at this stage; this is a natural consequence of combining fats of different water contents and is no cause for concern.
Step 4: Alternate the Liquids and Solids for the Three-Layer Coconut Cream Cake
With the mixer set to its lowest speed, add one-third of your sifted dry ingredients, followed immediately by half of the 240 milliliters of unsweetened canned coconut milk. Repeat this alternating pattern, finishing with the final third of the dry ingredients to prevent the batter from saturating or losing its aerated structure. Stop the mixer immediately once the last streaks of flour disappear, then gently fold in 80 grams of the sweetened shredded coconut using a rubber spatula. Run your spatula along the very bottom of the bowl to make sure no heavy pockets of butter or flour remain unmixed.
Step 5: Weigh and Bake the Layers
Divide the thick, fragrant batter evenly among your three prepared 8-inch pans, employing a digital kitchen scale to make sure each pan contains the exact same weight of batter for an even bake. Smooth the surfaces with an offset spatula, then transfer them immediately to the center rack of your preheated oven. Bake for 21 to 24 minutes, observing the layers as they rise evenly and turn a pale golden hue. The cakes are done when a wooden skewer inserted into the center emerges clean, with no wet crumbs attached.
Step 6: Cool the Cakes Completely
Remove the pans from the oven and place them on a wire cooling rack to rest for exactly one hour. This initial rest allows the delicate starch structure to set, preventing the warm cakes from tearing as they are released. After sixty minutes, carefully run a thin palette knife around the edges, invert each pan to release the cake, peel off the parchment paper, and place the layers right-side up on the rack. They must cool completely to room temperature before any frosting is applied, as even a hint of warmth will melt the delicate buttercream.
Step 7: Prepare the Coconut Cream Cheese Buttercream
While the cake layers cool, combine 226 grams of softened unsalted butter and 226 grams of brick cream cheese in a clean mixer bowl. Beat on medium speed for two minutes until completely smooth, ensuring no lumps of cream cheese remain. Gradually add 600 grams of confectioners’ sugar, 2 tablespoons of canned coconut milk, 1/2 teaspoon each of vanilla and coconut extracts, and a pinch of salt with the mixer on low. Once the sugar is incorporated, increase the speed to high and beat for three full minutes to whip the frosting into a cloud-like, spreadable consistency.
Step 8: Assemble and Decorate Your Masterpiece
Using a sharp serrated bread knife held completely horizontal, slice the domed tops off your cooled cake layers to create flat, level surfaces. Place your first layer on a cake stand, spread one heaping cup of frosting evenly across its surface, and top with the second layer, repeating the process. Place the third layer on top, then coat the entire cake in a thin crumb coat before finishing with the remaining buttercream. Immediately press the 160 grams of sweetened shredded coconut into the top and sides of the cake, ensuring complete coverage before refrigerating for at least twenty minutes to set the structure.
Where Precision Makes the Difference

The key to achieving a truly professional crumb lies in the temperature of your ingredients. If your butter, egg whites, or sour cream are cold, they will cause the batter to seize, leading to an uneven rise and a dense texture. Always allow your refrigerated items to sit on the counter for at least two hours before you begin baking. For more fundamental baking techniques, read our guide on preparing a classic vanilla layer cake to master the basics of cake structure.
To make sure your cake layers release cleanly from their pans, always use high-quality parchment paper. If you notice your cakes sticking to the sides of the pan, this is often because the pans were not greased thoroughly before the parchment was applied. Apply a thin, even layer of butter, place the parchment round, and then grease the top of the parchment as well. This double-barrier method guarantees a clean release every time.
When whipping your cream cheese buttercream, the texture of the cream cheese is of utmost importance. Always use brick cream cheese rather than a spreadable tub version, which contains too much water and will make your frosting runny. If your frosting becomes too thin or soupy, here is why and how to fix it: the butter or cream cheese was likely too warm when whipped. Place the mixing bowl in the refrigerator for 15 minutes to chill the fats, then beat it again on medium-high speed until it regains its structural integrity.
Weighing your ingredients is the only way to achieve consistent results in pastry. Standard measuring cups can vary wildly depending on how tightly the flour is packed, often leading to a dry, heavy cake. By using a digital scale and measuring in grams, you eliminate all guesswork and ensure that your cake matches the delicate texture intended by the recipe. This habit of precision is what separates amateur bakers from true pastry artisans.
To master the classic coconut sponge, you can also examine other expert resources like mastering the classic coconut sponge to expand your technical knowledge. This external resource offers alternative perspectives on sugar-fat ratios and aeration techniques that can further refine your baking skills.
For a flawless presentation, use a cake turntable and a metal bench scraper when applying your frosting. The turntable allows you to rotate the cake in one continuous motion, while the bench scraper held at a 45-degree angle creates smooth, professional sides. This technique takes a bit of practice but yields a stunning result that highlights the care you put into the baking process.
Frequently Asked Questions
Can I use all-purpose flour instead of cake flour?
While all-purpose flour can be used in a pinch, it will significantly alter the texture of your cake. All-purpose flour has a higher protein content, which leads to more gluten development and a heavier, denser crumb. If you must use it, replace 2 tablespoons of flour from every cup with cornstarch, sifting the mixture multiple times to ensure proper aeration and distribution.
What is the difference between cream of coconut and coconut milk?
Cream of coconut is a highly sweetened, syrupy product used primarily in cocktails like piña coladas, whereas canned coconut milk is unsweetened and has the consistency of whole milk. Using cream of coconut in this recipe will make the batter excessively sweet and oily, ruining the delicate balance. Always ensure you are purchasing unsweetened canned coconut milk for baking.
Can I use vegetable oil instead of butter?
Replacing the butter with vegetable oil will alter both the flavor and the structure of the cake. Butter provides a rich, classic flavor and plays a crucial role in aeration when creamed with sugar. While oil can make a cake moist, it lacks the ability to trap air, resulting in a flatter, less fluffy cake. We highly recommend sticking to quality unsalted butter.
What is the best frosting for coconut cake?
The classic pairing for a coconut cake is a rich, tangy cream cheese buttercream. The acidity of the cream cheese cuts through the sweetness of the sugar and complements the tropical flavor of the coconut. If you prefer a lighter finish, a French meringue buttercream or a simple whipped cream frosting can also be used, though they offer less structural stability.
How do I make the coconut flavor stronger?
To amplify the natural coconut flavor, you can lightly toast the shredded coconut before adding it to the batter or using it as a garnish. Simply spread the coconut on a baking sheet and bake at 325°F (163°C) for 5-8 minutes until golden and fragrant. Additionally, ensuring you use a high-quality, pure coconut extract will provide a clean, intense flavor without any artificial aftertaste.
Should I use sweetened or unsweetened coconut for the outside?
We recommend using sweetened shredded coconut for the exterior of the cake, as it is naturally moister and adheres better to the frosting. Unsweetened coconut can sometimes be dry and papery, which detracts from the luxurious mouthfeel of the cake. If you find the shreds too long, you can pulse them briefly in a food processor to achieve a finer texture.
How do I get perfectly flat layers?
To achieve flat, even layers, use wet cake strips wrapped around the outside of your pans before baking. These strips keep the edges of the pan cooler, allowing the entire cake to rise at a uniform rate and preventing a high dome from forming. Alternatively, you can carefully level the cooled cakes with a long serrated knife before assembling.
How far in advance can I make a coconut cream cake?
You can bake the cake layers and prepare the frosting up to 24 hours in advance. Wrap the cooled layers tightly in plastic wrap and store them at room temperature, and keep the frosting in an airtight container in the refrigerator. When ready to assemble, let the frosting sit at room temperature for 15 minutes, then beat it briefly to restore its creamy texture.
Considered Variations
While the classic three-layer format is spectacular, you can easily adapt this recipe into an elegant sheet cake. To do this, grease and lightly flour a 9×13-inch baking pan, pour the batter in evenly, and bake at 350°F (177°C) for approximately 40 minutes. This format is perfect for casual gatherings or picnics where slicing and transporting a tall layer cake might be impractical. It maintains the same exceptional moisture and rich coconut flavor while offering a simpler presentation. If you enjoy rich, spiced cakes, you might also like our recipe for quick italian cream cake which features a similar luxurious crumb structure.
Another excellent option is to convert this recipe into delicate cupcakes for individual servings. Fill paper-lined cupcake tins two-thirds full of batter and bake at 350°F (177°C) for 19 to 21 minutes, yielding about two to three dozen cupcakes. This variation is ideal for dessert tables or gatherings where individual portions are preferred. Top each cupcake with a swirl of the coconut cream cheese buttercream and a generous sprinkle of toasted coconut for a beautiful, handheld treat.
For those who prefer a more rustic presentation, you can bake this batter in a 10-cup Bundt pan. Ensure the pan is meticulously greased and floured, paying special attention to the central tube and any intricate patterns. Bake for approximately 55 to 65 minutes, checking for doneness with a long wooden skewer. Once cooled, drizzle the cake with a simple coconut glaze made from coconut milk and sugar, and press shredded coconut onto the surface.
Finishing and Presenting
When presenting this magnificent cake, the setting and the accompaniment should match the care put into its creation. We suggest serving this dessert on a vintage glass pedestal stand to highlight its elegant, snow-white layers. To make slicing easier, use a long, thin-bladed knife dipped in hot water and wiped dry before each cut. This technique guarantees clean, professional slices that show off the beautiful internal structure and the neat layers of frosting. For a lighter, summery alternative, you can also examine our recipe for angel food cake coconut whipped cream berries, which pairs wonderfully with fresh seasonal fruit.
To complement the rich, tropical notes of the coconut, serve each slice with a hot beverage that balances the sweetness. A robust black tea, such as Earl Grey or Assam, provides a pleasant astringency that cleanses the palate between bites. For coffee lovers, a light-roast pour-over coffee with bright, citrusy notes offers a beautiful contrast to the creamy texture of the buttercream. Avoid overly sweet drinks, as they will overwhelm the delicate flavors of the cake.
This cake is the perfect centerpiece for spring celebrations, bridal showers, or elegant family gatherings. If you are planning a larger dessert table, pair it with simple, fruit-forward desserts that won’t compete for attention. Fresh raspberries, sliced mango, or a simple passionfruit coulis drizzled over the plate add a striking pop of color and a welcome acidity that elevates the entire dining experience.

What You Have Learned Here
Baking a cake of this caliber is a journey in patience and precision. By honoring each step—from the careful tempering of your ingredients to the slow, measured folding of the batter—you have created a dessert that is truly worthy of celebration. The rewards of your attention are visible in every slice, from the velvety, even crumb to the perfectly balanced sweetness of the buttercream. It is a testament to the idea that beautiful baking is simply the sum of small, disciplined choices done with care.
As you share this cake with your loved ones, take pride in the techniques you have mastered. Each element represents a fundamental skill that will serve you well in all your future pastry endeavors. We invite you to share your baking journey and connect with our community of passionate home bakers. For more inspiring baking guides and stories, explore our three layer italian cream cake story and join the conversation online.
To stay connected and discover more refined recipes, follow our official channels on Pinterest, Facebook, and TikTok. We love seeing your baking creations and hearing about your kitchen successes. Happy baking, and may your kitchen always be filled with the warm, comforting scent of sweet vanilla and fresh coconut.
