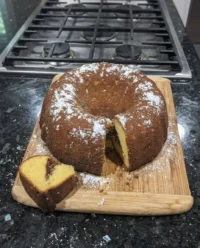
In France, we typically celebrate milestones with structured elegance—a *croquembouche* or a pristine fruit tart—but there is a distinct, chaotic joy in the American tradition of the smash cake that I have come to adore. It is less about the refined tasting experience and more about the sensory discovery: the feeling of cool buttercream against little fingers and the soft yield of a tender sponge. While my training emphasizes precision, this recipe allows for a moment of delightful mess, anchored by a sponge that is technically perfect underneath the playful decoration.

This recipe is designed specifically for that first birthday moment, yielding two small, manageable layers that stack into a charming tower. The crumb is exceptionally soft, thanks to the use of cake flour and a careful creaming method, ensuring it is easy for a baby to break apart. It is a classic vanilla cake, simple and pure, providing a safe and delicious introduction to the world of sweets.
The Art of the First Birthday
There is a profound beauty in making something specifically to be destroyed. You will love this recipe because it balances the structural integrity needed to stand tall with the tenderness required for a ‘smash.’ Unlike dense pound cakes that might resist a tentative hand, this sponge relies on the delicate aeration of butter and sugar, resulting in a texture that is light as air.
Furthermore, the scale is perfect. By using a 6.5-inch and a 4.5-inch pan, you create a tiered look without the overwhelming quantity of a standard wedding-sized tier. It is intimate, manageable, and creates a stunning visual centerpiece for photographs. The flavor is a nostalgic, aromatic vanilla—mild enough for a young palette but rich enough to satisfy the parents who will inevitably steal a bite.
Print
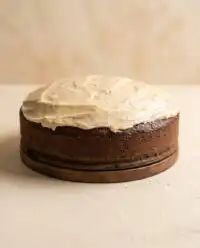
Smash Cake
- Total Time: 1 hour
- Yield: 1 small two-tiered cake
- Diet: Vegetarian
Description
Celebrate your little one’s first big milestone with this perfectly tender and charming two-tiered vanilla smash cake. Designed for easy crumbling and delightful photos, it features a velvety sponge and festive sprinkles that make the big mess absolutely worth it.
Ingredients
- 1 ½ cups cake flour
- ½ cup unsalted butter, softened to room temperature
- 1 cup white granulated sugar
- 2 large eggs, room temperature
- ¾ cup whole milk
- 2 teaspoons pure vanilla extract
- 2 teaspoons baking powder
- ½ teaspoon salt
- 16 ounces vanilla frosting
- 1 tablespoon multicolored sprinkles, plus more for decorating
Instructions
- Preheat your oven to 350°F (175°C) and grease one 6.5-inch cake pan and one 4.5-inch cake pan, lining the bottoms with parchment paper.
- In a medium bowl, sift together the cake flour, baking powder, and salt to aerate the mixture.
- In a large bowl, beat the softened butter and sugar with an electric mixer until the mixture is pale yellow and fluffy.
- Add the eggs one at a time, beating well after each addition, then stir in the vanilla extract.
- Add half of the flour mixture and half of the milk, mixing on low speed until just combined; repeat with the remaining flour and milk.
- Divide the batter between the prepared pans and bake until a toothpick comes out clean, approximately 20-25 minutes for the small pan and 35-40 minutes for the larger pan.
- Cool the cakes in their pans for 10 minutes before transferring to a wire rack to cool completely before frosting, stacking, and decorating with sprinkles.
Notes
To ensure the most delicate texture for little hands, avoid overmixing the batter once the flour is added. Using room temperature ingredients is essential for a smooth emulsion that creates that light, airy crumb perfect for a celebratory smash.
- Prep Time: 20 mins
- Cook Time: 40 mins
- Category: Dessert
- Method: Baking
- Cuisine: American
The Foundation of Flavor

To achieve a texture that is both sturdy and meltingly tender, we must pay close attention to our ingredients. In a recipe with so few components, the quality of each shines through.
- Cake Flour: We use 1 ½ cups of cake flour rather than all-purpose. The lower protein content limits gluten formation, ensuring the cake remains soft and velvety rather than chewy.
- Unsalted Butter: You will need ½ cup, softened strictly to room temperature (about 65°F or 18°C). If it is too cold, it will not aerate; too warm, and it will be oily. This is the base of our structure.
- White Sugar: 1 cup of granulated sugar does more than sweeten; it cuts through the butter to create air pockets during the creaming stage.
- Eggs: Two large eggs, also at room temperature, provide stability and moisture. Cold eggs can shock the batter and break the emulsion.
- Whole Milk: ¾ cup of milk adds liquid and fat. I recommend whole milk for the richest flavor profile.
- Vanilla Extract: Use 2 teaspoons of a high-quality pure vanilla extract. Since vanilla is the primary flavor, the artificial variety will be noticeable here.
- Baking Powder & Salt: 2 teaspoons of baking powder for lift, and ½ teaspoon of salt to balance the sweetness.
- Vanilla Frosting: The recipe calls for a 16-ounce container of vanilla frosting (such as Pillsbury®). While I typically advocate for Swiss meringue buttercream, a high-quality stabilized frosting holds up remarkably well for the duration of a party.
- Sprinkles: 1 tablespoon or more of multicolored sprinkles for that festive finish.
How to Master the Method
Step 1: Prepare the Molds
Preheat your oven to 350°F (175°C). Precision in temperature is vital for an even rise. Grease one 6.5-inch cake pan and one 4.5-inch cake pan thoroughly. For extra insurance against sticking, I always recommend lining the bottom with a round of parchment paper. This guarantees a clean release, preserving the sharp edges of your tiers.
Step 2: Aerate the Dry Ingredients
In a medium bowl, sift together the cake flour, baking powder, and salt. Sifting is not merely about removing lumps; it aerates the flour and ensures the leavening agent is perfectly distributed. This prevents large air tunnels in the final crumb, resulting in a uniform, professional texture.
Step 3: The Creaming Method
In a large bowl, beat the softened butter and sugar with an electric mixer. You are looking for a transformation in color and texture—the mixture should become pale yellow and fluffy. This process, known as mechanical leavening, forces air into the fat, which expands during baking. Take your time here; do not rush.
Step 4: Emulsify the Batter
Add the eggs one at a time, beating well after each addition. If the batter looks curdled, you may have added them too quickly or they were too cold. Continue beating until the mixture is smooth and cohesive. Stir in the vanilla extract, infusing the fat with the floral aroma.
Step 5: The Alternating Addition
Add half of the flour mixture to the butter mixture and mix on low speed until just combined. Pour in half of the milk and mix again. Repeat with the remaining flour and milk. Mixing in stages allows the flour to hydrate without overworking the gluten. Stop mixing the moment you see no more dry streaks to keep the cake tender.
Step 6: Bake to Perfection
Divide the batter between the prepared pans. Bake in the preheated oven. The smaller cake will require approximately 20 to 25 minutes, while the larger cake will take 35 to 40 minutes. Test by inserting a toothpick into the center; it should come out clean or with a few moist crumbs. A clean toothpick indicates the structure is set.
Step 7: Cooling and Decoration
Remove the cakes from the oven and let them cool in the pans for 10 minutes before inverting them onto a wire rack to cool completely (about 1 hour). Do not attempt to frost a warm cake, or your frosting will slide off. Once cool, spread frosting on the sides of the larger cake and roll it in sprinkles on a parchment-lined sheet. Place it on a platter, frost the top, and stack the frosted smaller cake on top. Finish by frosting the top tier and decorating with the remaining sprinkles.
Precision Secrets for Success

- Temperature Control: I cannot stress this enough—your butter and eggs must be at room temperature. If you forget to take your eggs out, place them in a bowl of warm water for 5 minutes. This ensures a silky, non-curdled batter.
- The Crumb Coat: If you find your frosting is picking up crumbs, apply a very thin layer of frosting first, then chill the cake for 20 minutes. This “crumb coat” locks in the loose particles, allowing your final layer of frosting to be pristine and smooth.
- Leveling the Layers: For a truly professional look, use a serrated knife to slice off the slight dome that forms on top of the cakes before stacking. This creates a flat, stable surface for your tiers. If you enjoy working with these smaller, manageable sizes, you might also appreciate the technique used in our modern mini cakes, which follow similar architectural principles.
- Handling Sprinkles: To get a perfectly coated side without making a mess, place the cake on a cardboard round smaller than the cake itself. Hold the cake in one hand over a baking sheet and gently press sprinkles onto the fresh frosting with the other hand.
Refined Twists on the Classic
- Citrus Infusion: To cut through the sweetness of the frosting, rub the zest of one lemon into the sugar before creaming it with the butter. This releases the essential oils and perfumes the entire cake. It adds a sophisticated brightness that pairs beautifully with vanilla.
- Natural Coloring: If you prefer to avoid artificial dyes, you can use freeze-dried fruit powders (like raspberry or strawberry) pulverized in a food processor to tint your frosting or batter naturally. For more colorful inspiration, look at our lemon rainbow cake, which uses vibrant layers to create joy.
- Alternative Sweeteners: For parents who are mindful of sugar intake for the first birthday, you might explore recipes that use maple syrup or bananas. While this recipe is a classic butter cake, other bakers like Rachael’s Good Eats offer variations that cater to different dietary philosophies.
- Almond Note: Replacing half of the vanilla extract with almond extract gives the cake a distinct, “wedding cake” flavor profile that is deeply aromatic and elegant.
Presentation and The Moment

Serving a smash cake is unique because the “service” is the event itself. Place the cake on a stable, non-breakable cake stand or a simple white platter that won’t distract from the colorful sprinkles. If you are doing this on the floor for photos, lay down a clean white sheet or a splash mat to catch the debris.
For the adult guests, you might serve cupcakes that match the flavor profile of the smash cake, or perhaps something more thematic like a car cake if the party has a specific motif. Ensure you have plenty of damp cloths nearby for the inevitable cleanup—sugar and butter can be slippery!
A Sweet Beginning
Creating a smash cake is a labor of love. It is a small project that carries a significant emotional weight, marking the transition from babyhood to toddlerhood. By using real butter, quality vanilla, and precise technique, you ensure that this messy milestone is also a delicious one. Even if the cake ends up in pieces on the floor, the memory of that first sweet bite will remain.
For more ideas on how to craft perfect party desserts, explore our guide to celebration cakes. We would love to see your little one’s reaction to their special treat. Please tag us in your photos on Instagram, Pinterest, or Facebook.

