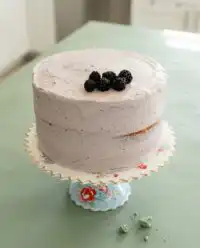
In the quiet ateliers of Paris, we are taught that true beauty often lies in what we choose to omit. During my early years of training, a mentor once explained that a cake with no garnish must be technically perfect, as there is nowhere for a mistake to hide. This minimalist cake embodies that philosophy, focusing on the pristine marriage of a tender crumb and a mathematically smooth finish.

This small-batch creation is a masterclass in texture and restraint, designed for those who find joy in clean lines and subtle flavors. By utilizing a unique Russian buttercream—a silky emulsion of butter and condensed milk—we achieve a level of stability and sheen that standard frostings cannot replicate. It is a canvas for your creativity, proving that simple ingredients, when treated with reverence, produce an extraordinary result.
The Aesthetic of Restraint
There is a profound sense of calm that comes with a minimalist cake, a trend that has captured the hearts of modern bakers worldwide. In an era of over-the-top decorations, this recipe invites you to slow down and appreciate the fundamental architecture of a well-made sponge. This approach is not merely about a lack of decoration; it is about the intentionality of every curve and the precision of every edge.
Technique becomes the star of the show when we strip away the excess. You will find that this cake offers a quiet luxury, making it the perfect centerpiece for intimate gatherings where the focus is on quality conversation and refined tastes. According to the experts at Black Velvet Cakes, the aesthetic of these cakes relies heavily on a soft color palette and a smooth-as-glass finish, which we will master together in the following steps.
Furthermore, the small-batch nature of this recipe allows you to focus entirely on the process. When you are only working with a few layers, you can ensure that the crumb is perfectly hydrated and the frosting is applied with the focus of a sculptor. It is a rewarding experience that transforms a simple afternoon of baking into a meditative practice of patisserie mastery.
Print
Minimalist Cake
- Total Time: 1 hour 20 mins
- Yield: 6 servings
- Diet: Vegetarian
Description
A sophisticated small-batch sponge cake featuring a tender crumb and a silky Russian buttercream finish. This recipe focuses on technical precision and minimalist aesthetics for a refined dessert experience.
Ingredients
- All-purpose flour
- Baking powder
- Baking soda
- Salt
- Full-fat Greek yogurt
- Milk
- Unsalted butter (at 68°F)
- Sweetened condensed milk
- Granulated sugar
- Large eggs
- Vanilla extract
- Fresh lemon zest
Instructions
- Preheat your oven to 350°F (175°C) and prepare cake tins by greasing them and lining the bottoms with parchment paper.
- Sift the flour, baking powder, baking soda, and salt into a bowl, then whisk briefly to distribute the leaveners.
- In a stand mixer, beat the sugar and eggs together until they reach the thick, pale ribbon stage before adding vanilla and lemon zest.
- Whisk together the milk and Greek yogurt, then combine with the egg base on low speed.
- Gently fold the sifted dry ingredients into the wet mixture in three separate additions using a silicone spatula.
- Divide the batter into the tins and bake for 25 to 30 minutes, allowing them to cool completely on a wire rack after a short rest in the tins.
- Beat the room-temperature butter for five minutes until pale and fluffy, then gradually stream in the condensed milk while continuing to beat.
- Assemble the cake by applying a thin crumb coat, chilling for 20 minutes, and then finishing with a smooth final layer of buttercream using a bench scraper.
Notes
For the most professional results, ensure your butter is exactly at room temperature (around 68°F) before starting the buttercream to prevent separation. If the frosting appears too soft, chill it for 10 minutes and whip it again to regain its structural integrity before decorating.
- Prep Time: 30 mins
- Cook Time: 30 mins
- Category: Dessert
- Method: Baking
- Cuisine: French-inspired
The Foundation of Quality

To achieve a cake that is as structurally sound as it is delicate, each ingredient must be selected and prepared with care. The chemistry of this sponge relies on the balance of acidity and fat, creating a melt-in-the-mouth sensation that serves as the perfect base for our stable frosting.
- The Flour and Leaveners: We use a combination of all-purpose flour, baking powder, and baking soda. The baking powder provides the initial lift, while the baking soda reacts with the Greek yogurt to produce a fine, even crumb without large air pockets.
- Full-Fat Greek Yogurt: This is our secret to a moist, tangy interior. The acidity tenderizes the gluten, ensuring the cake remains soft for days, while the fat content adds a richness that milk alone cannot provide.
- Unsalted Butter: Quality is paramount here. Your butter should be at a true room temperature—about 68°F (20°C)—to allow for a perfect emulsion with the sweetened condensed milk. This creates the signature “Russian Buttercream” that is the hallmark of the minimalist aesthetic.
- Sweetened Condensed Milk: This serves as both the sweetener and the stabilizer for our frosting. It results in a finish that is much smoother and less grainy than traditional powdered sugar buttercreams.
- Lemon Zest and Vanilla: These provide a subtle, aromatic backbone. The lemon zest is not intended to make the cake “lemony” but rather to brighten the other flavors and provide a clean finish on the palate.
The Method of Precision
Step 1: Preparation and Mise en Place
Begin by preheating your oven to 350°F (175°C). Prepare your cake tins by greasing them lightly with butter and lining the bottoms with parchment paper. In French patisserie, we call this *mise en place*—having everything in its place. Ensure your eggs, milk, and yogurt are all at room temperature to prevent the batter from curdling during the mixing process.
Step 2: Sifting the Dry Ingredients
Sift the flour, baking powder, baking soda, and salt into a medium bowl. Sifting is a vital technique that removes any lumps and aerates the flour, contributing to the lightness of the final sponge. Whisk these briefly to ensure the leavening agents are perfectly distributed throughout the flour.
Step 3: The Creaming Method
In the bowl of a stand mixer, beat the sugar and eggs together until they reach what we call the ribbon stage. This means the mixture should be pale, thick, and leave a trail on the surface when the whisk is lifted. This process incorporates the air necessary for a light rise. Slowly stream in the vanilla extract and lemon zest while continuing to mix.
Step 4: Emulsifying the Fats
Whisk together the milk and the full-fat Greek yogurt until smooth. Add this mixture to your egg and sugar base, mixing on low speed until just combined. Be careful not to over-mix at this stage, as we want to preserve the delicate air bubbles we have worked so hard to create.
Step 5: Integrating the Flour
Add the sifted dry ingredients to the wet mixture in three separate additions. Fold gently by hand using a silicone spatula, using a circular motion that cuts through the center and lifts from the bottom. This technique prevents the overdevelopment of gluten, which would result in a tough, bread-like cake rather than a tender sponge.
Step 6: The Bake
Divide the batter evenly between your prepared tins. Bake for 25 to 30 minutes, or until a wooden skewer inserted into the center comes out clean. The tops should be golden and spring back slightly when touched. Allow the cakes to cool in their tins for ten minutes before transferring them to a wire rack to cool completely. A warm cake will melt the frosting, ruining the minimalist finish.
Step 7: Crafting the Russian Buttercream
While the cakes cool, prepare the frosting. Beat the room-temperature butter until it is exceptionally pale and fluffy—this usually takes about five minutes of high-speed mixing. Gradually pour in the sweetened condensed milk in a slow, steady stream while continuing to beat. The mixture will transform into a glossy, thick, and stable cream that is remarkably easy to smooth.
Step 8: The Crumb Coat and Final Finish
Place your first layer on a cake turntable. Apply a thin layer of buttercream—the crumb coat—to seal in any loose fragments. Chill for 20 minutes. Once set, apply a generous second layer. Use a bench scraper held at a 45-degree angle to the cake to create perfectly vertical, smooth sides. For the top, sweep a palette knife from the edge toward the center for a sharp, clean rim.
Pastry Wisdom for a Pristine Finish

Achieving the signature look of a minimalist cake requires a steady hand and a few professional secrets. The temperature of your workspace is just as important as the temperature of your ingredients. If the room is too warm, your buttercream will lose its structural integrity; if it is too cold, it will become difficult to spread smoothly. Aim for a comfortable 70°F (21°C) to keep the frosting pliable.
When smoothing the sides, keep your bench scraper completely still while you rotate the turntable with your other hand. This continuous motion is the only way to avoid vertical lines or dips in the frosting. If you find small air bubbles appearing, gently heat your metal palette knife with a kitchen torch or hot water (wiping it dry first) and pass it over the surface to melt the frosting into a glass-like finish. For more insights on scaling these techniques down for even smaller treats, see our guide on the modern mini aesthetic.
Always use a high-quality food coloring gel rather than liquid drops. Minimalist cakes often use muted, sophisticated tones like sage green, dusty rose, or pale terracotta. Gels allow you to achieve these specific hues without thinning the buttercream, which is essential for maintaining those sharp, clean edges we desire.
Refined Twists on a Classic Foundation
While the classic vanilla and lemon profile is timeless, this recipe serves as a versatile base for several elegant variations. You might consider infusing the milk with culinary lavender or Earl Grey tea leaves before mixing. Simply heat the milk with the tea, let it steep for ten minutes, then strain and cool it back to room temperature. This adds a sophisticated floral note that pairs beautifully with the creaminess of the Russian buttercream.
Another exquisite option is to create a heart cake shape using this same batter and frosting technique. The minimalist style translates beautifully to unconventional shapes, where the focus remains on the clean application of the frosting rather than intricate piping. You could also substitute the lemon zest for orange zest and add a tablespoon of Grand Marnier to the frosting for a bright, citrusy profile that feels distinctly Parisian.
For a nutty variation, replace 50 grams of the flour with finely ground almond flour. This will result in a slightly denser, richer crumb that has a wonderful toasted aroma. Regardless of the flavor profile you choose, remember that the goal is balance; no single ingredient should overwhelm the delicate harmony of the cake and cream.
Presentation and The Final Touch

When it comes to serving a minimalist cake, the presentation should mirror the cake’s own simplicity. Place the cake on a flat, matte ceramic pedestal or a simple wooden board. Avoid ornate silver platters that might compete with the clean lines of your work. For a touch of French tradition, serve each slice with a small spoonful of lightly sweetened Chantilly cream on the side, but keep the cake itself unadorned.
To achieve the cleanest slices, use a long, thin knife dipped in hot water and wiped dry between every single cut. This prevents the frosting from dragging and ensures the interior layers are displayed with the same precision as the exterior. This technique is particularly effective when serving a vintage cake or any multi-layered creation where the cross-section is part of the visual appeal. Pair your slices with a delicate white tea or a dry Champagne to complement the subtle sweetness of the condensed milk frosting.
The Art of Mastery
Mastering the minimalist cake is a journey of patience and a celebration of the fundamentals of patisserie. By focusing on the quality of your ingredients and the precision of your movements, you have created something that is far more than just a dessert—it is a piece of edible art. Remember that every cake you bake is an opportunity to refine your technique and develop your own signature style within the bounds of restraint.
I encourage you to continue your journey into the world of refined baking by exploring our other celebration cakes, where we apply these same principles of precision to larger formats. The beauty of small-batch baking is that it allows us to strive for perfection in every bite. I look forward to seeing your elegant creations and hope they bring a sense of calm and joy to your table.
Connect with our community of bakers for more inspiration and technique tips:


