In my early days at a quiet patisserie in Lyon, the most requested creation was never the most complex; it was the one that tasted like a cherished memory. This birthday cake represents that intersection of nostalgic comfort and professional precision, where every crumb is intentional. Small-batch baking allows us to focus on the delicate emulsion of the batter, creating a texture that feels both airy and substantial.

This specific recipe produces a tender, golden sponge paired with a silky cocoa frosting that avoids the cloying sweetness of mass-produced versions. It is a celebratory centerpiece designed for those who appreciate the quiet brilliance of a well-executed classic. Whether for a milestone or a simple gathering, this cake honors the occasion with genuine quality and refined flavor.
The Art of a Perfect Celebration
There is a specific beauty in a cake that needs no gimmicks to stand out. This recipe relies on the hot milk method, a classic technique that creates a remarkably fine, even crumb that remains moist for days. Unlike standard creaming methods, this approach yields a sponge that is both sturdy enough for layering and delicate enough to melt on the tongue.
The frosting is equally thoughtful, utilizing a balance of hot water and softened butter to create a glossy, spreadable consistency that rivals professional ganache. By using high-quality cocoa powder and controlling the temperature of our fats, we achieve a deep chocolate profile that provides a sophisticated contrast to the vanilla sponge. It is a testament to the idea that when we treat simple ingredients with respect, the results are truly extraordinary.
Mastering this cake means you have a reliable foundation for any celebration. It is a recipe that grows with you, welcoming small refinements while always delivering a consistent, joyful result. The lack of fuss in the preparation allows you to focus on the most important part of baking: the care you put into the process.
Print
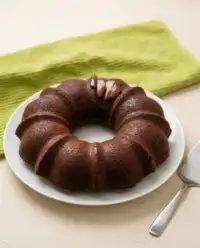
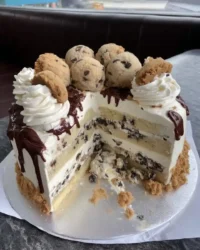
Vanilla Birthday Cake with Rich Chocolate Frosting
- Total Time: 55 mins
- Yield: 12 servings
- Diet: Vegetarian
Description
Experience the perfect balance of nostalgia and technique with this tender vanilla sponge made using the traditional hot milk method. Topped with a silky, deep cocoa frosting, this cake offers a refined crumb and a professional finish suitable for any landmark celebration.
Ingredients
- 240 grams unbleached all-purpose flour
- 4 large eggs, room temperature
- 1 1/2 cups granulated sugar
- 1 cup whole milk
- 1/2 cup unsalted butter, cubed
- 2 teaspoons baking powder
- 1/2 teaspoon salt
- 2 tablespoons vegetable oil
- 1 teaspoon vanilla extract
- 1/4 teaspoon almond extract
- 3 cups confectioners’ sugar, sifted
- 1/2 cup natural cocoa powder
- 1/2 cup boiling water
- 1/2 cup unsalted butter, softened
- 1 teaspoon vanilla extract (for frosting)
Instructions
- Preheat your oven to 325°F (163°C) and prepare two 8-inch or 9-inch round cake pans by greasing them and lining the bottoms with parchment paper.
- In a stand mixer, beat the eggs and granulated sugar on high speed for several minutes until the mixture reaches the ribbon stage, appearing pale and thick.
- Sift the flour, salt, and baking powder together, then gently fold these dry ingredients into the egg mixture in three separate additions using a spatula.
- Combine the milk and butter in a saucepan over medium heat until the butter melts and the liquid just begins to simmer, then stir in the vegetable oil and extracts.
- Temper the batter by stirring one cup of the egg mixture into the hot milk liquid before gently folding the entire tempered mixture back into the main batter.
- Divide the batter evenly between the pans and bake for 28 to 35 minutes until golden and a tester comes out clean; cool in pans for 10 minutes before moving to a wire rack.
- For the frosting, whisk the cocoa powder and half the confectioners’ sugar with hot water and vanilla, then beat in the softened butter and remaining sugar until glossy and smooth.
Notes
To ensure a perfect rise, ensure your eggs are truly at room temperature before beating to maximize aeration during the ribbon stage. When folding in the hot milk mixture, use a gentle hand to maintain the delicate structure of the sponge, and always allow the cakes to cool completely to room temperature before applying the frosting to prevent melting.
- Prep Time: 25 mins
- Cook Time: 30 mins
- Category: Dessert
- Method: Baking
- Cuisine: French-American
The Foundation of Quality Ingredients

To achieve the best results, we must look at the role each component plays in the structural integrity and flavor of the cake. Every ingredient should be at room temperature unless otherwise specified, as this allows the proteins and fats to bond correctly during the mixing process.
- Unbleached All-Purpose Flour: This provides the necessary structure without making the cake tough. Weighing your flour is vital; 240 grams is the precise amount needed for this specific hydration level.
- Large Eggs: At room temperature, eggs aerate much more effectively. They provide the primary lift and richness for the sponge.
- Granulated Sugar: Beyond sweetness, sugar aids in the tenderization of the crumb by interfering with gluten development.
- Whole Milk and Butter: The combination of hot milk and melted butter creates a unique emulsion that coats the flour particles, resulting in a velvet-like texture.
- Natural Cocoa Powder: For the frosting, natural cocoa provides a classic, nostalgic flavor, while Dutch-process offers a darker, more bittersweet experience.
- Vanilla and Almond Extracts: Quality extracts are the perfumes of the pastry world. The hint of almond is a secret of many French bakers to deepen the floral notes of the vanilla.
Using premium fats and fresh leavening agents is the difference between a good cake and one that is remembered long after the party ends.
The Method of Precision
Step 1: Preparation and Temperature Control
Preheat your oven to 325°F (163°C) with a rack positioned in the center. Lightly grease two 8-inch or 9-inch round cake pans and line the bottoms with parchment paper. This layer of protection makes certain that your delicate sponge releases cleanly after cooling.
Step 2: Aerating the Eggs and Sugar
In a large bowl, or the bowl of a stand mixer, combine the four eggs and the sugar. Beat these together at high speed for several minutes until the mixture reaches the ribbon stage. You will know it is ready when the batter is pale, thick, and falls from the whisk in a slow, trailing ribbon that holds its shape for a few seconds.
Step 3: Integrating the Dry Ingredients
Whisk together the flour, salt, and baking powder in a separate bowl. Sift these dry ingredients over the egg mixture in three additions. Gently fold them in using a large spatula, being careful not to deflate the air you have worked so hard to incorporate.
Step 4: The Hot Milk Emulsion
In a small saucepan or microwave-safe bowl, combine the milk and the butter pats. Heat until the butter is melted and the milk is just beginning to simmer. Remove from heat and stir in the vegetable oil and extracts. This warm liquid will help stabilize the batter.
Step 5: Tempering the Batter
To keep the batter light, pour about one cup of the egg-and-flour mixture into the hot milk. Stir this until smooth, then gently fold this tempered mixture back into the main batter. This technique prevents the heat from shocking the eggs and ensures a uniform consistency.
Step 6: Baking the Sponge
Divide the batter evenly between the prepared pans. Bake for 28 to 35 minutes, or until the tops are golden brown and a tester inserted into the center comes out clean. Allow the cakes to cool in the pans for 10 minutes before transferring them to a wire rack to cool completely.
Step 7: Creating the Silky Cocoa Frosting
While the cakes cool, prepare the frosting. Sift the cocoa powder and half of the confectioners’ sugar into a bowl to remove lumps. Stir in the hot water and vanilla to create a thick paste. Gradually beat in the softened butter and the remaining sugar until the frosting is glossy and supple.
Pastry Wisdom for Professional Results

Precision is the hallmark of a great baker. When you are measuring your ingredients, I highly suggest using a digital scale. The difference between a cup of flour that is packed down and one that is aerated can be up to 30 grams, which significantly changes the density of your cake for birthday celebrations. If you are interested in more traditional pairings, you might look at our guide on yellow cake with chocolate frosting for a different perspective on this classic duo.
Another vital tip is to monitor the temperature of your butter for the frosting. It should be soft enough to leave an indentation when pressed, but not so soft that it looks greasy. If the butter is too cold, the frosting will be lumpy; if it is too warm, it will lose its structural integrity and slide off the cake layers. If you find your frosting is too soft, a brief ten-minute rest in the refrigerator can often restore its workable texture.
Refined Twists on a Classic Foundation
Once you have mastered the base sponge, you can begin to introduce subtle variations. For a citrus-forward profile, omit the almond extract and fold the zest of two organic lemons into the batter just before baking. This adds a bright, uplifting note that pairs beautifully with a lighter whipped cream frosting. You can also see how we handle citrus flavors in our lemon rainbow cake for more inspiration.
For those who prefer a deeper, more complex chocolate experience, try substituting the natural cocoa in the frosting for a high-quality Dutch-process variety. This will result in a darker color and a more bittersweet flavor profile. You might also consider adding a layer of raspberry preserves between the cake rounds. The acidity of the fruit cuts through the richness of the cocoa, providing a balanced and sophisticated palate.
The Final Touch of Presentation

When it comes to serving, the presentation should be as thoughtful as the baking. For clean, professional slices, dip a long serrated knife in hot water and wipe it dry between each cut. This prevents the frosting from dragging and keeps the layers distinct. For a truly timeless look, you can study the aesthetics of a vintage cake to see how piped borders and simple pearls can create an air of elegance.
Serve each slice at room temperature to allow the butter in the frosting to soften and the flavors to fully bloom. This cake pairs exquisitely with a high-quality Darjeeling tea or a light-roast coffee. For those looking for more modern styling ideas, the famous techniques at Milk Bar show how exposed layers can also be quite striking.
The Art of Small Batches and Mastery
Baking a cake for a loved one is one of the most sincere gestures a person can make. By focusing on the techniques of aeration and emulsion, you have transformed simple pantry staples into a masterpiece of texture and taste. If you would like to continue your journey into more complex designs, I invite you to read about our various celebration cakes to find your next project. Remember that perfection is found in the details, and each cake you bake is an opportunity to refine your craft.
I would be delighted to see your results and hear about the memories you create with this recipe. Please share your progress with our community on Instagram, Pinterest, and Facebook. Happy baking, and may your kitchen always be filled with the scent of warm vanilla.

