I was staring at a minimalist art gallery wall when it hit me: why are we still hiding the most beautiful part of the cake under mountains of messy frosting? This Aesthetic Cake isn’t just a dessert; it’s a rebellion against the over-the-top, sugar-heavy towers that dominate our feeds. I wanted something that looked like a dream but tasted like a core memory.

We’re stripping it back to a perfect, small-batch yellow cake that’s as sturdy as it is tender. Whether you’re going for a vintage coquette vibe or a modern minimalist look, this is the canvas you’ve been waiting for.
Why This Aesthetic Cake Rules the Kitchen
When you’re making just six-inch cakes, you can afford to go wild with the details. This isn’t your average grocery store sheet cake; it’s a statement piece designed for those who appreciate the intersection of art and flavor. The texture is a revolutionary balance of light and dense, providing a powerful crumb that stands up to the most intricate decorating techniques without feeling heavy.
What makes this specific bake a breakthrough is the sheer versatility. It’s a fearless recipe that encourages you to play with your food again. We are talking about a unique, remarkable sponge that remains moist for days, making it the ultimate tool for anyone obsessed with food photography or just surprising their friends with something spectacular. It’s a triumph of small-batch baking that proves you don’t need a massive kitchen to create a mind-blowing masterpiece.
Print
Aesthetic Cake
- Total Time: 1 hour 25 mins
- Yield: 2 six-inch cakes
- Diet: Vegetarian
Description
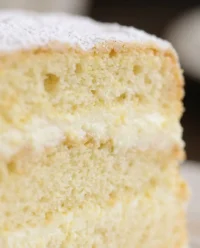
This small-batch yellow cake is designed for the modern baker who values both artistic presentation and a sophisticated, moist crumb. Its revolutionary texture provides a sturdy yet tender foundation perfect for minimalist decorating and high-end food photography.
Ingredients
- All-Purpose Flour
- Sour Cream
- Canola Oil
- Salted Butter (softened)
- Sugar
- Whole Milk
- Pure Vanilla Extract
- Sea Salt
- Baking Soda
- Baking Powder
- Eggs
Instructions
- Preheat your oven to 350 degrees F (175 degrees C) and prepare two 6-inch round pans by lining the bottoms with parchment paper and greasing the sides.
- In a medium-sized bowl, whisk together the all-purpose flour, baking soda, baking powder, and sea salt to aerate the dry ingredients.
- Using a stand mixer or hand mixer, beat the softened salted butter and sugar for approximately 2 minutes until the mixture becomes light and fluffy.
- Add the eggs one at a time to the butter mixture, followed by the vanilla extract, and beat for a full 60 seconds until thick and pale.
- Stir in the sour cream, whole milk, and canola oil until the batter reaches a smooth, consistent liquid gold appearance.
- Gently fold the dry ingredients into the wet mixture, stirring only until just combined to ensure a tender, soft crumb.
- Divide the batter evenly between the two prepared pans and bake for 30-35 minutes or until a toothpick inserted into the center comes out clean.
- Allow the cakes to rest in their pans on a wire rack for 30 minutes before removing them to cool completely prior to frosting.
Notes
For the cleanest aesthetic look, wrap your completely cooled cake layers in plastic wrap and chill them in the refrigerator for at least two hours before leveling. Cold cake layers are much easier to handle and produce fewer crumbs during the frosting process, ensuring your final design remains pristine.
- Prep Time: 20 mins
- Cook Time: 35 mins
- Category: Dessert
- Method: Baking
- Cuisine: American
The Flavor Arsenal

Every single component in this build serves a specific purpose in the grand design of the final product. We aren’t just throwing things in a bowl; we are constructing a flavor profile that is as balanced as a high-end perfume. This is the foundation of your creative journey.
- All-Purpose Flour: The structural engineer of our cake. It provides the necessary framework to hold up those beautiful layers without being too tough.
- Sour Cream: This is the secret weapon. It brings a subtle tang that cuts through the sweetness and ensures the crumb is shockingly moist.
- Canola Oil and Salted Butter: We use both because butter brings the flavor and oil brings the longevity. It’s a powerful combination that keeps the cake soft even after it’s been chilled for decorating.
- Whole Milk: Fat equals flavor. Don’t even think about using skim here; we need that richness to support the vanilla.
- Pure Vanilla Extract: Since this is a yellow cake, the vanilla is the star. Use the good stuff; your taste buds will thank you for the exciting depth it adds.
- Sea Salt: A daring touch that makes the sugar pop. It transforms a simple sweet treat into a complex flavor experience.
Let’s Build This
Step 1: Set the Stage
Preheat your oven to 350 degrees F (175 degrees C). Prepare your two 6” round pans by lining them with parchment paper and greasing the sides. This ensures a clean release, which is vital for that flawless look.
Step 2: The Dry Mix
In a medium bowl, whisk together your flour, baking soda, baking powder, and sea salt. This isn’t just about mixing; it’s about aerating the ingredients so your cake rises with a stunning, even texture.
Step 3: Creaming the Base
Using a stand mixer or hand mixer, beat the softened butter and sugar until the mixture is light, fluffy, and looks like a pale cloud. This should take about 2 minutes. Do not rush this—it’s where the magic happens.
Step 4: Emulsifying the Eggs
Add the eggs one at a time, followed by the vanilla. Beat for a full 60 seconds. You want to see a thick, pale yellow batter that is ready to accept the rest of the moisture.
Step 5: Marrying the Liquids
Stir in the sour cream, whole milk, and canola oil. The mixture might look a little strange at first, but keep stirring until it is a smooth, liquid gold consistency.
Step 6: The Final Incorporation
Add the dry ingredients to the wet. Stir only until just combined. Over-mixing is the enemy of a tender cake; we want a revolutionary soft crumb, not a tough bread-like texture.
Step 7: The Bake
Divide the batter evenly between your two pans. Bake for 30-35 minutes. You’ll know it’s a success when a toothpick comes out clean or with just a few moist crumbs clinging to it.
Step 8: The Cool Down
Let the cakes rest in the pans on a wire rack for 30 minutes before removing them. Once they are out, let them cool completely. A warm cake will melt your frosting and ruin your beautiful design.
Riley’s Secret Hacks

Temperature is everything in the world of bold baking. Make sure your eggs and milk are at room temperature before you start. This allows the batter to emulsify into a smooth, stable structure that results in a jaw-dropping crumb. If you’re in a rush, place your eggs in a bowl of warm water for five minutes.
Another pro move is the crumb coat. Before you go for the final finish, apply a very thin layer of frosting to lock in any loose crumbs. Chill the cake for 20 minutes before applying your final layer of chocolate buttercream. If you’re looking for more ways to master small-scale bakes, check out my guide on the modern-mini style for even more inspiration.
Twist It Up
Why not turn this into a citrus explosion? Swap the vanilla extract for almond extract and add two tablespoons of fresh lemon zest to the batter. This creates a bright, thrilling contrast to the rich chocolate frosting. It’s a daring move that pays off in every bite.
If you want something even more colorful, you can take some cues from my lemon-rainbow-cake and add gel food coloring to the batter for a surprise inside. You can also swap the whole milk for buttermilk if you want an even tangier profile that feels sophisticated and unique.
Showtime

This cake deserves a stage. Serve it on a simple white marble slab or a vintage glass pedestal to let the design speak for itself. It pairs beautifully with a dark roast coffee or even a spicy bourbon if you’re serving it at an evening gathering. The bitterness of the drink highlights the sweetness of the chocolate buttercream.
For a truly spectacular presentation, consider modeling your layout after a heart-cake display. Use fresh edible flowers or small pearls to add a touch of elegance that makes the entire experience feel like a curated event.
The Final Bite
Baking is the ultimate playground for creativity, and this recipe is your ticket to a fearless kitchen adventure. Don’t be afraid to make mistakes; sometimes the most explosive designs come from a happy accident. Whether you are aiming for a minimalist look or something inspired by a vintage-cake, the goal is to have fun and push the boundaries of what a yellow cake can be. For more tips on achieving that perfect minimalist look, take a look at this guide on aesthetic minimalist cakes. Catch you on the next flavor experiment!
Follow my latest bakes here:
