The classic creaming method, originating in traditional European pastry, requires patient friction to build structural stability, rewarding the disciplined baker with a sublime Blackberry Vanilla Cake.

To master the Blackberry Vanilla Cake is to understand how fat and air interlace to support a heavy, moisture-rich crumb. This cake demands your undivided attention during the initial creaming phase, where room-temperature butter and sugar transform into a pale, voluminous base. By respecting the physical limits of temperature and emulsion, your crumb will achieve an incomparable velvet texture. The reward is a balanced dessert that bridges the sharpness of fresh fruit with the deep warmth of real vanilla bean.
The Craft Behind This Blackberry Vanilla Cake
Prep: 40 min · Serves: 16 · Difficulty: Medium
- Develops an incredibly fine, velvet crumb structure.
- Balances tart fresh berries with rich vanilla.
- Uses a classic European-style creaming technique.
- Features a concentrated fruit curd core.
- Bakes evenly in compact six-inch pans.
When you dedicate your time to this design, you are practicing the fundamental disciplines of classic pastry. If you have previously enjoyed a classic vanilla butter cake, this berry-infused variation offers a sophisticated evolution of those traditional flavors. Every step of this method is designed to build your confidence and expand your technical repertoire at the oven. This is the recipe that proves how small disciplines yield magnificent rewards.
Get The Full Cake Recipe
Print
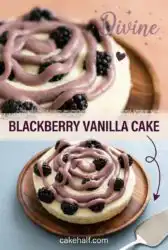
Blackberry Vanilla Cake
- Total Time: 2 hours 13 mins
- Yield: 16 servings
Description
This sophisticated Blackberry Vanilla Cake features a velvety, moisture-rich crumb layered with a sharp, concentrated blackberry curd and silky vanilla bean frosting. Perfect for special occasions, it showcases the classic European creaming technique for a professional, bakery-quality finish.
Ingredients
- Fresh blackberries
- Unsalted butter, room temperature
- Sour cream
- Vanilla bean seeds
- Blackberry curd
- Large eggs
- All-purpose flour
- Granulated sugar
- Baking powder
- Baking soda
- Milk
- Powdered sugar
Instructions
- Prepare the pans. Lightly grease three six-inch round cake pans and line the bottoms with parchment paper for easy removal.
- Cream butter and sugar. Beat room-temperature butter and granulated sugar for three minutes until the mixture is pale, airy, and voluminous.
- Emulsify the eggs. Add eggs one at a time on low speed, ensuring each is fully incorporated before adding the next to maintain a smooth batter.
- Combine dry and wet. Alternately fold in the flour mixture and the liquid mixture, finishing with flour, and mixing only until just combined to prevent gluten development.
- Dust the blackberries. Toss fresh blackberries with one tablespoon of flour to create a light coating that prevents them from sinking during the bake.
- Bake the layers. Divide the batter evenly into the three prepared pans, distribute the berries on top, and bake at 350°F for 28 to 33 minutes.
- Chill the cakes. Cool the layers on a wire rack before wrapping them in plastic and refrigerating for at least two hours to firm the structure.
- Whip the frosting. Beat softened butter with vanilla bean seeds until light, then gradually mix in powdered sugar and milk until the consistency is fluffy.
- Assemble with precision. Level the chilled cakes, then layer them with frosting and a well of blackberry curd, finishing with a final crumb coat and chill.
Notes
- Use a digital kitchen scale for all measurements to ensure the delicate crumb structure remains consistent.
- Ensure all dairy and egg components are at room temperature to prevent the batter from curdling during the creaming stage.
- Keep a thin spatula or knife handy when applying the crumb coat to ensure a perfectly level surface between layers.
- If the frosting seems too stiff or separates, gently warm the outside of the mixing bowl for a few seconds to restore its silky texture.
- Prep Time: 40 mins
- Cook Time: 33 mins
- Category: Dessert
- Method: Baking
- Cuisine: European
What This Recipe Requires

Before lighting the oven, your workspace must reflect the order of a professional patisserie. Every ingredient must be measured by weight rather than volume to achieve the precise chemical balance required for a delicate sponge. Gather these components on your benchtop and allow all cold items to adjust to the ambient temperature of your kitchen.
- Fresh Blackberries: These berries provide a sharp, acidic contrast to the buttery crumb, structural integrity, and deep color without weighing down the batter.
- Unsalted Butter: High-quality butter with an eighty-two percent fat content is essential for establishing the foundational air pockets during creaming.
- Sour Cream: This addition introduces lactic acid to tenderize the gluten strands, resulting in a crumb that remains moist for days.
- Vanilla Bean Seeds: Real vanilla seeds deliver an intense, woody aroma and visual elegance that synthetic extracts cannot replicate.
- Blackberry Curd: Serving as the concentrated core of the layers, this curd delivers a clean, sharp punch of fruit flavor that offsets the sweet frosting.
- Large Eggs: Tempered eggs act as the emulsifier, binding fat and liquid together into a smooth, cohesive batter.
| Ingredient | Why It Matters |
|---|---|
| Room Temperature Butter | Creates the physical structure by trapping tiny pockets of air during creaming. |
| Sour Cream | Lowers the pH of the batter to weaken gluten development, ensuring softness. |
| Flour-Dusted Blackberries | Prevents the fresh fruit from sinking to the bottom of the pans during baking. |
| Vanilla Bean | Infuses the frosting with genuine botanical complexity rather than one-dimensional sweetness. |
| Blackberry Curd | Offers a concentrated fruit acidity that slices through the rich dairy of the buttercream. |
Working Through the Recipe

Step 1: Prepare the Pans and Mise en Place
Begin by lightly greasing three six-inch round cake pans and lining the bottoms with parchment paper. This step is a non-negotiable insurance policy against sticking, allowing for clean releases later. Weigh out all ingredients using your digital scale, arranging them in neat bowls on your workspace. Let your eggs, milk, and butter sit on the counter until they reach a uniform, comfortably cool room temperature of approximately sixty-eight degrees Fahrenheit.
Step 2: Cream the Butter and Sugar
Fit your stand mixer with the paddle attachment, then combine the room-temperature butter and granulated sugar. Beat on medium speed for three full minutes until the mixture turns pale, voluminous, and no longer clings to the bowl sides. You are looking for a texture resembling wet sand that has transformed into a soft, spreadable cream. This mechanical aeration is the physical foundation that determines the final loft of your layers.
Step 3: Emulsify the Eggs
With the mixer running on low speed, introduce your eggs one at a time, allowing each to be fully absorbed before adding the next. This deliberate pace prevents the fat and liquid from separating, which would ruin the uniform structure of the crumb. If your mixture begins to look curdled, pause and add a single tablespoon of your weighed flour to bind the emulsion. The final mixture should appear glossy, smooth, and slightly thickened.
Step 4: Alternate the Dry and Wet Ingredients
Sift your flour, baking powder, and baking soda into a medium bowl, while whisking the milk, sour cream, and vanilla extract together in another. Set your mixer to the lowest speed, then add one-third of the flour mixture, followed by half of the liquids. Repeat this sequence, finishing with the final third of the flour to prevent over-developing the gluten. Stop mixing the instant you see no more dry pockets of flour remaining.
Step 5: Dust the Blackberries
Measure your fresh blackberries and toss them gently with a single tablespoon of all-purpose flour in a small bowl. The flour forms a light, protective barrier that absorbs surface moisture, helping the berries cling to the batter rather than sinking to the bottom. Each berry should look dusted with a thin white coat, with no dry flour pooling in the bottom of your bowl. Handle the fruit with care so you do not rupture the delicate skins.
Step 6: Bake the Blackberry Vanilla Cake Layers
Divide your smooth batter evenly among your three prepared pans, using a digital scale to verify exactly three hundred grams per pan. Distribute the flour-dusted berries evenly across the top of the batter in each pan, pressing them only halfway down. Transfer the pans to a preheated oven at three hundred and fifty degrees Fahrenheit and bake for twenty-eight to thirty-three minutes. They are ready when a wooden skewer inserted in the center emerges with only a few moist crumbs clinging to it.
Step 7: Chill the Baked Layers
Allow the cakes to rest in their pans on a wire rack for ten minutes until the hot metal is comfortable to touch. Carefully run a thin spatula around the edges, invert the layers onto the racks, and peel away the parchment paper. Wrap each warm layer tightly in plastic wrap and transfer them directly to the refrigerator for at least two hours. Chilling firms the crumb structure, making the leveling and assembly process clean and virtually crumb-free.
Step 8: Whip the Vanilla Bean Frosting
In a clean mixer bowl, combine your softened butter with the scraped seeds of half a vanilla bean. Beat on high speed for five to six minutes until the mixture turns exceptionally pale, almost white, and doubles in volume. Gradually sift in your powdered sugar on low speed, then add the milk and beat on high for three minutes until fluffy. Finish by beating on low speed for five minutes to press out any stubborn air bubbles, guaranteeing a silky finish.
Step 9: Assemble with Precision
Level your chilled layers using a sharp serrated knife, keeping your hand completely level. Place your first layer on a serving plate, spread a thin layer of frosting over it, and use your offset spatula to carve a shallow well in the center. Fill this well with half of your blackberry curd, then place the second layer on top and repeat. Once the third layer is in place, apply a thin crumb coat of frosting over the entire cake and chill for fifteen minutes before applying the final, decorative layer of buttercream.
Technical Notes

Weighing your ingredients is the single most important habit for pastry precision. If your cake layers bake up dome-shaped or dry, you have likely measured your flour by volume rather than using a digital scale. A scale guarantees consistent hydration levels, giving you a predictably tender crumb every time.
Room temperature for butter means sixty-five to sixty-eight degrees Fahrenheit, where it is still cool to the touch but yields to gentle thumb pressure. If your butter is too warm, it cannot trap air during the creaming step, leading to a heavy, greasy sponge. Let your butter sit on the counter for an hour before baking rather than softening it in the microwave.
If your frosting appears curdled or separated during whipping, your butter and milk were likely at different temperatures. To correct this, gently warm the outside of your mixing bowl with a warm towel or hair dryer for thirty seconds while beating on medium-high speed. The slight warmth will melt just enough fat to restore the emulsion into a smooth, luxurious spread.
When mixing the initial batter, observe the movement of the spatula. True mastery of the ribbon stage is a skill developed over time, where the batter flows from your spoon in thick, unbroken folds that hold their shape on the surface for three seconds before dissolving. This visual cue indicates that your liquid-to-solid ratio is perfectly balanced.
Should you find yourself enjoying the bright contrast of fresh fruit and rich dairy in this recipe, consider trying our recipe for strawberry vanilla cake citrus baking. That particular bake relies on similar foundational principles of dairy fat emulsification to achieve its remarkable tenderness. Applying those same step-by-step methods will help you build your confidence with seasonal fruit cakes.
To achieve a pristine slice, always use a long, thin chef’s knife dipped in hot water and wiped clean between every single cut. This technique guarantees a clean, sharp cross-section that beautifully showcases the distinct layers of white frosting and dark purple curd. A messy cut drags the frosting through the filling, obscuring the precise work you have done inside.
For additional guidance on adjusting batter volumes for different pan configurations, you may consult this original blackberry layer cake preparation which illustrates alternative scale-up options.
Frequently Asked Questions
Can I use frozen blackberries instead of fresh ones?
You can use frozen blackberries, but you must not thaw them before adding them to the batter. Thawing releases excess moisture that will bleed into the sponge, turning your batter purple and creating soggy pockets. Dust the frozen berries in flour and add them directly to the pans immediately before baking.
Why did all my blackberries sink to the bottom of the cake pans?
This common error occurs either because the berries were too heavy or the batter was mixed too thin. Verify you dust the berries in flour to create friction, and avoid over-mixing the batter, which breaks down its structural density. Additionally, placing the berries on top of the poured batter rather than folding them in helps prevent sinking.
How should I store this cake once it has been cut?
Store the cut cake in the refrigerator with a piece of plastic wrap pressed directly against the exposed cake faces. This physical barrier prevents dry air from robbing the sponge of its moisture. Allow your individual slices to sit at room temperature for fifteen minutes before serving to soften the butter fats.
Is it possible to make the cake layers ahead of time and freeze them?
Yes, you can easily prepare and freeze the layers up to three weeks in advance. Wrap the cooled layers tightly in a double layer of plastic wrap and a layer of aluminum foil before freezing. Thaw them in their wrapping in the refrigerator overnight before assembling to guarantee their optimal moisture levels.
What can I use as a substitute for sour cream?
Full-fat unsweetened Greek yogurt is the most suitable alternative for sour cream because it has a similar acidity and fat content. Avoid using low-fat or fat-free varieties, as they do not provide the necessary lipids to tenderize the gluten. The acid is crucial for reacting with the baking soda to give the cake its lift.
Will store-bought blackberry jam work instead of the curd?
While store-bought jam is an option, it is often too sweet and lacks the bright, clean acidity of a true curd. If you choose to use jam, select a high-quality, low-sugar preserve and add a small squeeze of fresh lemon juice to balance the sweetness. Be sure to build a sturdy frosting barrier around the edges to keep the looser jam from leaking.
Considered Variations
Introduce a bright, clean note to the sponge by rubbing the freshly grated zest of one lemon into the dry sugar before creaming the butter. The abrasive crystals release the essential oils of the citrus fruit, infusing the entire cake with a clear aroma that complements the blackberries. For another variation of citrus and berry pairings, read our guide on making a classic lemon blueberry cake.
Replace twenty percent of the all-purpose flour with finely ground blanched almond flour to introduce a subtle nuttiness and a more delicate, tender crumb structure. Almond flour lacks gluten-forming proteins, which further tenderizes the cake while adding moisture. Pair this variation with a tiny splash of pure almond extract in the vanilla bean frosting to highlight the stone-fruit notes of the blackberries.
Should fresh blackberries be unavailable during your local baking season, you can easily adapt this recipe to use red raspberries or wild blueberries. Keep the proportions exactly the same, making certain you toss the alternative berries in flour to prevent them from sinking into the batter. This adaptability makes the base sponge a reliable canvas for whatever high-quality fruit is currently at its seasonal peak.
Presentation and Service
A cake of this calibre deserves an elegant presentation that matches the care put into its baking. Serve this dessert on a flawless ceramic platter to keep the delicate butter frosting from softening too quickly in warm room conditions. Slice the cake at the table to reveal the beautiful contrast of dark berry curd nestled between the pale sponge and white vanilla bean frosting.
This cake pairs exceptionally well with clean, unsweetened beverages that do not compete with its delicate flavor profile. A cup of light black tea, such as Earl Grey, provides a floral citrus background that beautifully highlights the blackberries. If you prefer a simpler presentation without the fruit filling, you can always master our classic vanilla layer cake for an equally refined teatime experience.
For a stunning final touch, garnish the top of the cake with a few fresh, whole blackberries and sprigs of fresh mint or edible flowers just before serving. Verify any botanical decorations you use are thoroughly cleaned and verified as food-safe. This simple, rustic styling allows the natural beauty of the fruit to speak for itself without cluttering the clean lines of your piping.

Closing Notes
Baking this Blackberry Vanilla Cake is more than a culinary task; it is an exercise in mindfulness and precision. By taking the time to cream your butter correctly, emulsify your eggs, and measure your ingredients by weight, you have translated a simple recipe into an art form. The result of your patience is a delicate, structurally sound masterpiece that is as satisfying to slice as it is to eat.
If you find joy in this meticulous approach to baking, you may also enjoy preparing our strawberry vanilla cake, which uses a similar fruit-forward philosophy. Each recipe we share is designed to refine your skills and build your confidence at the bench. I invite you to share your baking journey, your clean cross-sections, and your beautiful creations with our community.
Connect with us and show us your results on our social platforms. You can find inspiration and share your progress on Pinterest, engage with other dedicated home bakers on Facebook, or watch step-by-step technical demonstrations on TikTok. Let us continue to master the fine art of baking together, one precise layer at a time.

