In my early days at the patisserie, I learned that the marriage of salt and deep cacao is a fundamental lesson in balance. This creation captures that precise harmony in every bite.

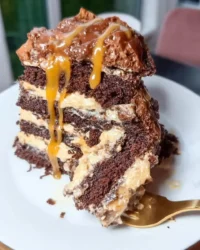
This Dark Chocolate Peanut Butter Cake is a masterclass in textures, featuring a moist crumb and a silky finish. It represents the quiet satisfaction of achieving professional results at home.
The Art of This Technique
Experience a perfect balance of salt, sugar, and deep cocoa.
- 🍫 Deeply moist crumb from quality cocoa
- 🥜 Silky peanut butter frosting texture
- 🍯 Glossy ganache finish for visual elegance
- ⚖️ Balanced saltiness that highlights the chocolate
- 🎂 Professional structure suitable for any occasion
Get The Full Cake Recipe
Print
Dark Chocolate Peanut Butter Cake
- Total Time: 1 hour 45 mins
- Yield: 12 servings
Description
This decadent Dark Chocolate Peanut Butter Cake combines a deeply moist cocoa sponge with a rich, silky peanut butter frosting and a luxurious ganache finish. Perfect for special occasions, it masterfully balances savory saltiness with deep chocolate notes for a professional-grade dessert experience.
Ingredients
- 2 1/2 cups all-purpose flour
- 2 cups granulated sugar
- 3/4 cup natural cocoa powder
- 1 1/2 tsp baking soda
- 1 tsp baking powder
- 1 tsp salt
- 1/2 cup canola oil
- 2 large eggs
- 1 cup full-fat sour cream
- 1 cup buttermilk
- 1 tbsp vanilla extract
- 1/2 cup hot coffee or water
- 1 cup mini semi-sweet chocolate chips
- 1 cup creamy peanut butter
- 1/2 cup unsalted butter, softened
- 2 cups confectioners’ sugar
- 1/4 cup heavy cream
- 6 oz high-quality dark chocolate (at least 56% cacao)
- 1/2 cup heavy cream (for ganache)
Instructions
- Preheat and prep. Preheat oven to 350°F (177°C) and grease three 9-inch cake pans with parchment paper lining.
- Whisk dry ingredients. Combine flour, cocoa powder, sugar, baking soda, baking powder, and salt in a large bowl.
- Emulsify wet ingredients. Beat oil, eggs, and sour cream on medium-high speed before adding the buttermilk and vanilla.
- Combine the batter. Pour wet into dry with the hot coffee, whisking until combined, then fold in the flour-coated chocolate chips.
- Bake the layers. Divide batter into pans and bake for 24–26 minutes, then cool completely on a wire rack.
- Prepare the frosting. Cream the butter and peanut butter together, then gradually beat in sugar, salt, vanilla, and heavy cream until fluffy.
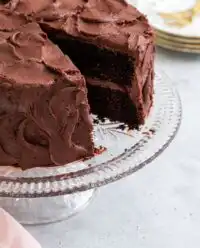
- Assemble the cake. Stack layers with frosting between each, apply a thin crumb coat to the outside, and chill for 30 minutes.
- Finish with ganache. Pour heated heavy cream over chopped chocolate, let sit for three minutes, stir until smooth, and drizzle over the chilled cake.
Notes
Ensure all refrigerated ingredients such as eggs and sour cream reach room temperature before starting to ensure a stable emulsion and a tender, even crumb. Using processed creamy peanut butter instead of natural varieties is essential for maintaining a stable frosting structure that holds up between the cake layers.
- Prep Time: 45 mins
- Cook Time: 26 mins
- Category: Dessert
- Method: Baking
- Cuisine: American
The Foundation of Flavor

Selecting your ingredients with care is the first step toward a superior Dark Chocolate Peanut Butter Cake. Every component plays a vital role in the final structure and flavor profile.
The Chocolate Components
- Natural Cocoa Powder: This recipe relies on the acidity of natural cocoa to react with the baking soda. This interaction creates the characteristic lift and dark color we desire.
- Mini Semi-Sweet Chocolate Chips: Tossing these in a small amount of flour prevents them from sinking, providing pockets of richness throughout the layers.
- Quality Dark Chocolate: For the ganache, choose a bar with at least 56% cacao to provide a sophisticated finish.
The Building Blocks of Moisture
- Full-Fat Sour Cream: The acidity and fat content here are non-negotiable for a tender crumb that remains moist for days.
- Buttermilk: This provides the necessary tang and moisture, contributing to the delicate texture of the sponge.
- Canola Oil: Unlike butter-based cakes, using oil ensures the cake remains soft even when served chilled.
The Nutty Element
- Creamy Peanut Butter: Stick to processed varieties for the frosting to maintain a smooth, stable emulsion that holds its shape against the weight of the layers.
The Method
### Step 1: Preparing Your Canvas
Begin by preheating your oven to 350°F (177°C). Grease three 9-inch cake pans and line them with parchment paper. This step is essential for a clean release. The parchment acts as a barrier, protecting the delicate edges of your Dark Chocolate Peanut Butter Cake as they set.
### Step 2: Mixing the Dry Aromatics
In a large bowl, whisk together the flour, cocoa powder, sugar, baking soda, baking powder, and salt. If you desire a more intense profile, add the espresso powder now. Whisking aerates the flour, helping to prevent lumps and ensuring an even distribution of the leavening agents.
### Step 3: Emulsifying the Liquid Ingredients
Using a stand mixer fitted with the whisk attachment, combine the oil, eggs, and sour cream on medium-high speed. Once combined, add the buttermilk and vanilla. This stage is about building a stable emulsion before introducing the dry ingredients, which prevents over-mixing later.
### Step 4: Combining and Folding
Pour the wet mixture into the dry ingredients and add the hot coffee or water. Whisk on low speed until the batter is just combined. The batter will appear thin; this is normal. Gently fold in the flour-coated chocolate chips with a spatula to keep them suspended in the liquid.
### Step 5: The Precise Bake
Divide the batter evenly between your prepared pans. Bake for 24–26 minutes. A toothpick inserted into the center should come out clean. Cooling in the pans for an hour allows the structure to set before you transfer them to a wire rack to finish cooling completely.
### Step 6: Crafting the Peanut Butter Frosting
Beat the softened butter until creamy, then incorporate the peanut butter. Gradually add the confectioners’ sugar, vanilla, and salt. Pour in the heavy cream while the mixer is on low, then increase the speed to medium-high to whip it into a light, spreadable consistency.
### Step 7: The Assembly and Crumb Coat
Place your first layer on a turntable. Spread a generous cup of frosting evenly. Repeat with the remaining layers. Apply a thin layer of frosting over the entire exterior to act as a crumb coat. This seals in any stray crumbs and creates a smooth surface for the final ganache application. Chill for at least 30 minutes.
### Step 8: The Ganache Finish
Heat your heavy cream until it simmers, then pour it over the finely chopped chocolate. Let it sit for three minutes before stirring slowly from the center outward. Once thickened but still pourable, spoon it over the chilled cake, allowing it to drip naturally down the sides.
Pastry Wisdom for Success

Temperature is your most important tool when working with this Dark Chocolate Peanut Butter Cake. Always ensure your eggs and sour cream are at room temperature to prevent the batter from curdling during the emulsion stage. If you find your ganache is too thin, a brief rest in the refrigerator will help it reach the perfect consistency for spreading. For those looking to master the basics of the sponge itself, you might find our chocolate cake recipe a helpful reference for understanding aeration. Remember, the goal with the ganache is a slow, controlled drip—if it runs too fast, let it cool for five more minutes.
Frequently Asked Questions
Do peanut butter and dark chocolate go together?
Absolutely. The bitterness of dark chocolate provides a sophisticated backdrop for the salty, creamy profile of peanut butter, creating a balanced and luxurious flavor profile.
What is the best peanut butter for cake frosting?
For the most stable and smooth frosting, use a processed creamy peanut butter like Jif or Skippy. Natural varieties often separate and can make the frosting greasy or unstable.
How do I make my chocolate cake very dark?
The darkness comes from using high-quality natural cocoa powder and incorporating hot coffee into the batter. The coffee blooms the cocoa, releasing its pigment and deepening the flavor without adding a coffee taste.
Can I make the cake layers in advance?
Yes, you can bake the layers, wrap them tightly in plastic wrap, and refrigerate them for up to two days. This actually makes the cake easier to trim and frost as the crumb becomes more stable.
Refined Twists
While the classic Dark Chocolate Peanut Butter Cake is a treasure on its own, small adjustments can provide a new perspective. For a textural contrast, consider adding chopped roasted peanuts between the layers. If you prefer a lighter profile, you could swap the ganache for a dusting of dark cocoa powder. For those who enjoy a surprise center, our Reese’s peanut butter cup poke cake offers a playful alternative that uses similar flavor notes in a different format. You might also experiment with adding a touch of sea salt to the ganache to highlight the sweetness of the frosting.
Presentation and Plating

Serving a Dark Chocolate Peanut Butter Cake requires a touch of finesse. Allow the cake to sit at room temperature for about 20 minutes before slicing; this softens the ganache and makes the frosting creamier. Use a sharp knife dipped in hot water and wiped dry between each cut for pristine, professional slices. Pair each slice with a small glass of cold milk or a strong espresso to cut through the richness. If you are hosting a larger gathering, you might also offer a slice of our chocolate mousse cake to provide guests with a variety of chocolate textures.
The Art of Small Batches
Mastering the Dark Chocolate Peanut Butter Cake is a rewarding journey that proves how patience and precision lead to extraordinary results. By focusing on the quality of your cocoa and the temperature of your ingredients, you create a dessert that is truly memorable. If you enjoyed this technique, our old-fashioned peanut butter cake is another wonderful way to practice your pastry skills. I invite you to share your creations and continue your learning with our community on Pinterest or Instagram.


