I was standing in the middle of a grocery store aisle, staring at two humble raspberry sponge cakes, when the ‘what if’ moment struck like lightning. Why do we accept store-bought desserts as the final act when they could be the foundation for a bold, pink, architectural masterpiece that defies every baking convention? I grabbed a Swiss roll and some strawberry chocolate, ready to stage a flavor heist that would leave my friends questioning if I had secretly spent the whole morning in a professional pastry kitchen.

This fake cake isn’t about cutting corners; it’s about hacking the system to create something visually stunning and taste-bud-shattering in record time. By focusing our energy on the structural design and the bold contrast of textures, we turn simple ingredients into a showstopper that feels unapologetically modern. Get ready to build a dessert that proves small-batch creativity doesn’t need a stand mixer or a four-hour bake time to be revolutionary.
The Ultimate Flavor Heist
This recipe is a total game-changer for anyone who wants the glory of a high-end bakery cake without the grueling labor of starting from scratch. We are taking the ‘fake cake’ concept and pushing it to the absolute edge by layering textures like crispy pink wafers against the soft, pillowy crumb of a strawberry Swiss roll. It is a fearless approach to dessert that celebrates the joy of assembly as a true art form.
What makes this bold is the sheer audacity of the flavor profile. You have the tartness of raspberry, the creamy sweetness of strawberry frosting, and the rich, melting quality of a Hershey’s Strawberries & Cream ganache. It’s a sensory explosion that hits every note—sweet, tangy, creamy, and crunchy. You will love this because it gives you the creative freedom to play with your food, turning a few pounds’ worth of ingredients into a pink triumph that looks like it belongs on a viral social media feed.
Print
Fake Cake
- Total Time: 50 mins
- Yield: 8 servings
- Diet: Vegetarian
Description
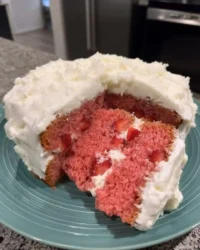
This innovative no-bake masterpiece transforms humble store-bought sponge cakes and Swiss rolls into a professional-looking architectural dessert. By focusing on smart assembly and bold textures like pink wafers and a custom strawberry cream ganache, you can create a stunning centerpiece without ever turning on the oven.
Ingredients
- 2 ready-made raspberry sponge cakes
- 1 tub strawberry flavor frosting
- 1 strawberry Swiss roll
- 1.5 Hershey’s Strawberries & Cream bars
- 2 to 4 teaspoons warm water
- Pink wafer biscuits
- Pink and gold sprinkle mix
Instructions
- Gather your equipment, including a cake turntable, angled palette knife, and a cake scraper.
- Secure the first raspberry sponge to a cake board using a small dollop of strawberry frosting as adhesive.
- Spread an even layer of frosting over the first sponge and carefully stack the second sponge on top.
- Apply the remaining frosting to the top and sides, using the turntable and scraper to achieve a smooth finish, then chill for 20 minutes.
- Melt the Hershey’s bars in the microwave in 30-second intervals until silky.
- Stir warm water into the melted chocolate one teaspoon at a time until it reaches a thick, pourable consistency.
- Press the sprinkle mix into the bottom edge of the chilled cake to create a decorative border.
- Slice the Swiss roll into rounds and decorate each slice with a drop of ganache and extra sprinkles.
- Nudge spoonfuls of ganache over the top edge of the cake to create a controlled drip effect.
- Pipe frosting swirls onto the top of the cake and anchor the Swiss roll slices and pink wafers into them to finish.
Notes
For the smoothest finish, make sure your store-bought frosting is at room temperature and give it a good stir before applying to remove any air bubbles. If the ganache begins to set too quickly while you are working on the drips, simply pop it back in the microwave for five seconds. Always use a hot knife when slicing the final cake to ensure you get clean cuts through the crispy wafer layers and soft sponges.
- Prep Time: 30 mins
- Cook Time: 0 mins
- Category: Dessert
- Method: Assembly
- Cuisine: Modern
The Flavor Arsenal

To pull off this successful flavor heist, you need ingredients that offer both structural integrity and a punch of personality. We start with two ready-made raspberry sponge cakes, which provide a moist, vibrant base that isn’t overly sweet. These serve as our canvas, offering a dense enough crumb to hold up the weight of our ambitious decorations.
- Ready-made Raspberry Sponge Cakes: These are the backbone of the build. They bring a subtle tartness that balances the sugar-heavy toppings.
- Strawberry Flavor Frosting: This is our mortar. It needs to be whipped until it’s light and airy, allowing for a smooth application that mimics a professional finish.
- Strawberry Swiss Roll: This is the secret weapon for height and visual drama. Slicing these into rounds creates a repeating pattern that is both nostalgic and avant-garde.
- Hershey’s Strawberries & Cream Bars: We aren’t just eating these; we’re transforming them into a radical ganache. The white chocolate base provides a luxurious mouthfeel that anchors the other strawberry notes.
- Pink Wafers and Sprinkles: These provide the necessary texture contrast. The crunch of the wafer against the soft cake is what makes each bite exciting and unpredictable.
Quality matters here—even when buying pre-made. Look for sponges that feel springy and frosting that has a clean, fruity aroma. When you’re working with just a few components, every single one has to pull its weight in the flavor department.
How to Build the Masterpiece
Step 1: Prep Your Command Center
Before you start, gather your tools. You’ll need a cake turntable to get those sharp, professional lines, an angled palette knife for the heavy lifting, and a cake scraper to achieve that smooth-as-glass finish. Having your station ready ensures you can move with the speed and confidence of a pro.
Step 2: Anchor the Base
Apply a small dollop of strawberry frosting to the center of your cake board. This acts as a glue, ensuring your first layer of raspberry sponge stays exactly where you want it. Place the first sponge down and give it a gentle press to secure the bond.
Step 3: Stack and Seal
Decant your frosting into a bowl and give it a vigorous stir to lighten the texture. Using your palette knife, spread a generous, even layer of frosting over the top of the first sponge. Carefully place the second sponge on top, aligning it perfectly to create a straight tower.
Step 4: The Smooth Operator
Pipe or spread the remaining frosting around the sides and across the top. This is where the turntable earns its keep. Rotate the cake while holding your scraper at a 45-degree angle against the side to create a clean, uniform surface. Pop it in the fridge for at least 20 minutes to set—this chill time is non-negotiable for a stable build.
Step 5: Ganache Alchemy
Break up one and a half Hershey’s bars into a microwave-safe bowl. Heat in 30-second intervals, stirring between each, until the chocolate is silky. Slowly stir in 2-4 teaspoons of warm water until you reach a perfect, dripping consistency that looks like liquid pink gold.
Step 6: Sprinkle Foundation
While the frosting is still slightly tacky at the bottom, carefully press your pink and gold sprinkle mix into the base of the cake. This creates a shimmering border that grounds the design and adds an immediate touch of luxury.
Step 7: Swiss Roll Transformation
Slice your strawberry Swiss roll into even rounds. Using a teaspoon, carefully drip a small amount of your warm ganache over the top of each slice and immediately top with more sprinkles. This turns a simple snack into a bespoke decorative element.
Step 8: The Drip Effect
Pour a tablespoon of ganache near the edge of the cake’s top. Use the back of your spoon to gently nudge the chocolate over the side, allowing it to run down in beautiful, controlled drips. Repeat this around the entire circumference for that iconic bakery look.
Step 9: Swirl Perfection
Load a piping bag with a small star nozzle and the last of your frosting. Pipe delicate, high-energy swirls around the top edge of the cake. These swirls act as the ‘thrones’ for our Swiss roll slices.
Step 10: Final Assembly
Place your decorated Swiss roll slices onto the frosting swirls. Finish the look by tucking pink wafers between the slices at jaunty angles and adding a final dusting of sprinkles. Step back and admire the fact that this masterpiece started in a grocery store basket.
Riley’s Secret Hacks

To get the most out of your fake cake, temperature control is everything. If your ganache is too hot, it will melt your frosting; if it’s too cold, it won’t drip beautifully. Aim for a temperature that feels just barely warm to the touch. If you find the chocolate seizing up when you add the water, don’t panic—just add the water half a teaspoon at a time and keep stirring until it smooths out. For more ideas on how to transform basic desserts into art, you might find inspiration in this guide on how to make a fake cake which covers different structural approaches. If you are aiming for a specific aesthetic, I always recommend checking out my tips on the vintage cake style to see how classic piping can change the entire vibe of your build.
Twist the Narrative
If you want to move away from the pink-on-pink vibe, try a ‘Midnight Fake Cake.’ Swap the raspberry sponges for chocolate ones and use a dark chocolate ganache with crushed honeycomb on top. The beauty of this method is its versatility. You could even go for a citrus explosion by using lemon sponges and a white chocolate-lemon drip. If you’re feeling particularly adventurous and have a furry friend celebrating a birthday, you can apply these same assembly techniques to an aesthetic dog cake using pet-safe ingredients. The goal is to keep experimenting with different ‘ready-made’ bases until you find the combination that speaks to your unique flavor style.
Showtime and Plating

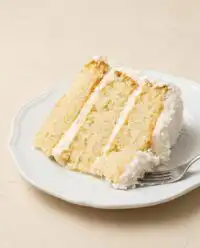
When it’s time to serve this pink triumph, presentation is half the battle. Use a sharp, thin knife dipped in hot water to get clean slices through the different layers of sponge and wafer. This cake is quite rich, so I recommend serving it with a side of fresh, tart raspberries or even a glass of sparkling rosé to cut through the sweetness. This is the king of celebration cakes because it looks so intricate that people will assume you’ve been working on it for days. Serve it on a simple white plate to let the vibrant pinks and golds really pop.
The Final Bite
Creating this cake was a lesson in why we should never be afraid to play with our food. The Swiss roll move was a total gamble, but it paid off in a big way, proving that even a £1 find can be transformed into something that looks like a high-end masterpiece. I hope this inspires you to look at the grocery store shelves with a bit more mischief in your eyes. If you enjoyed this radical approach to baking, you’ll definitely want to see my process for the velvet spray cake, which uses another modern technique to achieve a flawless finish. Don’t forget to share your creations with me on Instagram and follow my latest flavor experiments on Pinterest. Keep pushing the boundaries of what a cake can be!


