Emulsifying melted fat with whole eggs forms the foundation of classic baking, a discipline that yields a dense yet remarkably tender crumb when executed with patience.

This Double Chocolate Zucchini Cake is an exercise in structural harmony, where the natural moisture of grated vegetables suspends a rich, tight crumb. Home bakers often treat zucchini as a rustic addition, yet here it serves a scientific purpose by acting as an internal reservoir of moisture during the bake. You will find that the cake possesses a deep, complex cocoa flavor, refined by the inclusion of melted dark chocolate and bittersweet cocoa powder. With a slow, deliberate hand, you can transform simple summer produce into a chocolate dessert of undeniable sophistication.
Why Technique Matters for This Double Chocolate Zucchini Cake
Prep: 30 min · Serves: 12 · Difficulty: Medium
- Rich chocolate flavor built on layered fats.
- Moist crumb achieved without vegetable drainage.
- Simple ingredients transformed through classic methods.
- Symmetrical rise from a properly prepared pan.
- Satisfying density reminiscent of traditional gateaux.
This cake delivers a reliable standard of chocolate luxury to your table.
If you have previously enjoyed a simple easy chocolate cake, this recipe will expand your understanding of how moisture behaves in a baked batter.
Get The Full Cake Recipe
Print
Double Chocolate Zucchini Cake
- Total Time: 1 hour 15 mins
- Yield: 12 servings
Description
This decadent Double Chocolate Zucchini Cake balances a rich, fudgy crumb with the subtle moisture of fresh garden zucchini. The result is a sophisticated, deeply cocoa-infused dessert that stays remarkably tender without any hidden vegetable flavor.
Ingredients
- Unsalted butter, softened
- Dark chocolate (60-75% cacao), melted
- Sour cream
- Heavy cream
- Grated zucchini
- Light brown sugar
- All-purpose flour
- Cocoa powder
- Baking powder
- Kosher salt
- Vanilla extract
- Large eggs
Instructions
- Prepare the pan. Preheat your oven to 325°F and coat a 10-cup bundt pan with non-stick spray and a dusting of cocoa powder.
- Combine dry ingredients. Whisk together the flour, cocoa powder, baking powder, and salt in a bowl, and whisk the sour cream and heavy cream in a separate container.
- Cream butter base. Melt the chocolate then set aside; beat the butter and sugars in a stand mixer until light and fluffy.
- Emulsify the batter. Incorporate eggs one at a time, followed by the vanilla and the melted chocolate, mixing until glossy.
- Combine alternating ingredients. Mix in the dry ingredients and sour cream mixture in alternating batches, ending with the dry ingredients.
- Fold in zucchini. Gently stir the grated zucchini into the thick batter using a rubber spatula until evenly distributed.
- Bake the cake. Pour into the prepared pan and bake for 45 minutes or until a cake tester emerges with only a few moist crumbs.
- Cool and invert. Allow the cake to cool in the pan for 20 minutes before carefully inverting onto a wire rack to cool completely.
Notes
- Avoid squeezing the grated zucchini as the moisture is essential for the cake’s tender crumb.
- Use a digital kitchen scale to measure flour accurately to prevent the cake from becoming dense or dry.
- Ensure all ingredients, especially eggs and sour cream, are at room temperature to maintain a stable emulsion.
- Wait until the cake is completely cool before applying any glaze to prevent it from melting and running off the sides.
- Prep Time: 30 mins
- Cook Time: 45 mins
- Category: Dessert
- Method: Baking
- Cuisine: American
The Mise en Place

Before lighting the oven, you must organize your workspace so that every ingredient is measured by weight and tempered to room temperature. This strict discipline prevents the batter from curdling when the fats and liquids meet. Your ingredients already know what to do; you must only give them the proper conditions to do it.
- Unsalted butter: This must be softened yet still cool to the touch, measuring approximately 18 degrees Celsius, which allows it to trap air during the creaming stage.
- Dark chocolate: A high-quality chocolate containing 60 to 75 percent cacao provides a deep, authentic chocolate flavor that cocoa powder alone cannot achieve.
- Sour cream: The high fat content and natural acidity tenderize the flour gluten, creating a delicate melt-in-your-mouth texture.
- Grated zucchini: This ingredient acts as a silent source of hydration, releasing its moisture slowly as the cake bakes to preserve freshness.
- Light brown sugar: The presence of molasses in this sugar adds moisture and a subtle caramel undertone that rounds out the bitterness of the chocolate.
- Cocoa powder: Used both in the batter and to dust the pan, it provides a dry, intense chocolate baseline that balances the melted chocolate.
| Ingredient | Why It Matters |
|---|---|
| Unsalted butter | Creates the foundational emulsion and a tender crumb. |
| Melted chocolate | Imparts a rich, fudgy density and deep flavor. |
| Grated zucchini | Hydrates the crumb slowly during the baking process. |
| Sour cream | Weakens gluten strands for a luxurious mouthfeel. |
| Brown sugar | Offers humectant properties and deepens the sweetness. |
The Method, Step by Step

Step 1: Prepare Your Pan and Pre-heat
Set your oven to 325 degrees Fahrenheit, allowing the heat to stabilize completely before baking. Prepare your 10-cup bundt pan by coating the interior thoroughly with non-stick spray, then dusting it with a fine layer of cocoa powder. Tap the pan upside down over your sink to release any excess powder, leaving a thin, uniform veil. This barrier guarantees that your cake releases cleanly, preserving the sharp details of the pan.
Step 2: Combine the Dry and Liquid Bases
In a medium bowl, whisk together the all-purpose flour, cocoa powder, baking powder, and kosher salt until the mixture is uniform in color. In a separate container, whisk the sour cream and heavy cream together until smooth. Sifting the dry ingredients together breaks up any clumps of cocoa, which guarantees an even distribution of leavening. Set both bowls aside on your counter to temper.
Step 3: Melt the Chocolate and Cream the Butter
Melt your dark chocolate gently over a double boiler or in short bursts in the microwave, then set it aside to cool slightly. In the bowl of your stand mixer fitted with the paddle attachment, combine the softened butter with both sugars. Beat these ingredients on medium speed until the mixture lightens in color and shows a slightly fluffy texture. This process should take approximately four minutes of steady mixing.
Step 4: Emulsify the Eggs and Add the Chocolate
Introduce the eggs one at a time, allowing each to be fully absorbed before adding the next. Pour the vanilla extract in with the final egg, then scrape down the sides of the bowl to maintain a uniform batter. Pour the melted dark chocolate into the creamed mixture in a slow, steady stream while mixing on low speed. The batter should transform into a smooth, glossy emulsion that resembles a thick frosting.
Step 5: Alternately Combine the Batter
With your mixer running on the lowest speed, add one-third of your flour mixture, followed by half of the sour cream mixture. Repeat this alternating pattern, ending with the final portion of the dry ingredients. Stop the mixer when a few streaks of flour remain visible in the bowl. Over-mixing at this stage will develop the gluten, making the finished cake tough rather than tender.
Step 6: Fold the Zucchini Into Your Double Chocolate Zucchini Cake Batter
Remove the bowl from the stand mixer and add the freshly grated zucchini directly to the batter. Using a large rubber spatula, fold the vegetable gently into the thick batter until it is evenly distributed. You will notice that the batter is quite thick, but the moisture from the zucchini will release during baking. This is the crucial step that guarantees the inner crumb remains moist without becoming soggy.
Step 7: Bake to a Clean Crumb
Spoon the batter into your prepared bundt pan, smoothing the top with your spatula to promote an even rise. Bake the cake at 325 degrees Fahrenheit for approximately 45 minutes, monitoring the oven closely. Insert a cake tester into the deepest part of the cake; it should emerge with only a few moist crumbs clinging to it. The kitchen should smell deeply of warm chocolate and caramelized sugars.
Step 8: Cool and Turn Out the Cake
Allow the cake to cool undisturbed in its pan on a wire rack for exactly 20 minutes. Run a thin, flexible paring knife gently around the outer and inner edges of the pan to release any stuck sections. Place your wire cooling rack over the top of the pan, then confidently invert both to release the cake. Let the cake cool completely to room temperature before attempting to apply any glaze.
Where Precision Makes the Difference

Weighing your flour with a digital scale is the only way to guarantee accuracy in classic baking. Scooping flour directly from the bag with a measuring cup packs the flour, resulting in a dry, heavy cake that lacks the desired tenderness. If you must use cups, fluff the flour with a fork first, spoon it gently into the cup, and level it with a flat blade.
Do not press or squeeze the water out of your zucchini before adding it to the cake. The chemistry of this recipe relies on that specific water content to hydrate the flour as it bakes. When studying incorporating zucchini in chocolate batters, you will see that draining the vegetable results in a crumbly, dry cake that lacks the characteristic fudginess.
Make sure all your cold ingredients, particularly the eggs and sour cream, reach room temperature before you begin mixing. Cold ingredients will seize the creamed butter, breaking the delicate emulsion you have worked to build. If your batter curdles, the fat will separate during baking, leading to an oily texture and an uneven rise.
If your cake rises beautifully in the oven but sinks dramatically in the center as it cools, you likely underbaked it or added too much baking powder. Excess leavening creates fragile air pockets that collapse under their own weight once removed from heat. To fix this in the future, double-check your baking powder measurements and trust a physical cake tester rather than relying solely on the kitchen timer.
Allow your melted dark chocolate to cool to lukewarm before adding it to the creamed butter and sugar. If the chocolate is too hot, it will melt the fat in the butter, destroying the aerated structure you created during creaming. This small detail is what distinguishes a light, professional bake from a dense, greasy domestic attempt.
Patience here is not a virtue — it is an instruction. Applying glaze to a warm cake will cause the glaze to melt and run off, leaving a thin, messy coating instead of a thick, glossy crown. For more structural insights, you can study our foundational chocolate cake recipe to master the art of temperature control before decorating.
Frequently Asked Questions
Can you taste the zucchini in chocolate zucchini cake?
No, you will not taste the vegetable in the finished cake. The zucchini acts primarily as a source of moisture and structure rather than flavor. The intensity of the cocoa powder and melted dark chocolate completely masks any subtle green flavor.
Do you peel zucchini for a chocolate cake?
You do not need to peel the zucchini before grating it. The skin is quite tender and melts completely into the batter during the baking process. Peeling is unnecessary and would remove valuable moisture and dietary fiber from the cake.
Should you squeeze water out of zucchini for cake?
No, you must not squeeze the water out of the zucchini for this specific recipe. The dry ingredients are balanced to absorb the natural liquids released by the zucchini during baking. Removing this moisture will result in a dry, dense crumb.
Does zucchini cake need to be refrigerated?
You do not need to refrigerate the cake if you plan to consume it within three days. Keeping it in an airtight container at room temperature preserves its soft texture. If you must keep it longer, refrigerating it will extend its freshness, though it should be brought to room temperature before serving.
Can I freeze this chocolate zucchini cake?
Yes, this cake freezes exceptionally well, either whole or in individual slices. Wrap the completely cooled cake tightly in two layers of plastic wrap, followed by a layer of aluminum foil. Freeze for up to three months, and thaw at room temperature overnight before serving.
Can I use gluten-free flour in this recipe?
You can substitute the all-purpose flour with a high-quality 1-to-1 gluten-free baking blend containing xanthan gum. Keep in mind that gluten-free flours absorb moisture differently, so the cake may require an extra five minutes in the oven. The result will still be rich and tender, though slightly more delicate.
What type of cocoa powder is best for this cake?
This recipe is formulated to work beautifully with standard unsweetened natural cocoa powder. Natural cocoa powder reacts correctly with the baking powder to lift the heavy batter. Avoid using Dutch-process cocoa unless you increase the baking powder slightly to compensate for the lower acidity.
Considered Variations
To introduce a warm, aromatic element, you may add a half-teaspoon of ground cinnamon and a pinch of espresso powder to the dry ingredients. The espresso powder does not make the cake taste of coffee; rather, it intensifies the natural chocolate notes. This technique is often used in our triple chocolate layer cake to create a more sophisticated flavor profile.
You can introduce texture by folding a half-cup of toasted, finely chopped walnuts or pecans into the batter along with the zucchini. Toast the nuts at 350 degrees Fahrenheit for eight minutes until fragrant, then let them cool completely before chopping. This prevents the nuts from releasing steam inside the batter, which would disrupt the delicate moisture balance of the crumb.
If you prefer individual servings, you can distribute this batter among mini bundt pans instead of a large 10-cup pan. Reduce the baking time to approximately 20 to 25 minutes, monitoring the cakes closely with a toothpick. These smaller cakes make elegant individual desserts, especially when finished with a delicate ribbon of chocolate glaze.
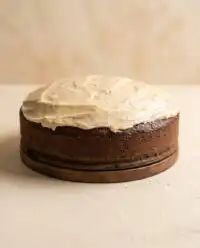
Finishing and Presenting
Presenting this cake requires minimal decoration, as the elegant lines of the bundt shape offer a natural beauty. A simple dusting of unsweetened cocoa powder or confectioners’ sugar is often sufficient for an afternoon tea setting. If you prefer a richer presentation, a warm chocolate fudge glaze allowed to pool in the ridges of the cake creates an inviting dessert.
To slice the cake cleanly, employ a sharp chef’s knife and wipe the blade with a warm, damp cloth between each cut. This attention to detail reveals the beautiful, uniform cross-section of the crumb, which is the final proof of your baking technique. For those who enjoy presenting a classic dessert table, pairing this cake with a traditional homemade chocolate cake provides an elegant study in chocolate textures.
Serve each slice alongside a spoon of lightly whipped cream, sweetened only slightly with vanilla bean paste. The cool cream balances the dense richness of the chocolate without overwhelming the palate. For an evening service, a handful of fresh raspberries or a simple compote of tart cherries will offer a bright acidity that cuts through the deep cocoa notes.

The Result of Your Care
Baking with fresh produce is a time-honored tradition that dates back generations. Much like a classic carrot cake, this recipe relies on the quiet contribution of vegetables to create an extraordinary texture. By respecting the science of moisture and emulsion, you have produced a cake that is far greater than the sum of its humble parts.
Take a moment to appreciate the clean crumb and the rich aroma that fills your kitchen. Small things, done exactly right, yield results that cannot be replicated by quick mixes or shortcuts. We invite you to share your baking journey and photos of your finished creation with our community of dedicated home bakers.
You can find more technical baking guides and connect with us on our social platforms. Join our community on Facebook, save our detailed tutorials on Pinterest, or watch our step-by-step videos on TikTok. Your dedication to the craft is what makes baking a true art form.


