A thin, black-as-night liquid splashes into foaming cocoa batter, sending up a cloud of toasted hazelnut aromas before you even slide the pans into a hot oven.

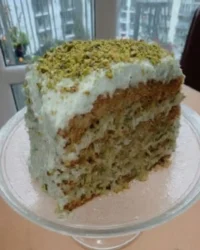
You are looking at the blueprint for the legendary Hershey’s Perfectly Chocolate Cake, a standard-bearer of home baking that thrives on an absurdly simple formula. Do not let the simplicity fool you into thinking it lacks complexity or depth. We take this timeless chocolate recipe and treat it with professional rigor, proving that a cocoa-heavy batter produces a crumb far superior to melted bar chocolate. Grab your kitchen scale and prepare to challenge everything you think you know about moisture control.
The Case for Making This Hershey’s Perfectly Chocolate Cake
Prep: 15 min · Serves: 12 · Difficulty: Medium
- Intense chocolate depth without tedious chopping.
- Ultra-hydrated crumb that resists staling.
- Quick mixing process requires no stand mixer.
- Reliable structure despite an incredibly thin batter.
- Masterful balance between sweetness and dark cocoa.
You want a crumb that melts instantly on the tongue while retaining its structural integrity under layers of rich frosting. This classic chocolate cake delivers precisely that, relying on chemistry rather than complex culinary acrobatics to achieve its signature texture. By understanding how the ingredients interact, you can achieve a superior homemade chocolate cake every single time you preheat your oven. This method turns a grocery-store classic into an undeniable masterpiece.
Get The Full Cake Recipe
Print
Hershey’s Perfectly Chocolate Cake
- Total Time: 50 mins
- Yield: 12 servings
Description
This classic chocolate cake features an ultra-hydrated crumb and deep cocoa flavor, relying on the chemistry of boiling water to bloom the cocoa. It is a reliable, professional-grade recipe that creates a moist, velvet-like texture perfect for layered desserts.
Ingredients
- 2 cups granulated sugar
- 1 3/4 cups all-purpose flour
- 3/4 cup Hershey’s cocoa
- 1 1/2 teaspoons baking powder
- 1 1/2 teaspoons baking soda
- 1 teaspoon kosher salt
- 2 large eggs
- 1 cup whole milk
- 1/2 cup vegetable oil
- 2 teaspoons pure vanilla extract
- 1 cup boiling water
- 1/2 cup unsalted butter
- 2/3 cup cocoa powder
- 3 cups powdered sugar
- 1/3 cup whole milk
- 1 teaspoon vanilla extract
Instructions
- Prepare oven and pans. Heat your oven to 350°F and grease two nine-inch round baking pans with shortening, then dust with cocoa powder to prevent sticking.
- Sift dry ingredients. Combine sugar, flour, cocoa, baking powder, baking soda, and salt in a bowl, sifting to remove clumps and whisking until uniform.
- Combine liquid emulsion. Add eggs, milk, oil, and vanilla to the dry mixture and beat with a hand mixer on medium speed for two minutes until a glossy paste forms.
- Hydrate the batter. Slowly stream in the boiling water while whisking by hand until the batter is thin, smooth, and fully combined.
- Bake the cakes. Divide the batter evenly into the prepared pans and bake for thirty to thirty-five minutes until a skewer comes out with only a few moist crumbs.
- Cool the layers. Rest the cakes in their pans for ten minutes, then carefully invert them onto wire racks to cool completely before frosting.
- Whip the frosting. Melt butter in a saucepan, stir in cocoa, then alternately beat in powdered sugar and milk until smooth, finishing with vanilla extract.
Notes
- Use a kitchen scale to measure ingredients by weight to ensure the cake does not end up dry or crumbly.
- Replace the boiling water with hot coffee to intensify the chocolate profile without adding a strong coffee flavor.
- Avoid using a high-speed stand mixer once the boiling water is added to keep the crumb tender rather than rubbery.
- Chill the cake layers in the freezer for thirty minutes before frosting for easier assembly and cleaner edges.
- Prep Time: 15 mins
- Cook Time: 35 mins
- Category: Dessert
- Method: Baking
- Cuisine: American
The Lineup

Your success depends entirely on setting up your workspace with the correct components before you begin. Each element in this bowl has a specific chemical job, turning raw powders into a velvety, structure-rich batter.
- Hershey’s Cocoa: The central pillar of flavor, providing an intense, non-alkalized acidic cocoa profile that reacts with your leaveners.
- Boiling Water: This critical addition blooms the cocoa powder, releasing trapped volatile flavor compounds and thinning the batter to maximize heat transfer.
- Vegetable Oil: Unlike butter, liquid oil remains fluid at room temperature, which guarantees a tender texture that never turns dry.
- Baking Soda and Baking Powder: This dual-leavening team works to neutralize the acidity of the natural cocoa while providing immediate lift when the heat hits.
- Granulated Sugar: Beyond sweetening, sugar acts as a liquefying agent and tenderizer by binding with water molecules to slow gluten development.
| Ingredient | Why It Matters |
|---|---|
| Hershey’s Cocoa | Delivers deep, uncompromised chocolate flavor and necessary acidity. |
| Boiling Water | Blooms the cocoa particles and melts the sugar crystals instantly. |
| Vegetable Oil | Keeps the crumb extraordinarily tender and soft for days. |
| Eggs | Provide the necessary structure and emulsification to bind the thin batter. |
The Method

Step 1: Prep the Oven and Pans
Heat your oven to 350 degrees Fahrenheit. Prepare two nine-inch round baking pans by greasing them with a thin layer of shortening, then dusting them with cocoa powder instead of flour to avoid white residue on the finished crust. Tap out any excess cocoa so you have a flawless, thin barrier that prevents sticking.
Step 2: Sift the Dry Powders
Combine two cups of granulated sugar, one and three-quarter cups of all-purpose flour, three-quarters of a cup of Hershey’s cocoa, one and a half teaspoons of baking powder, one and a half teaspoons of baking soda, and one teaspoon of kosher salt in your mixing bowl. Pass these dry ingredients through a fine mesh sieve to break up any stubborn cocoa clumps. Whisk them until the mixture shows a uniform, pale sandy color.
Step 3: Combine the Liquid Emulsion
Add two large eggs, one cup of whole milk, half a cup of neutral vegetable oil, and two teaspoons of pure vanilla extract directly to your dry mixture. Beat with a hand mixer on medium speed for exactly two minutes, watching the batter transform from dry powder into a thick, glossy paste. This duration is critical because it builds the structural base and incorporates exactly enough air to support the heavy crumb.
Step 4: Hydrate the Hershey’s Perfectly Chocolate Cake Batter
Bring one cup of water to a rolling boil and measure it precisely in a heatproof cup. Slowly stream this boiling water into your bowl while whisking by hand, noting the moment batter changes color or texture mid-mix as the cocoa blooms. Do not panic when the batter becomes incredibly thin and watery; this fluid state is necessary to dissolve the remaining sugar crystals and hydrate the cocoa starches.
Step 5: Bake and Monitor the Rise
Divide the liquid batter equally between your prepared nine-inch round pans, using your kitchen scale to confirm an exact weight match. Slide the pans onto the middle rack of your oven and bake for thirty to thirty-five minutes without opening the door prematurely. The cakes are baked when a wooden skewer inserted into the center comes out clean with only a few moist crumbs clinging to it.
Step 6: Execute the Cooling Cycle
Transfer the hot baking pans directly to wire cooling racks and let them rest undisturbed for exactly ten minutes. Run a thin, offset spatula around the edges of each pan to release the sides, then carefully invert the cakes onto the wire racks. Let them cool completely to room temperature before attempting to apply any frosting, as the delicate crumb requires this cooling window to set.
Step 7: Whip the Glossy Chocolate Frosting
Melt half a cup of unsalted butter in a medium saucepan, then immediately stir in two-thirds of a cup of cocoa powder until smooth. Alternately add three cups of powdered sugar and one-third of a cup of whole milk in small batches, beating vigorously with your hand mixer. Once you achieve a smooth, spreadable consistency, stir in one teaspoon of vanilla extract and apply it immediately to the cooled cake layers.
The Details That Matter

The kitchen scale is your ultimate liberation device in this process. Measuring your flour and cocoa by weight rather than volume eliminates the dry, crumbly outcome associated with packed measuring cups.
If you want to expand the flavor depth, replace the boiling water with fresh, hot drip coffee. This traditional swap does not make the cake taste like coffee; instead, the warm acidity amplifies the cocoa notes, mimicking a rich old fashioned chocolate cake from your favorite nostalgic bakery.
If your cake sinks in the center, here is why and how to fix it. This disappointing collapse usually indicates your baking soda has expired, or you opened the oven door during the first twenty minutes of baking, disrupting the delicate rise before the egg proteins could coagulate.
Never use a high-speed stand mixer once the boiling water enters the equation. Gentle hand whisking prevents overworking the gluten, making sure the finished crumb remains exceptionally tender rather than rubbery.
For clean, professional layers, wrap your cake rounds in plastic wrap and chill them in the freezer for thirty minutes before frosting. Chilling firms up the crumb, making it incredibly easy to spread the chocolate frosting without tearing the delicate surface.
Adjust the consistency of your frosting with micrometric precision. If the mixture feels too stiff, add milk one teaspoon at a time; if it runs too thin, beat in a tablespoon of sifted powdered sugar until it holds a firm peak.
Frequently Asked Questions
What makes Hershey’s chocolate cake so moist?
The high liquid content, combined with the use of neutral vegetable oil instead of butter, keeps the crumb incredibly tender. Oil remains fully liquid at room temperature, which prevents the cake from drying out or turning dense when stored.
Why is the cake batter so thin?
The inclusion of boiling water dramatically thins out the batter, which is entirely normal for this classic formula. This high hydration level allows the starches in the cocoa and flour to gelatinize quickly in the oven, creating an ultra-soft texture.
Can I substitute boiling water with hot coffee?
You can substitute hot coffee in an equal one-to-one ratio to bloom the cocoa. The heat still activates the chocolate flavors, while the subtle acidity of the coffee highlights the earthy undertones of the non-alkalized cocoa powder.
What kind of cocoa powder should I use?
This specific recipe relies on natural, non-alkalized cocoa powder like the classic Hershey’s brand. Do not use Dutch-processed cocoa here, as it lacks the necessary acidity required to react with the baking soda for a proper rise.
What frosting goes best with this recipe?
The classic chocolate buttercream frosting included in the instructions provides the most balanced flavor profile. If you prefer a less sweet contrast, a rich cream cheese frosting or a dark chocolate ganache works beautifully to cut through the cake’s sweetness.
Can I make this cake ahead of time?
You can easily bake the layers a day in advance, wrapping them tightly in plastic wrap once they cool completely. Store them at room temperature or in the refrigerator, then frost them right before serving to maintain peak freshness.
Where to Deviate
For a denser, more substantial structure reminiscent of a professional devils food cake, replace half a cup of the milk with full-fat sour cream. This modification introduces a pleasant tang and extra fat, which slows down gluten formation and results in an incredibly tight, velvety crumb that stands up beautifully to heavier fillings.
If you want a casual, crowd-feeding alternative, pour the entire batch of batter into a greased nine-by-thirteen-inch metal baking pan. Bake at 350 degrees Fahrenheit for thirty-five to forty minutes, cooling it completely in the pan before spreading the frosting over the top for an effortless backyard dessert.
Cutting, Plating, Presenting
Plating chocolate cake requires an eye for texture and temperature. For the best sensory experience, serve this cake at room temperature, allowing the cocoa butter in the frosting to soften to a silky, melt-in-your-mouth state. If you cut the cake while it is still slightly warm, the structure will crumble; patience is rewarded with clean, professional wedges.
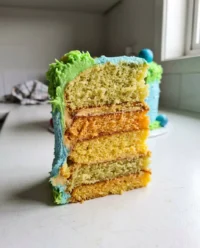
To achieve pristine slices that showcase the visual drama of a cross-section cut, run a long chef’s knife under hot tap water and wipe it clean between every single slice. This technique melts through the frosting cleanly without dragging crumbs through the tender interior of your chocolate cake recipe creation.
Accompany each slice with a dollop of unsweetened, lightly salted whipped cream to cut through the deep chocolate intensity. Fresh, tart raspberries or a simple dusting of espresso powder on the plate can turn a casual slice into an elegant, restaurant-quality dessert.

What You Just Proved
Tradition noted. Proceeding anyway. You have taken a historic, familiar recipe and proved that precision and chemistry trump complicated techniques every single time. By understanding how boiling water blooms raw cocoa and how oil preserves tenderness, you are no longer just following a script; you are controlling the variables of your kitchen.
This ultra-tender creation stands as proof that baking does not require specialized, expensive ingredients to feel luxurious. Share your successful bake with friends or keep the entire double-layer masterpiece in your kitchen for weekend slices. If you are looking to continue your home baking journey, try whipping up an easy chocolate cake for your next gathering.
Show us your finished slices and let us know how your batter looked when it came together. Connect with our community of pastry rebels on Pinterest, share your cross-section photos on Facebook, or watch our quick step-by-step videos on TikTok.


