I remember the soft rustle of the orchard leaves and how my grandmother would hum as we gathered the heaviest, sun-warmed fruit for the season’s first batch of baking.

In our family recipe box, few things capture the transition from late summer to early autumn quite like Peaches and Cream Bars. This recipe layers a buttery, golden crust with a silky cheesecake center and the bright, nostalgic flavor of preserved fruit. It is a slow, quiet process that rewards the baker with a texture that is both sturdy and delicate, reminiscent of a peach cake served on a shaded porch. When the scent of vanilla and warm peaches fills the air, the kitchen becomes a sanctuary of heritage and memory.
A Bite of Pure Nostalgia for Peaches and Cream Bars
Prep: 20 min · Serves: 15 · Difficulty: Medium
- Golden buttery crust provides a sturdy heritage foundation.
- Silky cheesecake layer offers a smooth, rich contrast.
- Preserved peaches bring a deep, concentrated fruit sweetness.
- Almond-infused glaze adds a refined and delicate finish.
- Handheld size makes these ideal for shared gatherings.
This is the recipe my family gathers for every harvest season.
Get The Full Cake Recipe
Print
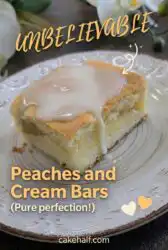
Peaches and Cream Bars
- Total Time: 60 mins
- Yield: 15 bars
Description
These delightful bars feature a buttery, tender crust layered with a silky cheesecake filling and sweet peach preserves. Topped with a delicate almond glaze, they are the perfect handheld treat for capturing the nostalgic flavors of the orchard harvest.
Ingredients
- 2 cups unsalted butter, softened
- 1 cup granulated sugar
- 2 large eggs
- 1 teaspoon vanilla extract
- 4 cups all-purpose flour
- 1/2 teaspoon salt
- 16 ounces cream cheese, softened
- 1/2 cup powdered sugar
- 1 large egg (for filling)
- 1 teaspoon vanilla extract (for filling)
- 20 ounces peach pie filling
- 1 cup powdered sugar (for glaze)
- 2 tablespoons milk
- 1/4 teaspoon almond extract
Instructions
- Cream the butter. Beat the softened butter and granulated sugar in a large bowl until light and fluffy, then mix in two eggs and vanilla.
- Combine dry ingredients. Whisk together the flour and salt, then stir into the butter mixture by hand until a thick dough forms.
- Press the base. Press half of the dough firmly into the bottom of a greased baking dish to create a solid crust.
- Prepare cheese layer. Beat the cream cheese and powdered sugar until smooth, then mix in one egg and vanilla before spreading over the crust.
- Layer the fruit. Carefully spoon the peach pie filling over the cream cheese layer, spreading it evenly to the edges.
- Add top crumbles. Drop the remaining dough in small, rustic dollops over the fruit layer.
- Bake the bars. Bake in the center of the oven until the crumbles are golden brown and the cheesecake center is set.
- Glaze and cool. Whisk together the glaze ingredients, drizzle over the bars once cooled, and refrigerate before cutting into squares.
Notes
- Ensure all dairy ingredients are at room temperature to prevent lumps in the cheesecake layer.
- Use a metal baking pan rather than glass for more consistent browning and crisper edges.
- Spoon and level your flour when measuring to avoid a dry or crumbly crust.
- Chill the bars completely in the refrigerator before slicing for clean, professional-looking squares.
- If the glaze is too thin, stir in additional powdered sugar by the teaspoon until you reach the desired consistency.
- Prep Time: 20 mins
- Cook Time: 40 mins
- Category: Dessert
- Method: Baking
- Cuisine: American
Gathering Your Ingredients

Preparation begins with selecting high-quality staples that have sat in our pantry for generations, ensuring every layer has the depth of flavor it deserves. By using room-temperature fats and fresh eggs, we honor the traditional methods that produce the finest crumb and the smoothest fillings.
- Unsalted butter: This provides the rich, shortbread-like texture for the base and the crumbled topping.
- Peach pie filling: Using a high-quality filling ensures the fruit stays suspended in the bars without making them soggy.
- Cream cheese: A full-fat block offers the necessary structure and tangy balance to the sweet peaches.
- Almond extract: This subtle addition in the glaze brings out the stone-fruit notes of the peach layer.
- All-purpose flour: The foundation of our dough, sifted for a light and tender bite.
- Powdered sugar: Used in both the cheesecake layer and the glaze for a fine, melt-in-the-mouth sweetness.
| Ingredient | Why It Matters |
|---|---|
| Softened Butter | Creates a tender, melt-away crust texture |
| Peach Filling | Provides consistent moisture and concentrated flavor |
| Cream Cheese | Adds a silky, tart contrast to the fruit |
| Almond Extract | Complements the natural sweetness of the peaches |
| Large Eggs | Bind the layers together with richness |
Step by Step in Teresa’s Kitchen

Step 1: Preparing the Heritage Dough
Begin by creaming your softened butter and granulated sugar in a large glass bowl until the mixture is pale and light. Incorporate the eggs one at a time, followed by a splash of vanilla, ensuring each is fully absorbed before adding the next. This patience creates a stable emulsion that will support the heavy fruit layer during the baking process.
Step 2: Mixing the Dry Staples
In a separate bowl, whisk together the flour and salt to remove any clumps that might mar the texture of your bars. Slowly add the dry mixture to your butter base, stirring by hand with a wooden spoon until a soft, thick dough forms. The dough should feel heavy and slightly tacky, smelling of sweet cream and flour.
Step 3: Pressing the Peaches and Cream Bars Crust
Take roughly half of your prepared dough and press it firmly into the bottom of a greased baking dish. Use the back of a metal spoon or your fingers to create an even layer that reaches into every corner of the pan. This base will act as the sturdy floor for our creamy cheesecake and fruit layers above.
Step 4: Crafting the Silk Layer
Beat together the softened cream cheese and powdered sugar until no lumps remain and the mixture looks like heavy satin. Add the egg and vanilla, mixing gently to avoid incorporating too much air, which can cause the layer to puff and then collapse. Spread this mixture over your bottom crust using an offset spatula for a smooth, uniform surface.
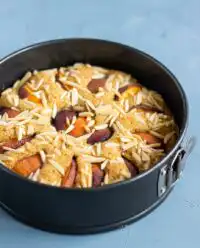
Step 5: Layering the Fruit Harvest
Open your peach filling and spoon it carefully over the cream cheese layer, spreading the fruit so every bar gets a generous portion. The amber color of the peaches against the white cream creates a beautiful visual that reminds me of early morning sunrises. Be gentle so as not to disturb the soft cheese layer underneath.
Step 6: Adding the Final Crumbles
Take the remaining half of your dough and drop it in small, rustic dollops over the top of the peach filling. Do not worry about covering every inch, as the dough will spread and the peaches will peek through like little jewels. This uneven surface is part of the charm of home-baked goods, showing the hand of the baker.
Step 7: The Gentle Bake
Place your dish into the center of the oven and bake until the top crumbles are golden brown and the cheesecake layer is set. You will know it is ready when the edges begin to pull away slightly from the sides and the fruit is bubbling at the margins. The scent in your kitchen at this moment is a reward in itself, warm and inviting.
Step 8: Glazing and Cooling
Whisk your powdered sugar, milk, and almond extract into a thin, pourable glaze while the bars begin their cooling process. Drizzle the glaze in long, sweeping motions across the surface once the bars are no longer hot to the touch. Allow the pan to sit until completely cold before cutting into squares to ensure the layers have fully bonded.
Secrets from the Recipe Box

Temperature is the most important factor when working with these heritage layers to achieve the desired texture. Ensure your cream cheese is truly soft before mixing, as cold cheese will create small lumps that never quite disappear in the oven. If your cream cheese remains stubborn, you can place the foil-wrapped block in a bowl of warm water for ten minutes.
Preventing a soggy bottom crust requires a bit of traditional wisdom regarding the fruit layer. If you find your fruit filling is particularly thin, you can drain a tablespoon of the excess syrup before spreading it over the cheesecake. This ensures the bars remain easy to hold and do not fall apart when lifted from the pan.
Using a metal pan rather than a glass one can lead to crisper edges and a more even bake for the bottom crust. Glass retains heat differently and can sometimes cause the center to remain underdone while the sides overcook. If you only have glass, consider lowering your oven temperature by twenty-five degrees and baking for a few minutes longer.
Cooling is not a step to be rushed when you are aiming for the perfect slice. These bars need the residual heat to finish setting the cheesecake center, and cutting them too early will result in a messy plate. For the cleanest lines, place the cooled pan in the refrigerator for an hour before using a sharp, thin knife.
When measuring your flour, always use the spoon-and-level method rather than dipping the cup directly into the bag. Dipping packs the flour down, leading to a dry and crumbly crust that lacks the melt-in-the-mouth quality we strive for. You can find more advice on maintaining the structure of layered fruit bars to help master this balance.
If you find your glaze is too thick to drizzle, add milk one drop at a time until it reaches the consistency of heavy cream. A glaze that is too thick will sit in heavy clumps rather than elegant lines across the golden crust. If it becomes too thin, a simple teaspoon of powdered sugar will bring back the body needed to hold its shape. A peach dump cake is another wonderful way to use these flavors if you prefer a more rustic, spoonable dessert.
Frequently Asked Questions
Can I use canned or frozen peaches instead of fresh?
Yes, canned peaches work beautifully as long as they are well-drained and sliced into uniform pieces. If using frozen peaches, thaw them completely and pat them dry with a clean cloth to remove excess moisture. This preparation prevents the liquid from thinning out the cheesecake layer and keeps the crust firm.
Can I use peach pie filling?
Peach pie filling is actually the preferred choice for this specific heritage recipe because it contains the perfect amount of thickener. The gel-like consistency stays in place during the baking process, ensuring the fruit doesn’t run into the bottom crust. It provides a consistent sweetness that pairs perfectly with the tangy cream cheese.
What can I substitute for the cream cheese?
If you find yourself without cream cheese, mascarpone is a wonderful alternative that offers a richer, milder flavor. You could also use a well-strained ricotta, though the texture will be slightly grainier and more rustic. Regardless of the choice, ensure the substitute is at room temperature before you begin mixing.
How do you prevent peach bars from being soggy?
The key to a crisp bottom is to ensure the first layer of dough is pressed firmly and evenly into the pan. Baking the bars on a lower rack in the oven can also help the bottom crust brown and set before the fruit releases too much moisture. Always allow the bars to cool completely in the pan to let the structure firm up.
Do the peaches need to be peeled?
If you are using fresh peaches instead of pie filling, peeling is generally recommended for a smoother texture. The skins can sometimes become tough or papery during the baking process, which can distract from the silkiness of the cream cheese. To peel them easily, blanch the whole peaches in boiling water for thirty seconds and the skins will slip right off.
How should I store leftover bars?
Because of the dairy in the cheesecake layer, these bars should be stored in the refrigerator in an airtight container. They will remain fresh and flavorful for up to five days, though the crust is best within the first forty-eight hours. Always let them sit at room temperature for a few minutes before serving to soften the butter in the crust.
Through the Seasons
While the peach remains our favorite harvest fruit, this recipe box staple is easily adapted for other times of the year. During the height of summer, you might try a peach tiramisu for a cooler variation, or simply swap the peach filling for cherry or blackberry. The tartness of berries provides a lovely contrast to the sweet almond glaze and rich cream cheese.
Spices can be adjusted to match the cooler months of late autumn or winter. Adding a teaspoon of ground cinnamon or a pinch of nutmeg to the flour mixture brings a warmth that complements the fruit beautifully. These spices evoke the feeling of a cozy kitchen during the holidays, making the bars feel even more like a celebration of the season.
Texture can be enhanced by adding a handful of toasted slivered almonds to the top dough crumbles before baking. The crunch of the nuts against the soft peach and creamy center adds another dimension to the eating experience. This variation is particularly popular at Sunday brunches where a little extra elegance is appreciated by the guests.
At the Table
Presenting these bars on a worn wooden board or a vintage glass platter honors the simplicity of the recipe. I find they are best enjoyed in the quiet of the afternoon with a warm cup of herbal tea or a cold glass of milk. For a more formal occasion, a small dollop of lightly sweetened whipped cream on top can make them feel like a plated dessert.
Sharing these treats during a Sunday dinner is a tradition that brings the whole family together around the table. They are sturdy enough for children to hold but refined enough for the adults to enjoy with a fork and a linen napkin. Consider pairing them with peach honey cheesecake cupcakes for a dessert table that celebrates the full range of summer fruit.
If you are serving them outdoors at a garden gathering, keep the platter in a shaded area to prevent the glaze from softening too much. The bright peach color looks beautiful against a backdrop of green leaves and summer flowers. These bars carry the spirit of the orchard wherever they are served, making every moment feel a bit more like home.

Baking Memories
There is a deep sense of peace that comes from the rhythm of baking, from the measuring of the flour to the final drizzle of the glaze. These bars are more than just a sweet ending to a meal; they are a bridge to the past and a way to share love with those around us. I hope you find as much joy in the making as you do in the eating, and that these flavors become a permanent part of your own family archives.
Take your time with the process and let the kitchen fill with the scents of your labor. If you find yourself looking for another way to honor the peach harvest, our peach cobbler pound cake is a wonderful companion to this recipe. We invite you to share your baking journey and the memories you create with us as we continue to preserve these old ways together.
Follow us for more heritage inspiration:
