Throw out the vintage rule that says cake batter must be whipped to maximum volume, because dump cakes thrive on heavy density.

You might think a Pumpkin Dump Cake is a lazy compromise, but this method actually produces a far superior crust than traditional baking. By scattering dry mix over a spiced custard base, we create a distinct contrast between the creamy interior and the crunchy topping. The moisture from the pumpkin rises during baking, hydrating the flour from below while the melting butter crisps it from above. It is a precise thermal dance masquerading as a simple sheet pan dessert.
The Case for Making This Pumpkin Dump Cake
Prep: 10 min · Serves: 18 · Difficulty: Easy
- Unmatched texture contrast in every bite.
- Zero bowls to wash after assembly.
- Warm spices dominate the creamy base.
- Chopped nuts deliver an essential crunch.
- Foolproof technique guarantees repeatable baking success.
If you are tired of dry cakes, this wet-custard masterpiece is the shortcut that outperforms traditional pumpkin pies every single autumn. We are skipping the traditional pie crust entirely to let the spiced pumpkin custard shine next to our crunchy pecan layer. It shares a similar texture profile with our cherry dump cake, highlighting how starch absorbs fat under direct heat. By allowing the liquid from the pumpkin puree to steam-cook the bottom of the cake mix, we achieve an incredibly tender middle layer that balances the crunchy, buttery top crust.
Get The Full Cake Recipe
Print
Pumpkin Dump Cake
- Total Time: 1 hour 30 mins
- Yield: 18 servings
- Diet: Vegetarian
Description
This effortless pumpkin dump cake features a creamy, spiced custard base topped with a perfectly crisp, buttery crumble. It is the ultimate fuss-free autumn dessert that balances delicate, tender pumpkin with a satisfying, crunchy nut topping.
Ingredients
- 1 can (15 oz) pumpkin puree
- 1 can (12 oz) evaporated milk
- 3 large eggs
- 1 cup granulated sugar
- 1 teaspoon vanilla extract
- 2 teaspoons pumpkin pie spice
- 1 box (15.25 oz) yellow cake mix
- 1 cup (2 sticks) salted butter, chilled
- 1 cup chopped walnuts or pecans
Instructions
- Prepare the custard. Whisk together the pumpkin puree, evaporated milk, eggs, granulated sugar, vanilla extract, and spices until smooth, then pour into a 9×13-inch baking dish.
- Layer dry mix. Evenly sprinkle the yellow cake mix over the pumpkin base, using a fork to gently level the powder across the entire surface.
- Grate the butter. Use a box grater to shred the cold salted butter, distributing it evenly over the dry cake mix to cover any visible flour.
- Add nut topping. Scatter the chopped walnuts or pecans across the butter layer and press them slightly to ensure they adhere during the bake.
- Bake the cake. Bake at 350°F on the middle oven rack for one hour until the top is golden brown and the custard has a stable wobble.
- Cool before serving. Allow the cake to rest on a wire rack for at least twenty minutes to let the custard set into a sliceable texture.
Notes
- Use a fine-mesh strainer to drain excess liquid from the pumpkin puree if it appears watery before mixing.
- Keep the butter as cold as possible while grating to ensure it creates thin layers rather than a single clump.
- Check the expiration date on the cake mix to ensure the leavening agents are active for the best crust texture.
- Cover the dish loosely with foil during the final 15 minutes if the pecans begin to darken too quickly.
- Prep Time: 10 mins
- Cook Time: 1 hour
- Category: Dessert
- Method: Baking
- Cuisine: American
Build Your Mise en Place

Baking is physics disguised as comfort food, so your choice of ingredients determines the entire structural outcome of the dessert. We are not merely tossing items into a pan; we are creating a layered emulsion that relies on exact fat-to-liquid ratios to set properly. Here is what you need to assemble on your counter before you flip the oven switch.
- Pumpkin Puree: Avoid pumpkin pie filling because we need pure vegetable starch without added sugars or liquids. This ingredient forms the dense, custard-like foundation that supports the dry topping.
- Evaporated Milk: This concentrated milk provides the necessary fat and protein structure without adding excess water that would make the base watery.
- Large Eggs: They act as the primary binding agent, coagulating during baking to transform the liquid pumpkin into a sliceable custard.
- Yellow Cake Mix: This dry layer serves as our flour and sugar source, absorbing the butter to form a cookie-like crumble.
- Salted Butter: Grating cold butter over the top guarantees every speck of dry flour is hydrated, leaving no powdery pockets behind.
- Chopped Nuts: Walnuts or pecans offer a bitter, earthy contrast to the sweet cake mix while providing crucial textural variety.
- Pumpkin Pie Spice: A precise blend of cinnamon, nutmeg, ginger, and cloves that cuts through the rich dairy fats and adds a warm, comforting aroma.
- Granulated Sugar: This sweetens the pumpkin puree while helping to tenderize the custard structure, preventing it from turning rubbery.
| Ingredient | Role in the Bake | Primary Sensory Cue |
|---|---|---|
| Pumpkin Puree | Dense structural base | Thick, matte orange paste |
| Salted Butter | Topping hydration | Rich toasted hazelnut aroma |
| Evaporated Milk | Custard emulsifier | Silky, uniform liquid mix |
| Yellow Cake Mix | Crispy flour barrier | Golden, bubbly biscuit top |
| Warm Spices | Flavor complexity | Warm, woody fragrance |
When heat meets this structured pan, the wet base and dry top undergo different physical transformations simultaneously. The eggs in the pumpkin puree cook into a firm, creamy custard at a relatively low temperature, while the cake mix requires higher heat to brown. This dual-zone baking process ensures you get two completely distinct layers from a single baking pan.
Let’s Bake

Baking should feel like an orderly progression of physical changes rather than a chaotic rush. By following these clear, sequential phases, you will guide your raw ingredients to their optimal structural states without any guesswork. Keep your eyes on the visual transitions as the batter moves from liquid to solid.
Step 1: Prepare the Custard Base
Whisk the pumpkin puree, evaporated milk, large eggs, granulated sugar, vanilla extract, and spices in a large mixing bowl. The mixture should shift from a thick orange paste to a silky, pourable liquid that coats the back of a spoon. Pour this liquid custard into a standard 9×13-inch baking dish, smoothing the top with a spatula to create an even foundation. Ensuring an even depth across the entire pan prevents thin spots that would overcook and turn rubbery.
Step 2: Layer the Dry Flour Barrier
Sprinkle the yellow cake mix evenly across the surface of the wet pumpkin base, making sure you cover every inch. Avoid dumping the dry mix in one heavy spot, as this creates dense flour pockets that will not bake through properly. Use a clean fork to gently level the powder, spreading it all the way to the edges of the baking dish. This dry flour barrier acts as a sponge, ready to absorb the melting fats from above during the baking process.
Step 3: Distribute the Grated Butter
Grate cold salted butter directly over the dry cake mix using a box grater to cover every visible white patch. This method distributes fat far more evenly than melting and pouring, which often misses the corners of the pan. The butter should look like a pale yellow blanket resting gently on top of the flour. As it melts in the oven, it creates a uniform pastry-like crust rather than greasy streams.
Step 4: Add the Earthy Crunch Layer
Scatter your chopped walnuts or pecans across the butter layer in a uniform fashion. This raw nut layer will toast in the oven heat, releasing essential oils that deepen the overall aroma. The nuts should sit high on the surface, ready to catch the direct heat of the upper elements. Pressing them slightly into the butter prevents them from falling off when you slice the finished cake.
Step 5: Bake the Pumpkin Dump Cake
Slide the pan onto the middle rack of your oven preheated to 350 degrees Fahrenheit. Let the dessert bake for exactly one hour, watching for the edges to bubble with thick orange liquid. The top is ready when the cake mix transforms into a deep golden brown crust and the center has a slight, stable wobble. This long, slow bake allows the starch in the cake mix to gelatinize properly.
Step 6: Cool and Set the Custard
Remove the baking dish from the oven and set it on a wire rack to cool for twenty minutes. The interior custard needs this cooling period to firm up, turning a loose pudding into a clean, sliceable dessert. You will notice the surface settle slightly as the steam escapes, leaving behind a beautifully textured cross-section. Slicing too early will result in a messy plate, so patience is key here.
The Details That Matter

Precision is your best ally when working with layered bakes that do not get stirred. If your topping remains dusty with dry flour after baking, it means the butter was not distributed evenly enough to hydrate the starches. To fix this common issue, simply use a butter knife to gently press any dry flour spots into the bubbling butter during the final ten minutes of baking. This ensures a uniform crust without any floury pockets.
Avoid the temptation to use pumpkin pie filling instead of pure canned pumpkin. Pie filling contains extra moisture and sugars that will ruin the chemical balance of your custard, resulting in a soggy mess that refuses to set. If you find yourself wanting to experiment with other fruit bases, check out our guide on the classic 3 ingredient dump cake to learn the basic science of cake mix hydration. This understanding will save you from many failed baking projects.
Your kitchen scale is a liberation device when measuring out the ingredients for this recipe. Weighing your butter ensures you have the exact amount of fat needed to hydrate the dry mix without leaving greasy pools on the surface. For home bakers looking to master similar techniques, studying a pumpkin crumble cake can provide excellent insights into the physics of crumb toppings. Accurate measurements eliminate the variables that cause uneven bakes.
Grating cold butter is vastly superior to pouring melted butter over the cake mix. When you melt butter, the water content separates from the fat, which can lead to uneven baking and tough, chewy patches. Grated butter melts slowly during the initial stages of baking, basting the flour continuously as the oven temperature rises. This results in a flaky, shortbread-like texture that melted butter simply cannot replicate.
Always bake this dessert on the middle rack of your oven to ensure even heat distribution. If the top browns too quickly before the pumpkin base sets, cover the pan loosely with aluminum foil for the final fifteen minutes. This traps the steam inside, allowing the pumpkin custard to finish cooking without burning your toasted pecans. It is a simple control measure that prevents bitter, burnt notes in your final dish.
Check the expiration date on your yellow cake mix before starting the recipe. Even though dump cakes are forgiving, old leavening agents in stale cake mix can prevent the topping from rising and crisping properly. A fresh mix guarantees that beautiful, tender biscuit texture we are aiming for. It also ensures the fats are absorbed properly without leaving a soapy aftertaste.
Let the canned pumpkin sit in a fine-mesh strainer for ten minutes if you notice it looks particularly watery. Some brands of pumpkin puree pack more water than others, which can dilute the egg proteins and prevent a clean slice. Removing this excess moisture ensures a dense, fudge-like custard texture. This small step makes a significant difference in the final structural integrity of the cake.
Frequently Asked Questions
Do I need to refrigerate it?
Yes, because the base of this dessert is a dairy-and-egg-heavy custard, it must be stored in the refrigerator. Leave the pan to cool completely to room temperature before covering it tightly with plastic wrap and sliding it into the fridge. It will keep beautifully for up to four days, and many bakers find the spices actually deepen after a night in the cold. It can be served cold straight from the fridge or gently rewarmed.
Can I use pumpkin pie filling instead of pure pumpkin puree?
No, you should never make this substitution because pumpkin pie filling has pre-added sugars, liquids, and spices. These extra ingredients will disrupt the liquid-to-starch ratio, leaving you with a runny custard that will not set properly. Always check the label carefully to ensure you are buying one hundred percent pure pumpkin. This keeps you in control of the sweetness and texture.
Should the butter be melted or sliced?
While many vintage recipes call for melted butter, grating or thinly slicing cold butter yields a much more uniform crust. Melted butter tends to run into channels, leaving some areas of flour completely dry while others become greasy. Grated butter melts evenly across the surface, ensuring every single crumb of flour gets hydrated. This produces a reliable crunch every single time.
Can I use a spice cake mix instead of yellow?
Using a spice cake mix is an excellent swap that increases the warmth and depth of the overall bake. If you choose this path, you may want to slightly reduce the ground cinnamon in the pumpkin custard to keep the spices balanced. This simple change transforms the dessert into a spiced masterpiece. It is one of our favorite ways to customize the flavor.
How do I know when the custard is fully baked?
The easiest way to check is to gently shake the baking dish while it is still in the oven. The edges should look dry and set, while the very center should have a slight, gel-like wobble rather than a liquid splash. If it still looks wet in the middle, let it bake for another five to eight minutes. A toothpick inserted near the edge should come out clean.
Can I freeze this dessert for later?
You can freeze this cake after it has been fully baked and cooled to room temperature. Wrap individual slices tightly in plastic wrap and store them in a freezer-safe container for up to three months. To serve, thaw the slices in the refrigerator overnight and warm them in the oven before plating. This preserves the texture of both the custard and the crust.
What should I do if my cake topping is too sweet?
If you prefer a less sweet dessert, you can reduce the granulated sugar in the pumpkin custard to one cup. The yellow cake mix already contains a significant amount of sugar, so lowering the sweetness of the base helps balance the overall profile. You can also use toasted pecans to add a natural bitterness that cuts through the sweetness.
Can I make this dessert gluten-free?
Yes, you can easily make this recipe gluten-free by swapping the standard yellow cake mix for your favorite gluten-free cake mix. No other modifications are needed for the pumpkin custard base, as it is naturally gluten-free. The texture remains incredibly crispy and rich, and your guests will not even notice the difference.
Rebel Swaps
The recipe is a starting point. You are the variable. While the traditional yellow cake mix is the standard, substituting a rich spice cake mix creates a deeper flavor profile that pairs beautifully with the pumpkin. You can also swap the walnuts for standard pecans or even sliced almonds depending on what you have in your pantry. Each nut variety brings its own unique fat content and roasting qualities to the table.
For those who love fruit-forward desserts, replacing the pumpkin base with a spiced apple filling is a fantastic alternative. This adaptation behaves similarly to our popular apple dump cake, using the natural fruit juices to hydrate the cake mix during the bake. You will get a completely different texture that still delivers that essential autumn comfort. It is an excellent way to use up excess fall harvest fruits.
If you are looking for a decadent chocolate twist, try using a dark chocolate cake mix over the pumpkin base. The bitterness of cocoa cuts through the sweetness of the pumpkin custard, making for a sophisticated pairing. This combination echoes the rich layers found in our chocolate experiments, proving that pumpkin does not always need to stay traditional. The chocolate melts into the pumpkin, creating a beautiful marbled effect.
Cutting, Plating, Presenting
This dessert is a study in thermal contrast, meaning it is best served warm from the oven alongside a cold scoop of vanilla bean ice cream. The heat from the spiced pumpkin custard slowly melts the ice cream, creating a rich sauce that coats the crunchy pecan topping. If you prefer a lighter finish, a dollop of unsweetened whipped cream dusted with a touch of ground cinnamon works beautifully. The contrast of temperatures makes every spoonful exciting.
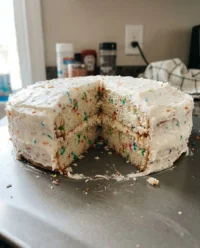
For a more structured presentation, allow the pan to cool completely in the refrigerator before slicing it into clean, sharp squares. This technique reveals the beautiful cross-section of the bake, showing the distinct boundary where the creamy orange custard meets the golden crumb crust. For more inspiration on beautiful autumn bakes, take a look at our classic pumpkin layer cake story to see how we style spiced desserts. Cold slicing also helps the cake hold its shape during transport.
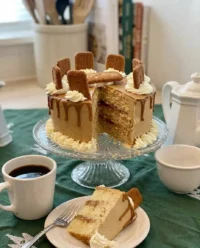
Serve this rustic treat at casual weekend gatherings or as a stress-free alternative to traditional Thanksgiving pies. Plated on simple ceramic dishes, the warm orange hues of the pumpkin and the golden tones of the crust instantly evoke a sense of autumn comfort. It is the kind of dessert that invites guests to dig in without ceremony, celebrating the beauty of simple baking. It pairs beautifully with a dark roast coffee or a hot spiced cider.

What You Just Proved
Baking does not require hours of meticulous folding or delicate piping to deliver an extraordinary result. By understanding how starches absorb fats under direct heat, you have turned a handful of pantry staples into a sophisticated layered dessert. This cake proves that simplicity, when executed with precision, can easily outshine the most complex recipes. It is a testament to the power of smart kitchen science.
Now that you have mastered the thermal balance of this bake, you are ready to experiment with other flavors and textures. If you enjoyed working with these autumn spices, you will find our pumpkin spice cake story to be an excellent next step on your pastry journey. Keep testing the limits of your kitchen, and remember that every variation is simply more data to fuel your creativity. There are no mistakes, only feedback.
Share your baking experiments with us and let us know how your crust turned out. Connect with our community of adventurous home bakers on Pinterest, share your kitchen photos on Facebook, or watch our quick technique videos on TikTok. Let’s keep breaking the rules of traditional baking together, one small batch at a time. Your voice is a valuable part of this culinary experiment.

