The kitchen is perfectly still in the early morning light, with nothing but the faint scent of vanilla warming the air and a dusting of flour on the worn countertop.

Bringing these lovely Red Velvet Cake Pops to life is a gentle journey that recalls the quiet joy of baking from scratch. In my grandmother’s kitchen, we understood that the finest sweets require patience and a gentle touch rather than fancy machinery. This simple recipe transforms humble ingredients into beautiful crimson bites that will brighten any family gathering. It is an unhurried process that turns standard baking into an act of pure connection.
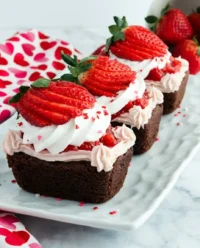
Red Velvet Cake Pops: A Bite of Pure Nostalgia
Prep: 40 min · Serves: 24 · Difficulty: Easy
- Rich cocoa notes in every bite.
- Tender crimson crumbs that melt away.
- Charming treats for every family gathering.
- A delightful project for quiet afternoons.
- Beautifully rustic without any modern fuss.
Long before modern trends took over our kitchens, we baked to share something genuine from our hands. Crafting these treats from our kitchen shelf reminds me of the unhurried Sunday afternoons spent rolling dough on Grandma’s wooden counter. If you love the rich cocoa undertones of a traditional red velvet cake, you will find these sweet rounds deeply satisfying. This is the nostalgic recipe my family gathers for every autumn harvest.
Get The Full Cake Recipe
Print
Red Velvet Cake Pops
- Total Time: 1 hour 25 mins
- Yield: 24 servings
Description
These nostalgic Red Velvet Cake Pops combine a moist, cocoa-infused cake base with a smooth, crisp white candy shell. Perfectly portioned and easy to craft, they make a charming addition to any cozy family gathering or afternoon tea service.
Ingredients
- 1 box Red Velvet Cake Mix
- 1/2 cup Vegetable Oil
- 3 large Fresh Eggs
- 1 cup Water
- 1/2 cup Creamy Vanilla Frosting
- 12 ounces White Candy Melts
- 1 tablespoon Melting Aid
Instructions
- Bake the cake. Combine the cake mix, oil, eggs, and water in a bowl; stir until smooth and bake according to package instructions in a prepared dish.
- Cool the base. Allow the cake to cool completely to room temperature before removing it from the pan to prevent the crumb from becoming too fragile.
- Remove the crusts. Trim away the dry golden-brown outer edges of the cake and discard, using only the soft red center.
- Crumble the cake. Break the cake into fine, sand-like crumbs using your fingers until no large lumps remain in the bowl.
- Form the pops. Mix in the frosting until a dough forms, then pinch off portions and roll them into firm 1.25-inch spheres.
- Prepare the anchors. Dip the ends of paper sticks into melted candy and insert them into the center of each cake ball.
- Chill the shapes. Place the cake pops in the freezer for exactly fifteen minutes to firm up the crumbs and set the candy anchors.
- Apply final coat. Dip each chilled pop into the melted candy glaze and tap off excess before standing upright to set.
Notes
- Ensure all liquid ingredients are at room temperature to achieve the best cake texture.
- Use a consistent rolling pressure to ensure each cake pop is the same size for even setting.
- Work in small batches so the cake dough remains cool and easy to handle during the dipping process.
- Store finished cake pops in an airtight container at room temperature for up to three days.
- Prep Time: 40 mins
- Cook Time: 30 mins
- Category: Dessert
- Method: Baking
- Cuisine: American
Gathering Your Ingredients

Before we begin, we must gather the simple components that build our base. Taking a moment to measure each element carefully creates a peaceful rhythm in the kitchen. Let us look at what we need to bring these classic treats to life.
- Red Velvet Cake Mix: This provides the classic, subtle cocoa flavor and signature crimson hue that we cherish.
- Vegetable Oil: Adding this guarantees the crumb remains incredibly tender and moist during the baking process.
- Fresh Eggs: These bind our batter together, offering structure and a rich texture to the finished base.
- Creamy Vanilla Frosting: A small spoonful acts as the sweet mortar, holding our crumbled cake together gently.
- White Candy Melts: These create a smooth, beautiful outer shell that seals in the rich moisture of the cake.
- Melting Aid: A small spoonful helps the candy coating flow smoothly and coat each piece evenly.
| Ingredient | Why It Matters |
|---|---|
| Red Velvet Cake Mix | Creates the iconic crimson base and nostalgic cocoa flavor. |
| Vanilla Frosting | Binds the fine crumbs together without making them heavy. |
| Candy Melts | Form a crisp, protective shell around the tender cake. |
| Melting Aid | Viscosity helper for an even, satin-like glaze. |
Step by Step in Teresa’s Kitchen

Step 1: Prepare the Oven and Bake the Base
Set your kitchen oven to the temperature listed on the cake box, allowing the warmth to slowly fill the room. Spray a spacious baking dish with nonstick spray to keep the tender edges from sticking. Combine the fresh eggs, vegetable oil, water, and red velvet cake mix in a glass mixing bowl, stirring until a smooth, deep red batter forms. Pour the batter gently into the prepared dish and bake until a toothpick inserted in the center comes out clean.
Step 2: Cool the Crimson Cake Completely
Place the hot baking dish on a wire rack and let the sweet scent of cocoa drift through your quiet kitchen. Allow the cake to cool fully to room temperature before you touch it, as warmth will make the crumb too fragile. This cooling hour is the perfect time to clear your workspace and set out your mixing bowls. Patience here helps our sweet treats hold their shape beautifully later on.
Step 3: Trim the Outer Crusts
Slide a sharp knife along the outer edges of your cooled cake to remove the dry, golden-brown crusts. These caramelized pieces are far too dry and can prevent the cake balls from sticking together properly. Crumble only the soft, bright red interior of the cake for our project. Trimming the dry parts is a timeless trick that makes sure every single bite remains incredibly soft and uniform.
Step 4: Crumble to a Fine Sand
Transfer the trimmed cake into a large glass bowl and use your hands to break it apart gently. Rub the pieces between your fingers until they resemble fine, soft sand with no large lumps remaining. This tactile process feels remarkably peaceful, grounding us in the simple craft of baking. Taking your time here makes the mixing process much easier in the next stage.
Step 5: Shape the Red Velvet Cake Pops
Add two generous tablespoons of sweet vanilla frosting to your red cake crumbs. Use a wooden spoon to fold the mixture, then use your hands to work the frosting thoroughly into the crumbs until a soft dough forms. Pinch off small portions of the dough and roll them into neat, round balls about one and a quarter inches in diameter. You want each sphere to feel firm and smooth, with no deep cracks on the surface.
Step 6: Melt the First Candy Coating
Place a small handful of white candy melts into a small glass bowl. Warm them in your microwave in brief thirty-second increments, stirring carefully between each interval to prevent the sugar from scorching. You will know it is ready when the candy flows smoothly off your spoon like warm honey. Let it sit for a minute to cool slightly before we proceed to the next step.
Step 7: Anchor the Wooden Sticks
Dip the tip of each paper stick about half an inch deep into the melted white candy. Insert the coated end of the stick directly into the center of each rolled cake ball, going slightly more than halfway through. This small dab of melted candy acts as a strong anchor, keeping the treats securely attached. Place the anchored pieces onto a parchment-lined baking sheet as you finish them.
Step 8: Chill the Shapes in the Freezer
Slide the baking sheet gently into the freezer and let the cake balls rest for exactly fifteen minutes. This brief chill firms up the crumbs and hardens the candy anchor so nothing slips during the dipping process. Be careful not to leave them in the freezer for too long, as extreme cold can cause the outer glaze to crack later. Use this quiet interval to prepare your dipping station.
Step 9: Prepare the Satin Glaze
Melt the remaining white candy melts in a deep, narrow cup using the same gentle heating method. Whisk in a spoonful of melting aid to make sure the glaze is thin enough to coat the spheres smoothly. The mixture should look sleek and glossy, without any thick clumps or air bubbles. Pouring the warm coating into a tall, narrow cup makes dipping much cleaner and more efficient.
Step 10: Coat and Drizzle
Hold a chilled cake pop by the stick and lower it straight down into the warm glaze until the cake is fully submerged. Pull it straight up, then gently tap your wrist to let the excess coating drip back into the cup. Place the stick upright in a block of styrofoam to let the shell set. Finally, drizzle a few ribbons of melted red candy over the top to complete the look.
Secrets from the Recipe Box

When preparing the base, always make sure your large eggs and water are at room temperature before mixing. Cold ingredients can cause the batter to bake unevenly, leading to a denser crumb that is difficult to crumble. Taking the time to let everything warm up on the counter is an old-fashioned practice that never fails.
If your Red Velvet Cake Pops start sliding off the stick during the dipping process, here is why and how to fix it. The cake ball may be too warm, or the frosting ratio might be too high, making the dough overly heavy. To resolve this, return the slipped balls to the freezer for ten minutes, or add a few dry cake crumbs to the mixture to balance the moisture.
Measuring your frosting with a light hand is crucial for achieving the perfect texture. If you add too much frosting, the cake balls will become oily and heavy, losing their delicate bite. You can read more about these structural secrets in our classic vanilla cake pops story to perfect your technique.
For those who wish to study this traditional method further, referring to expert guides can offer wonderful insights. The classic red velvet cake pops preparation tips provide excellent visual guidelines for achieving the perfect satin finish. Keeping your glaze warm and thin is truly the secret to a professional look.
Never stir your melting candy melts with a vigorous hand, as this introduces unwanted air bubbles into the coating. Bubbles will rise to the surface and pop, leaving small craters in your beautiful white shells. A slow, gentle figure-eight motion with a rubber spatula is the best way to keep the glaze smooth.
Keep your dipping cup deep and narrow so that you can submerge the cake balls in one swift motion. Swirling the cake around in a shallow bowl will pull at the crumbs and cause the ball to break off the stick. A clean, downward dip followed by a steady upward pull is all it takes to achieve a flawless finish.
Frequently Asked Questions
Can you make red velvet cake pops with box mix?
Yes, using a high-quality box mix is a wonderful way to simplify the process while keeping the cake tender. It guarantees consistent moisture and a bright crimson color every single time. Follow our trimming and crumbling steps to achieve a perfectly refined texture without any modern fuss.
Do red velvet cake pops need to be refrigerated?
It is actually best to store these sweet treats at room temperature in an airtight container. Refrigeration can cause condensation to form on the candy shells, making them sticky and dulling their gloss. Keep them in a cool, dry pantry where they will stay fresh and beautiful for up to five days.
How long do red velvet cake pops last?
When kept in a sealed container at room temperature, these treats will remain moist and delicious for about five to seven days. The candy shell seals in the cake’s natural moisture, acting as a protective barrier. They are wonderful for preparing a few days ahead of a family gathering.
Can you freeze red velvet cake pops?
You can freeze these treats quite successfully for up to six weeks. Place them in a single layer inside a freezer-safe container, separated by sheets of parchment paper. When you are ready to serve them, let them thaw slowly in the refrigerator overnight before bringing them to room temperature.
Why are my cake pops cracking or falling off the stick?
Cracking usually occurs when there is a large temperature difference between the cold cake ball and the hot candy glaze. Falling off the stick happens if the cake balls are too warm or if the stick was not dipped in melted candy before insertion. Keeping your cake balls gently chilled but not frozen solid is the key to preventing these issues.
What is the secret to perfect cake pops?
The true secret lies in achieving the correct ratio of cake crumbs to frosting and maintaining gentle temperatures. Too much frosting makes the mixture greasy, while too little frosting makes it crumble apart. Taking your time to measure carefully and work the mixture by hand will keep everything in an ideal balance.
What frosting goes best with red velvet cake pops?
A simple vanilla frosting or a traditional cream cheese frosting pairs beautifully with the subtle cocoa notes of the cake. Vanilla frosting provides a sweet, clean base that does not overpower the red velvet flavor. Make sure the frosting is smooth and at room temperature before mixing it into the crumbs.
Classic Variations
While we cherish the traditional Red Velvet Cake Pops, there are several lovely ways to adapt this classic recipe. You can easily adapt the flavor profile by swapping the candy melts or adjusting the sweet garnishes to suit the season. These simple shifts allow you to bring a personal touch to your baking without losing the nostalgic feel of the original treat.
For a rich and comforting twist, consider coating your cake balls in dark chocolate melts instead of white candy. The deep, bitter notes of dark chocolate pair beautifully with the mild cocoa in the red velvet cake. This variation recalls the rustic charm of old-fashioned bakeries and makes a wonderful addition to a winter holiday table.
If you are baking for a spring celebration, a splash of pure orange extract in the frosting adds a bright, citrusy note. This subtle touch lifts the deeper flavors of the cake beautifully, creating a bright contrast. You can find more inspiration for seasonal decorations in our guide on traditional cake pops to keep your recipe box filled with ideas.
The Perfect Occasion
These crimson treats are wonderful for sharing during cozy family gatherings, Sunday dinners, or festive holiday celebrations. Their striking color makes them a beautiful centerpiece when placed upright in a vintage glass jar filled with sugar. Serving them on a worn silver platter passed down through generations adds a touch of nostalgia to the table.
They pair beautifully with a hot cup of black tea or a dark roast coffee during quiet afternoon visits. The rich bitterness of the warm drinks balances the sweet glaze of the treats perfectly. If you are preparing a large dessert spread, combining these with traditional cake balls creates a lovely, rustic display that invites guests to linger.
For a simple yet elegant presentation, wrap each individual treat in a small cellophane bag tied with a piece of cotton baker’s twine. This thoughtful touch makes them feel like heartfelt gifts from a bygone era. Sharing these handmade sweets is a gentle way to show your love and bring a piece of your kitchen to theirs.

Before You Close the Recipe Box
Baking has always been about more than just the final product; it is a way to slow down and connect with those we love. Rolling these simple treats by hand offers a quiet moment of reflection in a busy world. I hope this recipe brings a sense of warmth and comfort to your kitchen, as it has to mine for many years.
If you enjoyed working with this classic crimson color, you might also love our red velvet layer cake story for your next weekend project. It is another wonderful way to celebrate traditional flavors and slow, mindful baking. Let us continue to keep these sweet traditions alive, one batch at a time.
Please share your baking journey with our quiet community of home bakers. You can find us and share your beautiful creations on Pinterest, follow our weekly kitchen updates on Facebook, or watch our slow baking videos on TikTok. Until we meet again in the kitchen, keep your hands flour-dusted and your heart warm.


