I remember the humid summers of my childhood, where the hum of the cicadas mixed with the clatter of mixing bowls in my grandmother’s kitchen. She always kept things beautifully simple when the July heat settled in, relying on sweet icebox cakes and cold treats to cool us down. This lovely Red White & Blue Mixed Berry Yum Yum brings me right back to those sunny afternoons on the porch. It is a humble, no-bake layered dessert that celebrates the beauty of familiar ingredients without ever turning on the oven.

A true Yum Yum dessert is all about the generous layers, offering a wonderful contrast of textures that feels just right for a summer gathering. We begin with a buttery graham cracker crust, gently pressed into the pan just like the old days. From there, we alternate sweet cream cheese and fluffy whipped cream with vivid red strawberries and deep blue summer berries. It is a festive, cooling treat that feels right at home at a backyard picnic or a quiet Sunday supper.
The Magic of This Vintage Icebox Treat
There is a special kind of comfort that comes from a recipe passed down through generations. Back before homes had central air conditioning, home bakers relied heavily on their iceboxes to create spectacular desserts for Sunday dinners and holiday picnics. This Red White & Blue Mixed Berry Yum Yum is a testament to that era. It requires no baking, no fussing with hot pans, and no complicated pastry techniques. You simply layer the ingredients, place it in the refrigerator, and let time do the quiet work of marrying the flavors together.
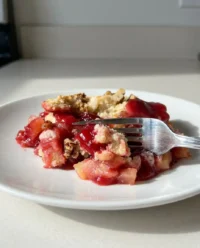
The magic truly lies in the contrasting textures. When you take a bite, your fork yields easily through the soft, pillowy layers of homemade whipped cream and sweetened cream cheese. Then, it meets the brightly flavored fruit fillings, which bring a lovely tartness to balance the sweet cream. Finally, you reach the buttery graham cracker crust at the base. Over the course of the night, the crust absorbs just enough moisture from the cream above it to soften slightly, giving it a beautifully tender crumb that melts in the mouth.
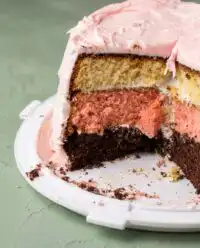
Beyond its taste, this dessert is a visual treasure. The striking alternating layers of ruby red strawberries, pristine white cream, and deep midnight blue berries make it a natural centerpiece for the Fourth of July or Memorial Day. It captures the patriotic spirit in the most delicious way possible, proving that you do not need an elaborate fondant creation to make a table look festive and inviting.
Print
Red White & Blue Mixed Berry Yum Yum
- Total Time: 8 hours 25 mins
- Yield: 12 servings
- Diet: Vegetarian
Description
This festive no-bake layered dessert combines a buttery graham cracker crust with velvet-smooth cream cheese and vibrant berry fillings. It is a refreshing, patriotic treat that is perfect for summer gatherings and requires no time in the oven.
Ingredients
- 2 cups graham cracker crumbs (plus 3 tablespoons reserved)
- 1/2 cup unsalted butter, melted
- 16 oz cream cheese, softened to room temperature
- 1 cup confectioners’ sugar
- 2 teaspoons vanilla extract, divided
- 2 cups heavy whipping cream, cold
- 1/2 cup granulated sugar
- 21 oz can strawberry pie filling
- 21 oz can blueberry pie filling
Instructions
- In a medium bowl, stir together graham cracker crumbs and melted butter; reserve 3 tablespoons of the mixture and press the remainder firmly into a 9×13-inch baking dish.
- In a large bowl, beat the softened cream cheese, confectioners’ sugar, and 1 teaspoon of vanilla extract with an electric mixer until completely smooth.
- In a separate chilled bowl, whip the heavy cream, granulated sugar, and the remaining 1 teaspoon of vanilla until stiff peaks form, then gently fold this into the cream cheese mixture.
- Spread one-third of the cream mixture evenly over the graham cracker crust.
- Dollop the strawberry pie filling over the cream layer and spread it into an even layer.
- Add another third of the cream mixture over the strawberries, followed by a layer of the blueberry pie filling.
- Top with the remaining cream mixture, smooth the surface, and sprinkle with the reserved graham cracker crumbs.
- Cover and refrigerate for at least 8 hours, preferably overnight, before slicing and serving.
Notes
To achieve a perfectly smooth cream layer, ensure your cream cheese has sat at room temperature for at least two hours before mixing. For the best results when whipping the heavy cream, use a chilled metal bowl and beaters, as the cold temperature helps the cream reach its maximum volume and stability.
- Prep Time: 25 mins
- Cook Time: 0 mins
- Category: Dessert
- Method: No-Bake
- Cuisine: American
The Pantry Staples

One of the greatest joys of vintage baking is looking at a recipe card and realizing you already have most of what you need right in your pantry. These are honest, straightforward ingredients that come together to make something truly special.
- Graham Cracker Crumbs: The humble foundation of so many classic icebox desserts. They bring a honeyed warmth and a gentle crunch that grounds the entire dish.
- Unsalted Butter: Melted and warm, it binds our crumbs together. Using unsalted butter lets the natural sweetness of the graham crackers shine through.
- Cream Cheese: Be sure to let this soften on the counter until it is perfectly room temperature. It brings a gentle, familiar tang that cuts through the sweetness of the fruit.
- Confectioners’ Sugar & Granulated Sugar: We use confectioners’ sugar in the cream cheese for a perfectly smooth texture, and granulated sugar to sweeten the whipped cream.
- Heavy Whipping Cream: While it might be tempting to use a store-bought tub, taking a few extra minutes to whip real cream from scratch makes a tremendous difference. It is richer, fresher, and wonderfully nostalgic.
- Vanilla Extract: A generous splash of pure vanilla extract adds a background note of floral warmth to our cream layers.
- Strawberry & Blueberry Pie Fillings: The stars of our festive presentation. I recommend seeking out premium fruit fillings at your grocer, as they tend to have more whole berries and a richer fruit flavor.
Step-by-Step Instructions
Step 1: Prepare the Buttery Crust
In a medium bowl, gently stir together your graham cracker crumbs and warm melted butter. Use a simple kitchen fork to blend them until the mixture resembles damp, coarse sand. Take a moment to set aside exactly three tablespoons of these buttered crumbs in a small dish; we will use them later to dust the top of our finished dessert. Press the remaining crumb mixture firmly and evenly into the bottom of a 9×13-inch baking dish that has been lightly coated with non-stick spray.
Step 2: Mix the Cream Cheese Base
In a large mixing bowl, combine your softened cream cheese, the confectioners’ sugar, and one teaspoon of the vanilla extract. Use an electric hand mixer to beat them together until the mixture is completely smooth, creamy, and free of any little lumps.
Step 3: Whip the Heavy Cream
In a separate, chilled bowl, pour in your cold heavy whipping cream, the granulated sugar, and the remaining one teaspoon of vanilla extract. Whip this mixture on medium-high speed until stiff peaks begin to form. You want it to hold its shape proudly, but be careful not to over-whip it into butter. Gently, by hand, fold this freshly whipped cream into your cream cheese mixture until they are beautifully married together.
Step 4: Begin the Layers
Spoon roughly one-third of your cream cheese mixture (which should be about three cups) over your prepared graham cracker crust. Spread it gently with an offset spatula or the back of a spoon, taking care not to pull up any of the sandy crumbs beneath it.
Step 5: Add the Strawberry Layer
Open your can of strawberry pie filling and drop large, generous dollops evenly across the top of the cream cheese layer. Use a spoon to gently spread the strawberries, connecting the dollops until you have an even, ruby-red layer of fruit.
Step 6: Add More Cream and the Blueberry Layer
Top the strawberry layer with another third of your cream mixture, spreading it smoothly and completely over the red fruit. Next, drop your blueberry pie filling by spoonfuls over this second cream layer. Spread the blueberries gently to form a rich, dark blue stripe of flavor across the entire dish.
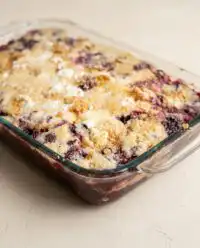
Step 7: Finish and Chill
Spoon the final third of the cream mixture over the blueberries, smoothing it out to create a pristine white canvas on top. Take those three tablespoons of reserved graham cracker crumbs and sprinkle them gently over the surface, like a light dusting of sweet snow. Cover the dish tightly with plastic wrap or foil, and place it in the refrigerator. Let it chill overnight before serving.
Secrets from the Recipe Box

The most important piece of wisdom I can share about this Red White & Blue Mixed Berry Yum Yum is to respect the chilling time. Overnight resting is not merely a suggestion; it is the secret to a dessert that slices beautifully and holds its lovely layered shape on the plate. If you try to cut it after only a few hours, you will find the layers prone to slipping and sliding apart.
When blending your cream cheese, make sure it is completely softened to room temperature before you begin mixing. If it is even slightly chilly, you will end up with stubborn little white lumps in your cream layer. I usually set my cream cheese out on the counter about two hours before I plan to start making the dessert.
For those who love collecting variations from old community cookbooks, you might enjoy reading about how others interpret this classic. I often find inspiration in recipes like this delightful version of Red White & Blue Mixed Berry Yum Yum from my fellow home bakers. And if you are fond of elegant fruit pairings, you might also enjoy the baked charm of our raspberry-white-chocolate-cake for your next gathering.
Classic Variations
While the strawberry and blueberry combination is perfect for patriotic holidays, this old-fashioned icebox method is wonderfully adaptable to whatever fruit you love best. If you are baking for Valentine’s Day or Christmas, you could easily use two cans of cherry pie filling to create striking, festive red layers.
If you prefer a different foundation, you can swap out the graham cracker crumbs for crushed vanilla wafer cookies or even buttery shortbread crumbs. The method remains exactly the same, but the flavor profile shifts beautifully. For those who want a more traditional baked sponge for a summer party, you might consider baking a classic red-white-and-blue-cake layered with fresh summer berries and a sturdy buttercream.
You can also substitute the homemade whipped cream with two eight-ounce containers of non-dairy whipped topping if you are in a pinch. While I always prefer the rich, old-fashioned taste of real cream whipped by hand, the substitute will absolutely work and still yield a delicious, comforting dessert.
At the Table

When it is finally time to serve, bring the dish straight from the refrigerator to the table. Use a sharp, thin knife to cut through the layers, wiping the blade gently with a damp cloth between slices to keep the red and blue colors from bleeding into the pristine white cream.
I love to serve this on my grandmother’s mismatched floral china plates, letting the bright colors of the dessert stand out. It pairs beautifully with a tall glass of iced tea on a hot July afternoon, or alongside a hot cup of black coffee as the evening cools down. If you are hosting a large summer brunch, this dessert makes a wonderful, cooling finish after our hearty blueberry-coffee-cake has been enjoyed.
Baking Memories
There is a quiet, simple joy in preparing a dessert that asks nothing more of you than a little patience and a few good ingredients. While a beautifully baked flag-cake is always a grand tradition for summer holidays, there is something uniquely comforting about a cold, creamy Yum Yum straight from the icebox. It tastes like childhood summers, barefoot afternoons, and the simple pleasures of a slower time.
I would be so delighted to see how this dessert turns out in your own kitchen. Please share your family baking stories and photos with me over on Instagram. You can also pin this cherished recipe to your favorite heritage boards on Pinterest, or come join our community of home bakers on Facebook. May your summer be filled with sweet memories and cool, delicious treats.

