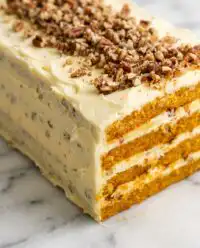
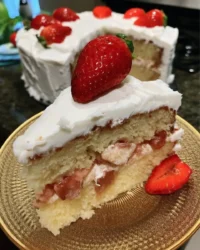
The foundation of a superior crumb lies in the emulsification of fats and liquids, a technique that transforms this Strawberry Vanilla Cake into a masterpiece of texture.

You will notice that the secret to a refined cake is not found in the complexity of the fruit but in the integrity of the sponge. A well-executed Strawberry Vanilla Cake demands a balance between the delicate floral notes of vanilla and the bright, acidic lift of fresh berries. Your attention to temperature and timing will determine whether the final result is merely a dessert or a true patisserie achievement.
The Craft Behind This Strawberry Vanilla Cake
Prep: 30 min · Serves: 8 · Difficulty: Medium
- Balanced acidity from fresh strawberry maceration.
- Tender crumb through precise buttermilk activation.
- Elegant strawberry jam-infused whipped cream layers.
- Sophisticated presentation for your next gathering.
- Natural flavors highlighting seasonal fruit peak.
This is the technique I rely upon when precision is the only acceptable standard for a strawberry vanilla cake.
Get The Full Cake Recipe
Print
Strawberry Vanilla Cake
- Total Time: 1 hour 55 mins
- Yield: 8 servings
- Diet: Vegetarian
Description
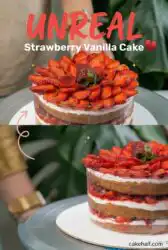
This elegant Strawberry Vanilla Cake features a tender, buttermilk-infused sponge layered with fresh berries and strawberry-tinted whipped cream. It is a refined dessert that balances the delicate floral notes of vanilla with the bright acidity of seasonal fruit.
Ingredients
- 1 cup milk
- 1 tablespoon vinegar
- 1/2 cup yogurt
- 1 cup sugar
- 1/2 cup neutral oil
- 1 teaspoon vanilla essence
- 1 1/2 cups maida (all-purpose flour)
- 1 teaspoon baking powder
- 1/2 teaspoon baking soda
- 2 cups fresh strawberries
- 1 cup heavy whipping cream
- 2 tablespoons strawberry jam
- Sugar syrup (for soaking)
Instructions
- Prepare acidic base. Combine the milk and vinegar in a glass vessel and allow it to sit for ten minutes until curdles form.
- Combine wet ingredients. Whisk the yogurt, sugar, oil, and vanilla essence into the buttermilk mixture until fully emulsified and smooth.
- Incorporate dry ingredients. Sift the maida, baking powder, and baking soda into the wet ingredients and fold gently with a spatula until just combined.
- Bake the sponge. Pour the batter into a lined tin and bake at 180°C for twenty to twenty-five minutes until a tester comes out clean.
- Divide the layers. Once cooled, trim the domed top and slice the cake horizontally into three equal, uniform layers.
- Prepare the fruit. Wash, dry, and slice the fresh strawberries into thin, uniform rounds for the filling and garnish.
- Whip the cream. Beat the cold heavy cream on medium-high speed until it reaches stable, stiff peaks.
- Enrich the frosting. Gently fold the strawberry jam into the whipped cream to incorporate flavor and color without deflating the texture.
- Assemble the cake. Brush the sponge layers with sugar syrup, then alternate layers of cream and fresh strawberries to build the cake.
- Final presentation. Cover the exterior with the remaining cream, decorate with reserved strawberries, and refrigerate for one hour before serving.
Notes
- Ensure all ingredients are at room temperature before mixing to achieve a superior emulsified batter.
- Use a digital scale rather than volume measurements to guarantee the exact hydration levels of the flour.
- Chill your mixing bowl and beaters in the freezer for fifteen minutes before whipping cream to ensure a stable structure.
- Wipe your knife with a hot, damp cloth between each cut for perfectly clean and professional cross-section slices.
- Prep Time: 30 mins
- Cook Time: 25 mins
- Category: Dessert
- Method: Baking
- Cuisine: Contemporary Patisserie
The Mise en Place

Before you begin, ensure every component is weighed and brought to the correct environment. Precision in your mise en place ensures the chemical reactions occur exactly as intended throughout the baking process.
- Maida (All-purpose flour): This provides the structural framework of your cake; its protein content must be handled gently to avoid toughness.
- Vinegar: When introduced to milk, this acid creates an immediate chemical buttermilk that tenderizes the gluten strands.
- Yogurt: The inclusion of yogurt adds a specific weight and moisture to the crumb that milk alone cannot achieve.
- Oil: A neutral oil ensures the cake remains soft even after refrigeration, unlike cakes relying solely on butterfat.
- Fresh Strawberries: These must be firm and dry before slicing to prevent excess moisture from compromising the cream layers.
- Whipping Cream: Select a high-fat cream that has been chilled thoroughly to ensure stable aeration and stiff peaks.
| Ingredient | Why It Matters |
|---|---|
| Baking Soda | Provides the immediate lift when meeting the acidic buttermilk. |
| Sugar Syrup | Ensures the internal layers remain hydrated during assembly. |
| Strawberry Jam | Intensifies the fruit profile within the whipped cream mask. |
The Method, Step by Step

Step 1: Prepare the Acidic Base
You will begin by combining the milk and vinegar in a glass vessel, allowing it to rest for ten minutes. This interval is necessary for the vinegar to denature the milk proteins, creating a thick, acidic buttermilk that will later react with the leavening agents. You will see small curdles forming on the surface, which indicates the chemical transition is complete.
Step 2: Combine the Wet Emulsion
Into your buttermilk mixture, you will whisk the yogurt, sugar, oil, and vanilla essence with a steady hand. It is vital that these ingredients are at room temperature to ensure they emulsify into a pale, uniform liquid. You are looking for the sugar to dissolve completely, leaving no grit at the base of your bowl before you proceed.
Step 3: Incorporate Dry Ingredients into your Strawberry Vanilla Cake
Sift the maida, baking powder, and baking soda directly over the wet ingredients to remove any clumps and aerate the flour. You must fold these together using a wide spatula, stopping the moment the last trace of white flour disappears into the batter. Over-mixing at this stage will develop the gluten, leading to a dense and unrefined crumb rather than a light sponge.
Step 4: Execute the Bake
Pour the batter into a lined four or five-inch baking tin, smoothing the top to ensure an even rise in the oven. You will bake at 180°C for twenty to twenty-five minutes, or until the cake pulls slightly away from the edges of the tin. A clean tester inserted into the center should emerge without any clinging batter, signaling the starch has fully set.
Step 5: Divide the Sponge
Once the cake has reached room temperature, you will carefully demold it and use a serrated knife to remove the domed top. With a steady hand, slice the sponge horizontally into three equal layers, ensuring each surface is flat and uniform. This precision is what allows the final assembly to stand straight and look professional upon slicing.
Step 6: Prepare the Fruit Component
Wash and dry your strawberries with great care, as excess water will cause the whipped cream to weep. Slice a portion of the berries into thin, uniform rounds for the interior layers while reserving the most aesthetically pleasing ones for the top. If your fruit lacks natural sweetness, a light dusting of powdered sugar will encourage the release of juices.
Step 7: Achieve Stiff Peaks
Your whipping cream must be cold, ideally pulled from the refrigerator the moment you are ready to whisk. Using an electric hand blender, you will beat the cream on a medium-high speed until it reaches the point of stiff peaks. You will know it is ready when the whisk leaves deep, permanent tracks in the bowl and the cream holds its shape firmly.
Step 8: Enrich the Cream
Take your strawberry jam and gently fold it into the whipped cream using a silicone spatula to maintain the aeration. This technique adds a concentrated fruit flavor and a subtle pink hue without thinning the consistency of the frosting. Work slowly to avoid over-beating the cream, which could cause it to turn grainy or separate into butter.
Step 9: Assemble the Layers
Place the bottom layer on your serving plate and apply a generous brush of sugar syrup to the surface. You will then spread a layer of the flavored cream, followed by an even arrangement of the sliced strawberries. Repeat this process with the subsequent layers, pressing down gently to ensure the structure is stable and aligned.
Step 10: The Final Presentation
Cover the exterior of the cake with the remaining strawberry cream, using an offset spatula to create a smooth or textured finish. Garnish the top with your reserved whole or halved strawberries in a deliberate pattern. The cake should rest in the refrigerator for at least one hour before serving to allow the layers to settle and the flavors to meld.
Technical Notes

Precision is not a constraint. It is the freedom to repeat success. When whipping your cream, always chill your bowl and beaters in the freezer for fifteen minutes before you begin. This cold environment prevents the fat from warming up during the friction of whisking, which is the most common reason cream fails to hold its shape. If your cream begins to look grainy, it is over-whipped; you can sometimes fix this by gently folding in a tablespoon of un-whipped liquid cream to smooth the texture.
When applying the sugar syrup, do not soak the cake to the point of saturation. You are looking for a light moisture that preserves the crumb, not a wet sponge that will collapse under the weight of the fruit. If you find your cake layers are sliding during assembly, it is often because the fruit slices are too thick or the cream is too soft. You can find more details on how to achieve a balance of flavors in strawberry cake to refine your results.
Always use a scale for your dry ingredients rather than volume measurements. A cup of flour can vary significantly in weight depending on how it was packed, and even a ten-gram difference can change the hydration of your Strawberry Vanilla Cake. For those looking to master the base sponge, following a detailed strawberry cake recipe is the best way to practice consistency.
Frequently Asked Questions
How do you get a natural, strong strawberry flavor in the cake?
To achieve a deep flavor without artificial extracts, you must use high-quality strawberry jam folded into the cream and macerated fresh berries between the layers. The jam provides a concentrated essence that fresh berries alone cannot match when used as a filling. This dual approach ensures every bite carries the distinct aroma of the fruit.
Should I use fresh strawberries in the cake batter?
In this specific recipe, fresh strawberries are kept for the filling and topping to preserve the integrity of the sponge. Adding fresh fruit directly into the batter can create pockets of moisture that lead to an uneven bake or a soggy crumb. By layering them with cream, you maintain the contrast between the soft cake and the juicy fruit.
What is the best frosting for a strawberry vanilla cake?
A stabilized whipped cream enriched with jam is the traditional choice for its lightness and ability to highlight the fruit. If you require a more durable finish for an outdoor event, a Swiss meringue buttercream infused with strawberry reduction offers superior stability. However, for immediate serving, the fresh cream remains the most elegant option.
Does vanilla or strawberry cake stay more moist?
A vanilla cake base using oil and yogurt, such as this one, typically retains moisture better than those relying on fruit purees which can affect the pH balance. The sugar syrup soak further ensures that the layers remain tender over several days. The key to moisture is the correct ratio of fats to flour rather than the flavor profile itself.
Can I substitute cake flour with all-purpose flour?
This recipe specifically calls for maida, which is an all-purpose flour common in many kitchens. While cake flour would provide a finer crumb, the yogurt and buttermilk in this method provide enough tenderizing power to make all-purpose flour perform beautifully. If you must substitute, ensure you sift the flour multiple times to lighten its weight.
Can I use strawberry jam instead of a strawberry puree?
Yes, jam is actually preferred for flavoring the cream because it has a lower water content than fresh puree. A puree can often break the emulsion of the whipped cream, causing it to become soupy. Jam provides the necessary sugar and concentrated flavor without compromising the structural integrity of the frosting.
Considered Variations
If you wish to adapt this recipe for a different seasonal profile, you may substitute the strawberries with raspberries or blackberries. The acidic profile of these fruits works harmoniously with the vanilla base, though you may need to adjust the sugar syrup if the berries are particularly tart. For a deeper aromatic experience, consider scraping the seeds of a whole vanilla bean into the batter during the wet ingredient phase.
For a different textural experience, you might explore a vanilla cake recipe that utilizes the reverse creaming method for an even tighter, more velvet-like crumb. You may also experiment with different citrus zests in the sugar syrup to add a layer of complexity to the fruit. Small things, done exactly right, allow these variations to feel like entirely new creations rather than mere substitutions.
Finishing and Presenting
When presenting this cake, a clean, sharp knife and a steady hand are your most important tools. Dip your knife in hot water and wipe it dry between every slice to ensure the cross-section of the cream and berries remains pristine. This reveal of the internal layers is the final proof of your technique and care during the assembly process.
This cake is best served on chilled plates to keep the whipped cream from softening too quickly at the table. A light dusting of powdered sugar over the fresh berries just before serving adds a professional touch without overwhelming the palate. For those who enjoy a variety of textures, serving this alongside a classic vanilla layer cake can provide a lovely contrast in a dessert spread.
Consider pairing a slice with a light Earl Grey tea or a dry sparkling wine, both of which complement the floral notes of the vanilla. Avoid overly sweet beverages that might compete with the natural sweetness of the strawberries. The goal is to let the clarity of the fruit and the quality of the sponge remain the focal point of the experience.

The Result of Your Care
Creating a Strawberry Vanilla Cake from scratch is an exercise in patience and discipline that yields a reward far greater than the sum of its parts. By respecting the temperatures of your ingredients and the timing of your whisk, you have produced a confection that honors the traditions of fine pastry. This cake is not merely a sweet ending to a meal, but a testament to what can be achieved through focused attention.
I encourage you to share your results with those who appreciate the finer details of a well-made bake. If you find yourself drawn to these flavor profiles, you may also enjoy reading about strawberry vanilla cake citrus baking for further inspiration. There is always more to learn in the quiet space of a kitchen, and every cake is a new opportunity for mastery.
Follow our journey for more technical insights:


