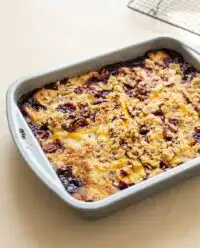
The quiet, satiny sheen of properly emulsified pumpkin batter is the first indicator that your cake will achieve its signature tight, tender crumb.

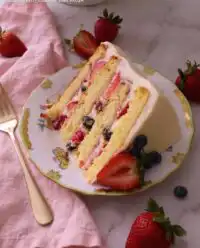
When the autumn air cools, the thoughtful baker turns their attention to spices that warm the kitchen and ingredients that promise structure and crumb. This Classic Pumpkin Layer Cake represents a departure from the overly sweet, structurally weak spice cakes that often dominate the seasonal table. By focusing on the precise balance of moisture and fat, we create a sponge that is both remarkably sturdy and delightfully tender. This cake is designed to be sliced with a clean, sharp knife, revealing a sharp cross-section of defined layers that speak directly of care and method.
The secret to its success lies in the meticulous suspension of ingredients within a stable oil-based emulsion. Unlike traditional butter cakes which can dry out quickly, this formulation remains luscious and moist even after several days in the refrigerator. As you work through the steps, you will develop an appreciation for the structural mechanics that allow such a large, grand dessert to hold its shape with absolute elegance. We are not merely making a cake; we are engineering a masterpiece of texture and balance.
Why Technique Matters in This Classic Pumpkin Layer Cake
Prep: 45 min · Serves: 20 · Difficulty: Medium
- Balanced spices highlight the true pumpkin flavor.
- Sturdy layers hold cream cheese frosting beautifully.
- Pecan toffee adds a satisfying textural contrast.
- Large scale serves a crowd with ease.
- Meticulous methods guarantee a professional finish.
This grand cake will become the silent centerpiece of your autumn celebrations.
The architecture of a great cake relies on the precise alignment of moisture, fat, and starch. Too often, seasonal bakes sacrifice crumb integrity for a wet, heavy texture that fails to satisfy. By contrast, our method guarantees a clean, sharp crumb that carries spices cleanly across the palate. Small things, done exactly right, yield an exceptional dessert that stands apart from standard holiday fare.
The careful structure of this sponge accommodates the weight of velvety frosting without collapsing under its own weight. If you have previously prepared our elegant pumpkin cheesecake, you understand how beautifully this particular squash pairs with a rich, lactic tang. This layered masterpiece takes that pairing to its logical, refined conclusion. It is a dessert designed to impress not through modern gimmickry, but through the flawless execution of classic pastry principles.
Get The Full Cake Recipe
Print
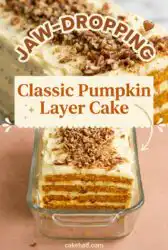
Classic Pumpkin Layer Cake
- Total Time: 1 hour 30 mins
- Yield: 20 servings
Description
A sophisticated autumn dessert featuring tender, spice-forward pumpkin sponge layers filled and frosted with a rich cream cheese icing. Finished with a house-made salty pecan toffee, this elegant cake offers a perfect balance of texture, moisture, and refined flavor for any seasonal celebration.
Ingredients
- Fresh pumpkin puree
- Neutral vegetable oil
- Room temperature eggs
- Granulated sugar
- All-purpose flour
- Baking powder
- Cinnamon
- Kosher salt
- Softened cream cheese
- Unsalted butter
- Icing sugar
- Vanilla extract
- Toasted pecans
Instructions
- Prepare the oven. Preheat to 180°C (160°C fan-forced) and line two 38x25cm baking sheets with flat, overhang-style parchment paper.
- Create the emulsion. Whisk pumpkin puree, eggs, sugar, and oil until fully cohesive and glossy with no visible oil separation.
- Integrate dry ingredients. Sift in flour, baking powder, cinnamon, and salt, whisking until just combined to avoid overworking the gluten.
- Bake the layers. Divide batter evenly, smooth with an offset spatula, and bake for 15 minutes until the centers spring back.
- Cool and slice. Cool in pans for 10 minutes, invert to finish cooling, then slice into four identical rectangular slabs.
- Make the toffee. Melt sugar until golden, stir in toasted pecans and salt, then pour to cool before chopping into fine crumbles.
- Whip the frosting. Beat butter and cream cheese until smooth, then gradually incorporate icing sugar, vanilla, and salt until lofty and spreadable.
- Assemble the cake. Layer the cake slabs with frosting and pecan toffee, then finish by frosting the exterior with the remaining cream.
Notes
- Ensure all dairy ingredients are at room temperature for at least two hours to prevent frosting separation.
- Always use block-style cream cheese rather than spreadable tub varieties for superior structural integrity.
- Wipe your knife with a warm, damp cloth between each slice to ensure clean, professional-looking layers.
- Chill the cake layers before assembly to firm the fats, making them significantly easier to handle and stack.
- Allow the finished cake to rest in the refrigerator overnight to let moisture migrate and flavors deepen.
- Prep Time: 45 mins
- Cook Time: 15 mins
- Category: Dessert
- Method: Baking
- Cuisine: American
The Mise en Place

Before beginning, weigh each ingredient precisely to establish the foundation of structural success. Our selection focuses on purity of flavor and predictable chemical reactions, removing the uncertainty from your baking environment. When your workspace is organized and every ingredient is tempered to the correct temperature, the baking process unfolds with a quiet, satisfying rhythm.
- Fresh Pumpkin Puree: Steamed and thoroughly drained squash provides a clean, clear flavor profile far superior to waterlogged alternatives.
- Neutral Vegetable Oil: Using fat in liquid form coating the flour molecules keeps the crumb exceptionally tender without hindering the rise of the sponge.
- Room Temperature Eggs: Emulsifying at twenty-one degrees Celsius ensures the batter traps air efficiently, laying the groundwork for a uniform bake.
- Sifted Icing Sugar: Removing any packed lumps from your sugar is essential to achieving a smooth frosting free of dry pockets.
- Unsalted Butter: Selecting high-quality butter with an eighty-two percent fat content allows the frosting to retain its shape and clean finish.
- Kosher Salt: Coarse crystals temper the sweetness of the toffee while bringing the subtle notes of pumpkin to the forefront.
- Toasted Pecans: A brief roast in the oven releases essential oils, turning a simple nut into a deeply aromatic component.
| Ingredient | Why It Matters |
|---|---|
| Fresh Pumpkin | Provides authentic flavor and essential structural moisture |
| Neutral Oil | Guarantees a soft texture even when chilled |
| Cream Cheese | Lends a necessary acidic contrast to the rich toffee |
| Baking Powder | Drives the reliable lift across the large baking sheets |
| Cinnamon | Adds warm, woody aromatics that define the holiday season |
The Method, Step by Step

Step 1: Prepare the Sheet Pans and Pre-heat
Begin by preheating your oven to 180°C (160°C fan-forced). Lightly grease two sheet pans measuring thirty-eight by twenty-five centimeters, then line them with baking paper, leaving a slight overhang on the long sides. Your paper must lie completely flat against the metal, with no creases to warp the thin layers of batter. Taking the time to secure this flat foundation prevents uneven baking and ensures your finished slabs are uniform in height.
Step 2: Form the Pumpkin Batter Emulsion
In a spacious bowl, whisk together your chosen pumpkin puree, room temperature eggs, sugar, and neutral vegetable oil until the mixture is uniform. You should see a glossy, cohesive liquid with no traces of separated oil on the surface. Introducing the wet ingredients together first establishes the stable base your dry ingredients require to integrate smoothly. This step cannot be rushed, as a proper emulsion is what guarantees the tight, velvet texture of the final crumb.
Step 3: Integrate the Dry Ingredients
Sift the flour, baking powder, cinnamon, and kosher salt directly into your bowl of wet ingredients. Whisk with steady, rhythmic strokes from the center outward until the flour is completely absorbed and the batter forms a pale ribbon when lifted. Stop whisking immediately once the dry patches vanish to prevent developing excess gluten, which would toughen the sponge. The resulting batter should look silky and hold its shape for a brief moment when drizzled.
Step 4: Bake Your Classic Pumpkin Layer Cake Layers
Divide the batter evenly between your prepared pans, aiming for approximately 735 grams of batter per tray to ensure complete symmetry. Use an offset spatula to smooth the surface to the very edges, then tap the pans firmly on your counter to release trapped air bubbles. Bake for fifteen minutes until the centers spring back under light pressure and a toothpick emerged from the middle comes out clean. The kitchen will fill with the warm aroma of toasted cinnamon and sweet squash.
Step 5: Cool and Slice the Cake Slabs
Allow the baked layers to cool in their pans for ten minutes before carefully inverting them onto wire racks to finish cooling. Once cold, place each slab on a clean cutting board and slice lengthways to create four identical, long rectangular pieces. Wrap each piece in its own sheet of parchment paper to protect the delicate crumb during assembly. Chilling the slabs in the refrigerator for thirty minutes before handling will make them much easier to stack.
Step 6: Create the Toffee Pecan Crumble
Melt the white sugar in a heavy saucepan over medium-low heat, stirring occasionally with a single wooden chopstick to encourage even melting. When the syrup turns a pale, warm golden color, instantly stir in your toasted pecans and salt before pouring the mixture onto parchment paper. Once completely cool and glass-hard, chop the praline into a mixture of small pebbled pieces and fine dust. The contrast of the salty caramel against the sweet pumpkin is the true triumph of this recipe.
Step 7: Emulsify the Cream Cheese Frosting
Combine your softened butter and block cream cheese in the bowl of a stand mixer fitted with the paddle attachment. Beat on medium-high speed for two minutes until the mixture appears pale, lofty, and entirely free of tiny lumps. Gradually introduce the sifted icing sugar in three stages, mixing on low speed to maintain order before a final whip with vanilla and salt. The frosting should be thick enough to hold its shape on a spatula without sliding.
Step 8: Assemble the Precise Layers
Position your first cake slab on your chosen serving platter, as moving this grand cake once assembled is highly risky. Spread one-fifth of the cream cheese frosting evenly over the surface, then sprinkle with a quarter cup of your chopped toffee crumble. Gently lower the second layer onto the frosting using the paper overhang, repeating the process until the final layer is crowned. Finish by frosting the top and sides with the remaining cream cheese frosting and dusting with the left-over toffee.
What Experience Teaches Here

The temperature of your cream cheese and butter must be flawlessly matched before you begin beating. If your fats are at different temperatures, they will refuse to emulsify, leaving tiny, unsightly flecks of butter throughout your frosting. To correct this, let both ingredients sit on the counter for at least two hours before beginning your bake.
If your frosting turns out soupy or loose, here is why and how to fix it. This common failure occurs when the cream cheese is beaten too long, breaking its delicate emulsion, or if spreadable tub cheese was used instead of block cheese. To restore structure, sift in an additional quarter-cup of icing sugar and chill the frosting for twenty minutes before beating it briefly on low speed.
To secure a clean, professional finish on your cake, assemble the layers while the sponge is slightly chilled. A cool cake firms the vegetable oil within the crumb, making the slabs much easier to lift without cracking or bowing. Working with cold cake also prevents the cream cheese frosting from melting or sliding during the assembly.
When cutting this cake, always wipe your chef’s knife with a warm, damp cloth between every single slice. This practice prevents the cream cheese frosting from dragging through the dark pumpkin layers, keeping the internal lines pristine. A clean, sharp knife and a steady hand are the final tools required to reveal the beautiful cross-section of your work.
Much like our classic, spiced carrot cake, this sponge benefits immensely from an overnight rest. Patience here is not a virtue — it is an instruction. As the assembled cake sits in the refrigerator, the moisture from the frosting slowly migrates into the cake, deepening the cinnamon flavor and stabilizing the structure for effortless slicing.
Always toast your pecans before introducing them to the hot sugar. Cold nuts will instantly drop the temperature of the caramel, causing it to seize into a hard, unworkable mass before you can spread it onto your baking paper. A brief ten minutes in the oven is all that is required to prepare the nuts for their sweet coating.
Frequently Asked Questions
What is the best frosting for a pumpkin layer cake?
A slightly tangy, cream cheese frosting is the classic choice as its acidity cuts through the dense sweetness of the pumpkin sponge. To guarantee the frosting remains stable enough to support multiple layers, always use full-fat block cream cheese rather than spreadable tubs. The block variety contains less water, which prevents the frosting from becoming soupy or weeping over time.
How do I keep my pumpkin cake perfectly moist?
The inclusion of vegetable oil instead of butter is the key to maintaining a tender crumb that does not dry out when chilled. Additionally, keeping the cake wrapped tightly in plastic wrap once cooled prevents the air from drawing away its natural moisture. Your ingredients already know what to do; you must solely provide the conditions to preserve their natural texture.
Can I make the cake layers in advance?
Yes, you can bake the rectangular slabs up to two days before assembly, storing them wrapped tightly in plastic wrap in the refrigerator. For longer storage, freeze the wrapped layers flat for up to one month, defrosting them in the refrigerator before handling. This advance preparation makes the assembly process much smoother and less rushed on the day of serving.
How long do the leftovers last?
This cake will remain beautifully fresh and creamy for up to five days when stored in an airtight container inside the refrigerator. The sponge actually improves after twenty-four hours as the spices meld and the frosting sets firmly. You can enjoy a slice straight from the refrigerator, as the oil-based crumb remains soft even when cold.
Why did my pumpkin cake sink in the middle?
A sunken center usually indicates either an excess of baking powder or that the oven door was opened too early during the bake. Additionally, using fresh pumpkin puree that has not been properly drained can introduce excess moisture, disrupting the structure. Always verify your leavening agents are fresh and measured with absolute precision to avoid this structural failure.
Can I use table salt instead of kosher salt?
You may use table salt, but you must reduce the volume by half to avoid making the cake overly salty. Kosher salt has larger, hollow crystals that deliver a gentler, more controlled seasoning to the sweet components. In this recipe, salt is essential for highlighting the earthy pumpkin and cutting through the sweet toffee.
Can I freeze this cake after it has been fully assembled?
While you can freeze the individual cake layers with great success, freezing the fully assembled cake with cream cheese frosting is not recommended. The delicate emulsion of the frosting can break upon defrosting, resulting in a weeping, separated texture that ruins the presentation. For the best results, assemble the cake fresh and enjoy it within five days.
Considered Variations
The Eight-Inch Circular Presentation
For those who prefer a traditional silhouette over the grand rectangular slab, this recipe easily translates into a tall round cake. You may divide the batter among three eight-inch pans and adjust your bake time to twenty-two minutes. This presentation mirrors the dramatic height of our triple chocolate layer cake, offering a beautiful alternative for formal gatherings. Ensure you monitor the bake closely, as circular pans retain heat differently than shallow baking sheets.
The Pureed Squash Alternative
While canned pumpkin provides a highly consistent moisture profile, roasted butternut squash or kabocha puree offers an exceptional depth of earthy sweetness. To adapt this, steam the squash thoroughly and leave it in a colander over a hot pot for thirty minutes to dry completely before pureeing. This technique guarantees your batter remains balanced without introducing excess water that could cause the sponge to sink. The natural sugars in roasted squash also allow you to reduce the added sugar slightly if desired.
Refined Spicing Swaps
If you wish to create a more complex aromatic profile, you can swap the cinnamon for a blend of ground ginger, nutmeg, and cardamom. This combination intensifies the warmth of the cake, pairing beautifully with the roasted notes of the pecan toffee. For a visually flawless presentation, you may study this thoughtful assembly guide to master the clean lining of the rectangular layers. This resource provides excellent visual guidance for bakers seeking perfection.
Finishing and Presenting
The presentation of a cake of this scale requires careful consideration. Because of its unique fifteen-inch length, you should select your serving platter before you begin the assembly process, as transferring the finished masterpiece is highly risky. A long, flat wooden board or a custom ceramic platter provides the ideal stage for this striking rectangular profile.
Before slicing, allow the cake to sit at room temperature for fifteen minutes to soften the butter within the frosting. This brief rest guarantees the cream cheese yields cleanly to your knife, releasing its full aroma. For a truly elegant presentation, pair each slice with a hot cup of black tea or a lightly roasted coffee to complement the spiced crumb.
If you are hosting a formal gathering, you may slice the cake into small, neat squares to serve as elegant petits fours. This delicate style of presentation offers a beautiful contrast to the rustic nature of pumpkin, much like the refined presentation of a classic vanilla layer cake. Garnish each square with a single whole toasted pecan to hint at the rich textures hidden within, demonstrating your eye for detail.

The Result of Your Care
Baking a cake of this magnitude requires a deliberate surrender to the process. When you step away from shortcuts and embrace the quiet discipline of weighing your ingredients and tempering your fats, the kitchen becomes a space of pure craft. The clean cross-section of your first slice is the ultimate proof of your technical care, showing the beautiful alignment of sponge, frosting, and toffee.
If you enjoyed the meticulous method required for this bake, we invite you to try our simpler pumpkin spice cake for your quiet weekend mornings. Each recipe we share is designed to build your confidence and refine your hand at the bench. There is a deep, quiet satisfaction in mastering these small disciplines, one beautiful layer at a time.
We would be delighted to see the results of your precision in your own kitchen. Please share your creations with our baking community on Pinterest, connect with us on Facebook, or watch our step-by-step techniques on TikTok. Let us continue to refine our home baking together, with patience and intention.
