I found the faded recipe card tucked inside a worn copy of an old family cookbook, written in Grandma’s tight cursive script with a faint smudge of vanilla extract in the top corner.

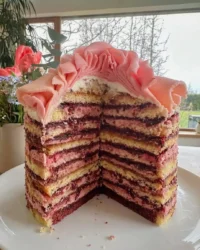
This classic vanilla naked cake represents the beauty of baking without pretense or heavy, overwhelming frosting. By leaving the sides of the golden cake layers exposed, we celebrate the honest texture of the crumb and the quiet warmth of real vanilla. In our family archives, this style of cake was always reserved for quiet celebrations where the quality of the ingredients mattered far more than elaborate sugar decorations. It is a humble yet striking centerpiece that brings a sense of nostalgic comfort to any gathering. When you slice into it, you see the beautiful layers of cake, cream, and fruit clearly defined, telling the story of the care you put into making it.
What Makes Our Vanilla Naked Cake Special
Prep: 45 min · Serves: 12 · Difficulty: Medium
- Honest flavors shine through every single bite.
- Soft golden crumb melts on your tongue.
- Subtle sweetness honors old-fashioned baking traditions.
- Clean presentation highlights beautiful seasonal fruit.
- Simple assembly reduces heavy frosting decoration time.
We return to this quiet dessert because it strips away the noise of modern confectionery. There is no thick wall of sugary icing to hide behind, only the pure harmony of butter, sugar, and cream. Each bite carries a soft, comforting texture that reminds us of Sunday afternoons spent around Grandma’s dining table. As you prepare your kitchen, you might also think of our raspberry fluff cake which shares a similar delicate fruit spirit. This is the recipe my family gathers for every harvest season.
Get The Full Cake Recipe
Print
Vanilla Naked Cake
- Total Time: 6 hours
- Yield: 12 servings
- Diet: Vegetarian
Description
Bake a beautiful vanilla naked cake with golden layers, rich buttercream, and fresh berries. This rustic dessert brings nostalgic warmth to your table.
Ingredients
- 3 and 3/4 cups (443g) sifted all-purpose flour
- 2 teaspoons baking powder
- 3/4 teaspoon baking soda
- 1 teaspoon salt
- 1 and 1/2 cups (340g) unsalted butter, softened to room temperature
- 2 cups (400g) granulated sugar
- 5 large eggs, at room temperature
- 1 Tablespoon pure vanilla extract
- 1 and 3/4 cups (420g/ml) buttermilk, at room temperature
- 1–2 cups (120–250g) fresh raspberries (optional)
- Vanilla Buttercream:
- 1 and 1/2 cups (340g) unsalted butter, softened to room temperature
- 5.5–6 cups (660–720g) confectioners’ sugar
- 5–6 Tablespoons (75–90g/ml) heavy cream
- 1 teaspoon pure vanilla extract
- 1/4 teaspoon salt
Instructions
- Prep Pans: Preheat oven to 350°F (177°C). Grease three 9-inch round cake pans, line with parchment paper rounds, then grease the parchment paper.
- Whisk Dry: In a large bowl, whisk the flour, baking powder, baking soda, and salt together. Set aside.
- Cream Butter: Using a handheld or stand mixer fitted with a paddle or whisk attachment, beat the butter and sugar together on medium-high speed until smooth and creamy, about 3 minutes.
- Add Eggs: On medium-high speed, add 1 egg at a time, beating well after each addition. Beat in the vanilla extract.
- Combine Batter: With the mixer on low speed, add the dry ingredients in three additions, alternating with the buttermilk, beginning and ending with the dry ingredients, and mixing each addition just until incorporated. Do not over-mix.
- Bake Layers: Pour the batter evenly into the prepared pans and smooth the tops. Bake for 25–26 minutes or until a toothpick inserted into the center comes out clean. Allow cakes to cool completely in the pans set on a cooling rack.
- Make Frosting: Beat the butter on medium speed until creamy—about 2 minutes. Add 5 and 1/2 cups confectioners’ sugar, 5 Tablespoons heavy cream, vanilla extract, and salt on low speed. Gradually increase to high speed and beat for 3 full minutes.
- Assemble Cake: Slice a thin layer off the tops of the cakes to create a flat surface. Place 1 cake layer on your cake stand. Spread 1 and 1/2 cups of frosting evenly on top. Dot half of the raspberries around the rim and flatten them down. Top with the second cake layer, frosting, and remaining raspberries. Top with the third cake layer.
- Coat Sides: Spread the remaining frosting on top and all around the sides using an icing spatula. Use a bench scraper to smooth out the frosting on the sides, leaving the cake layers partially exposed. Refrigerate for at least 2–3 hours before slicing and serving.
Notes
- Make Ahead: Cake layers can be baked, cooled, and covered tightly at room temperature overnight. Frosting can also be prepared and refrigerated overnight.
- Sifting: Be sure to sift the flour before measuring to prevent a dense or dry crumb.
- DIY Buttermilk: Add 1 Tablespoon of white vinegar or lemon juice to a measuring cup, then add whole milk up to 1 and 3/4 cups. Let sit for 5 minutes before using.
- Raspberries Note: If making the cake more than a day in advance, leave the berries out as they will leak juice over time.
- Prep Time: 45 mins
- Cook Time: 25 mins
- Category: Cake
- Method: Bake
- Cuisine: American
What You’ll Need

Gathering your ingredients is the first quiet step in bringing this dessert to life. We use standard pantry items, but selecting high-quality butter and real vanilla makes all the difference in the final flavor. When these humble elements are combined with care, they transform into something truly memorable. Let us look at what we will need to lay out on the counter before we begin.
- All-purpose flour: This flour provides the essential structure for our delicate layers, and sifting it beforehand makes certain we achieve a light, tender crumb that never feels heavy. Sifting also helps remove any small lumps, allowing the dry ingredients to incorporate smoothly into the batter.
- Unsalted butter: Softened to room temperature, this ingredient creamed with sugar creates the rich, buttery base of both our cake and our smooth frosting. It offers that classic, melt-in-your-mouth quality that defines old-fashioned yellow cakes.
- Granulated sugar: Beyond adding sweetness, sugar beats together with the butter to trap tiny pockets of air, giving the cake its gentle rise and tender structure. It also helps lock in moisture, keeping the cake fresh for days.
- Pure vanilla extract: We use a generous tablespoon in the cake batter to carry that classic, nostalgic aroma through every layer. Real vanilla bean extract provides a complex, warm flavor profile that imitation flavorings cannot replicate.
- Buttermilk: The natural acidity in buttermilk reacts with our leavening agents to produce an incredibly soft, moist texture that melts on your tongue. It also adds a very subtle tang that balances the sweetness of the sugar.
- Fresh raspberries: These optional berries provide a bright, tart contrast nestled between the sweet layers of buttercream. Their bright color looks beautiful against the pale frosting, adding a touch of natural elegance.
| Ingredient | Why It Matters |
|---|---|
| Sifted Flour | Creates a tender, uniform crumb structure |
| Room-Temp Eggs | Emulsify smoothly into the butter mixture |
| Heavy Cream | Whipped into the buttercream for a velvety texture |
| Buttermilk | Keeps the cake crumb tender and moist |
| Granulated Sugar | Provides sweetness and helps the cake rise |
Step by Step in Teresa’s Kitchen

Step 1: Prep Your Pans
Preheat your oven to 350°F (177°C) and prepare your baking space. Grease three nine-inch round cake pans with a bit of butter, line the bottoms with parchment paper rounds, and grease the paper itself. You will feel the smooth wax of the paper under your fingers, allowing the baked layers to release cleanly without tearing. Taking this extra time now prevents the heartbreak of a stuck cake later.
Step 2: Whisk Dry Ingredients
Whisk the sifted flour, baking powder, baking soda, and salt together in a large glass bowl. Watch the flour become light and powdery as the whisk moves through it, creating a uniform mixture. Set this dry bowl aside while we prepare the wet ingredients. This step makes certain that the leavening agents are evenly distributed, leading to a consistent rise across all three pans.
Step 3: Cream Butter and Sugar
Beat the softened unsalted butter and sugar together in a stand mixer fitted with the paddle attachment. Run the mixer on medium-high speed for about three minutes until the mixture turns pale yellow and fluffy. You should see the sugar granules fully integrate into the creamed butter, forming a soft, cloud-like texture. Scrape down the sides of the bowl with a spatula to make certain every bit is evenly creamed.
Step 4: Add Eggs and Vanilla
Incorporate the room-temperature eggs one at a time, beating well after each addition to keep the emulsion stable. Pour in the tablespoon of pure vanilla extract, letting the warm, sweet aroma fill your kitchen. Scrape down the sides of the bowl with a flexible spatula to make certain every bit is evenly combined. This slow, methodical process prevents the batter from curdling or separating.
Step 5: Alternate Dry and Wet
Mix the dry ingredients and buttermilk into the creamed butter in alternating additions on low speed. Begin and end with the flour mixture, stirring only until the streaks of flour disappear to avoid overworking the gluten. The resulting batter will look smooth, velvety, and thick enough to hold its shape. Over-mixing at this stage will make the cake tough, so keep your touch light.
Step 6: Bake the Layers
Divide the batter evenly among your three prepared pans, using a kitchen scale for precision if you wish. Bake for 25 to 26 minutes, or until the tops are golden and a wooden toothpick inserted into the center comes out clean. Let the pans cool on a wire rack until they are comfortable to touch, then turn the cakes out to cool completely. The quiet warmth of the baking cakes will fill your home with a beautiful vanilla scent.
Step 7: Assembling the Vanilla Naked Cake
Trim the cooled cake layers using a long serrated knife to create flat, even surfaces. Place the first layer onto a cake stand, spread a generous portion of buttercream across the top, and press fresh raspberries into the frosting. Repeat this process with the second layer, guaranteeing the fruit is flat so the structure remains stable. This step creates those beautiful, distinct layers that make the naked cake design so appealing.
Step 8: Whip the Buttercream
Whip the remaining butter in a clean bowl until creamy, then slowly add the confectioners’ sugar, heavy cream, vanilla, and salt. Beat on high speed for three minutes until the frosting is light, airy, and holds its shape beautifully. Adjust the consistency with a splash of cream or a spoonful of sugar as needed. The buttercream should slide smoothly off your spatula but remain firm enough to support the cake layers.
Step 9: Coat the Exterior
Apply a thin layer of buttercream to the top and sides of the assembled cake. Use a metal bench scraper held at a right angle to gently smooth the sides, scraping away excess frosting so the golden edges of the cake layers peek through. Chill the finished cake in the refrigerator for at least two hours before slicing to let the structure set. This chilling time is essential for clean slices and a stable cake.
Secrets from the Recipe Box

Paying close attention to ingredient temperatures is the secret to a uniform cake crumb. Cold eggs or cold buttermilk will cause the creamed butter to seize, resulting in a dense, heavy texture rather than a delicate bite. Always set your refrigerated items on the counter at least two hours before you intend to begin mixing. This simple step makes a world of difference in how easily the batter comes together.
Sifting your flour after measuring, rather than before, makes certain that you do not pack too much flour into your measuring cup. If you find your cake layers are turning out dry or crumbly, it is often because too much flour was scooped into the bowl. For more wisdom on achieving a soft texture, read our guide on making a classic lemon velvet cake. Keeping your measurements precise is the key to heritage baking.
If your cake layers sink in the center during baking, here is why and how to fix it. This common issue happens when the oven door is opened too early, causing a sudden drop in temperature, or if the leavening agents have lost their potency. Check the expiration dates on your baking powder and baking soda, and keep the oven door closed until the final minutes of baking. A gentle touch and a little patience will save your layers.
Using parchment paper is non-negotiable when baking delicate layers that will have exposed sides. Without parchment, the edges of the cake are likely to stick to the pan, tearing away when you try to remove them. This tearing ruins the clean, rustic aesthetic that defines the naked style. Taking the time to cut these simple paper rounds is a small act of preparation that yields beautiful results.
For those who wish to study the finer details of this assembly method, you can refer to this external guide to mastering the vanilla naked cake for additional technical illustrations. Visualizing the process before you begin can help you feel more confident as you handle the delicate layers. It is always helpful to see how other bakers approach the craft with care and precision.
Always chill your cake layers for thirty minutes in the refrigerator before trimming and assembling them. Warm cake is incredibly fragile and will crumble easily under the blade of your serrated knife. Cold layers are much firmer, allowing you to achieve clean, flat surfaces without creating a mess of crumbs. This cold temperature also prevents the buttercream from melting or sliding as you apply it.
When applying the final layer of buttercream to the sides, keep your scraper completely clean. Wipe the blade after every pass around the cake to make certain you are removing the excess frosting rather than smearing it back onto the golden edges of the cake. This clean technique is what gives the naked cake its elegant, rustic appearance, letting the natural beauty of the cake shine through.
Frequently Asked Questions
What is the difference between a “naked” cake and a “semi-naked” cake?
A naked cake has virtually no frosting on the outer sides, leaving the cake layers completely bare to showcase their golden color. A semi-naked cake features a very thin, translucent layer of buttercream scraped along the sides, offering a slightly more finished look while still revealing the texture beneath. Both styles celebrate simplicity and look beautiful with fresh fruit decorations.
What frosting works best for a naked cake?
A sturdy American buttercream or a Swiss meringue buttercream works best because they hold their shape and seal in moisture. Standard whipped cream is too soft and will cause the layers to slide, especially if you are adding heavy fruit. Our vanilla buttercream recipe is specifically formulated to provide the necessary structure to support the three heavy cake layers.
How do you assemble a naked cake without it collapsing?
To keep your cake stable, make certain your layers are completely cold and flat before stacking them. If you are adding fresh berries, press them firmly into the frosting so they do not roll around and create uneven gaps. Chilling the assembled cake immediately after frosting also helps lock everything in place, preventing any sliding or leaning.
What are the best decorations for a vanilla naked cake?
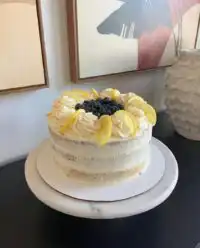
Fresh, seasonal berries, edible flowers, and a light dusting of confectioners’ sugar are beautiful, traditional choices. Avoid heavy, artificial decorations that detract from the natural, rustic charm of the exposed layers. Simple rosemary sprigs or fresh mint leaves can also add a lovely touch of greenery during festive family gatherings.
Can I make the cake layers in advance?
Yes, you can bake the layers a day in advance, let them cool completely, and wrap them tightly in plastic wrap at room temperature. Alternatively, you can freeze the wrapped layers for up to two months before assembling. Thaw them in the refrigerator overnight before trimming and frosting for the best results.
Why did my cake turn out dry?
Dryness is usually caused by over-measuring the flour or over-baking the layers. Be sure to spoon your sifted flour into the measuring cup and level it off rather than scooping directly from the bag. Keep a close eye on the oven during the final minutes, as even two extra minutes can dry out the delicate crumb.
How do I store leftovers?
Store the cake in a covered cake carrier or loosely wrap the sliced edges with plastic wrap to prevent them from drying out. It will keep at room temperature for up to two days or in the refrigerator for up to one week. Bring refrigerated slices to room temperature before serving for the best flavor and texture.
Can I use a different size pan for this recipe?
You can use two eight-inch pans if you prefer thicker layers, though you will need to adjust the baking time slightly. Bake them for 30 to 35 minutes, keeping a close eye on the center of the cakes. Make sure you line the pans with parchment paper exactly as you would with the nine-inch pans to prevent sticking.
Classic Variations
A touch of citrus can beautifully brighten the deep vanilla notes of this cake. You can rub the zest of a fresh lemon or orange into the granulated sugar before creaming it with the butter. This simple technique releases the natural oils of the fruit, infusing the entire crumb with a delicate, sun-warmed aroma. It is a wonderful way to bring a hint of spring to your baking table.
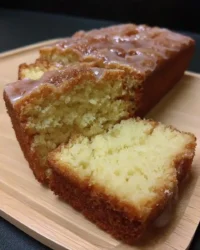
Replacing half of the vanilla extract with pure almond extract offers a rich, nutty depth that feels wonderfully old-fashioned. This variation pairs beautifully with cherry or blackberry fillings instead of the traditional raspberries. If you appreciate unique structures, you might also enjoy reading about our vintage crepe cake for your next baking project. The almond flavor adds a comforting, nostalgic note that reminds us of classic bakery treats.
During the cooler autumn months, adding a pinch of freshly grated nutmeg and ground cinnamon to the dry ingredients introduces a comforting warmth. This subtle spice blend transforms the cake into a cozy dessert that pairs beautifully with a warm cup of black tea by the fireplace. You can also swap the fresh berries for caramelized apple slices or spiced pear compote between the layers. This seasonal touch makes the cake feel right at home during holiday gatherings.
Sitting Down Together
Serving this dessert is an invitation to pause and enjoy the company of those you love. Place the cake on a simple glass pedestal or a worn wooden board to emphasize its rustic, unpretentious beauty. Slice it at the table with a long, sharp knife dipped in hot water, making clean cuts that showcase the beautiful contrast between the golden cake, white frosting, and red berries. This presentation turns the simple act of serving dessert into a memorable moment.
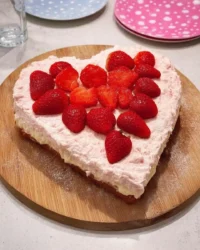
To accompany this dessert, offer a pot of freshly brewed Earl Grey tea or a light, unsweetened chicory coffee. The gentle bitterness of these warm drinks balances the sweet buttercream beautifully, allowing the vanilla flavor to shine. If you are hosting a larger summer gathering, pairing a slice of this cake with our classic strawberry heaven dessert will give your guests a beautiful spread of nostalgic fruit flavors. It creates an elegant table that honors the traditions of old-fashioned hospitality.
For a special touch during holiday dinners, you can serve each slice with a small spoonful of warm berry compote or a dollop of lightly whipped cream. This addition highlights the moist crumb of the cake and adds a luxurious texture to each plate. Your guests will appreciate the thoughtful details, making them feel truly welcomed in your home.

Before You Close the Recipe Box
Baking is, at its heart, an act of quiet devotion and a way to preserve the memories of those who taught us. When we slow down to sift the flour and cream the butter, we connect with generations of home bakers who did the exact same things in their own quiet kitchens. This dessert does not demand flawless execution; it only asks for your time and care. The beauty of the exposed layers lies in their simple, honest imperfections.
We hope this recipe brings a sense of warmth and comfort to your home, as it has to ours for many years. Feel free to browse our complete recipe index for more traditional, small-batch baking inspiration that honors the old ways. We invite you to share your baking journey and connect with our community on Pinterest or follow our family updates on Facebook as we continue to share our love for heritage baking.
As you clean the flour from your counters and wash the mixing bowls, take a moment to appreciate the sweet aroma lingering in your kitchen. It is the scent of a home filled with love and the promise of a beautiful meal shared together. Until we bake again, may your kitchen always be a place of peace, warmth, and delicious memories.