The butter and brown sugar fuse into a bubbling, amber slurry in the bottom of the tin, singing with caramelized heat before the cake batter even lands.
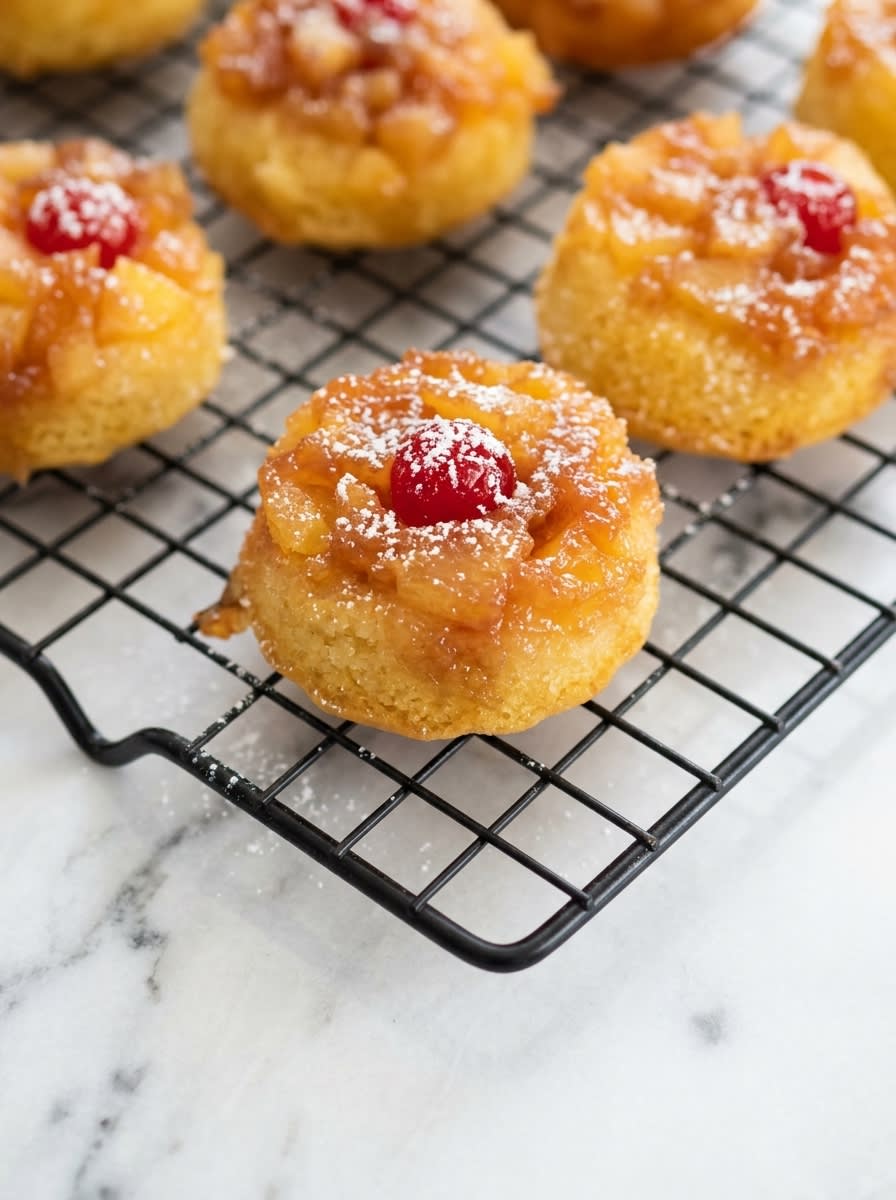
Traditionalists want you to bake a massive cake that takes an hour to settle, but we are bypassing that queue. When you bake these Pineapple Upside Down Cupcakes, you get instant caramelization and an ideal ratio of fruit to sponge in every bite. This small-batch method guarantees that every single cupcake gets its own crown of golden pineapple and a bright red cherry. There is no waiting for a giant centerpiece to cool, only pure, immediate pastry satisfaction.
The Case for Making This Pineapple Upside Down Cupcakes Recipe
Prep: 20 min · Serves: 24 · Difficulty: Easy
- Individual portions offer great structural integrity.
- Saves you from messy slicing presentation disasters.
- Delivers caramelized edges on every cupcake.
- Uses real juice for non-artificial flavor.
- Bakes in half the time of cakes.
You deserve a dessert that values your time without compromising on the deep, caramelized magic of a vintage recipe. This is the exact reason I prefer the mini format over the best pineapple cake when hosting a crowd.
Get The Full Cake Recipe
Print
Pineapple Upside Down Cupcakes
- Total Time: 40 mins
- Yield: 24 cupcakes
- Diet: Vegetarian
Description
These individual pineapple upside-down cupcakes provide a perfect, perfectly caramelized treat in every bite. With their dense fruit topping and tender sponge, they offer an elegant and foolproof alternative to traditional large-format cakes.
Ingredients
- 1/4 cup salted butter, melted
- 1 cup brown sugar, packed
- 24 maraschino cherries
- 1 can (20 oz) crushed pineapple, well-drained
- 1 box yellow cake mix
- 1 cup pineapple juice
- 1/2 cup vegetable oil
- 3 large eggs
Instructions
- Preheat and prep. Preheat oven to 350°F and grease two 12-cup muffin tins thoroughly.
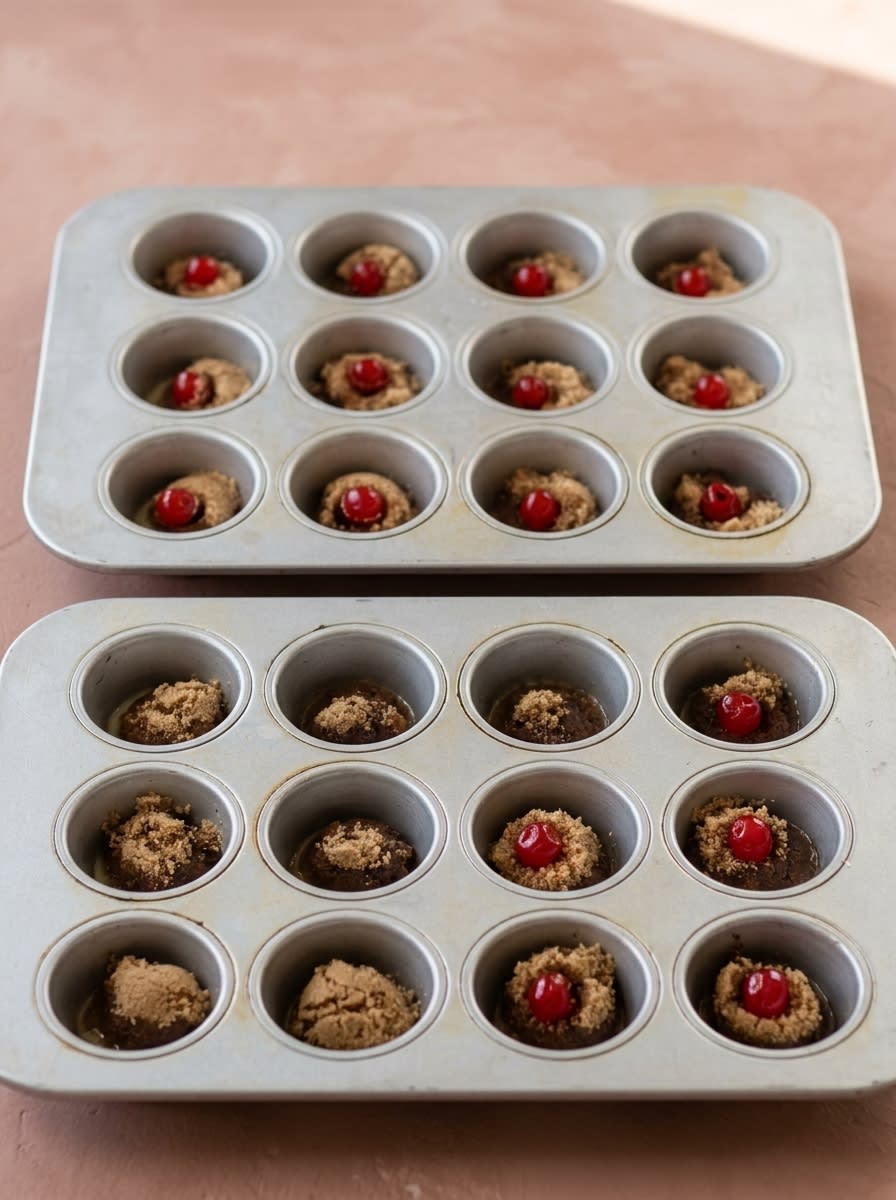
- Layer the caramel. Pour one teaspoon of melted butter into each cup, then top with one tablespoon of brown sugar.
- Anchor the cherries. Place one maraschino cherry in the center of each cup, pressing it into the sugar.
- Add the pineapple. Spoon one heaping tablespoon of crushed pineapple over each cherry and compact it firmly.
- Mix the batter. Whisk together cake mix, pineapple juice, oil, and eggs until smooth and pale.
- Portion the batter. Fill each muffin tin to the top rim with the prepared cake batter.
- Bake the cupcakes. Bake for 20 minutes until the tops are springy and a toothpick comes out clean.
- Invert the cakes. Let cool for five minutes, then carefully flip the tins over onto a baking sheet to release.
Notes
- Ensure pineapple is thoroughly drained to prevent a gummy texture under the cake.
- Use room temperature eggs to guarantee proper emulsification of the butter and batter.
- Weigh dry ingredients on a kitchen scale to ensure the perfect cake consistency.
- Invert the cupcakes within ten minutes of baking so the caramel remains fluid.
- Prep Time: 20 mins
- Cook Time: 20 mins
- Category: Dessert
- Method: Baking
- Cuisine: American
Build Your Mise en Place
Creating these treats requires understanding how fat, sugar, and acid behave under heat. We do not merely toss things into a bowl; we curate our ingredients so the crumb holds up against the heavy fruit topping. Each component has a specific job in preventing your sponge from becoming soggy.
- Salted Butter: Melted directly into the cups to create a rich, fluid caramel layer that prevents sticking.
- Brown Sugar: High moisture and molasses content yield a deep caramelization that standard white sugar cannot match.
- Crushed Pineapple: Provides a compact, dense layer of fruit that stays put instead of sliding off the cake.
- Pineapple Juice: Replaces water in the batter to infuse the entire crumb with sharp, natural acidity.
- Vegetable Oil: Keeps the sponge tender even when refrigerated, providing a reliable crumb texture.
- Eggs: Offer structural proteins that lift the heavy batter and support the fruit topping when flipped.
| Ingredient | Why It Matters |
|---|---|
| Melted Butter | Keeps the bottom caramelized and prevents sticking |
| Brown Sugar | Melts into a glossy, deeply flavored glaze |
| Crushed Pineapple | Forms a dense, concentrated fruit layer |
| Pineapple Juice | Acids tenderize the crumb and boost flavor |
| Large Eggs | Bind the flour proteins for optimal rise |
Let’s Bake
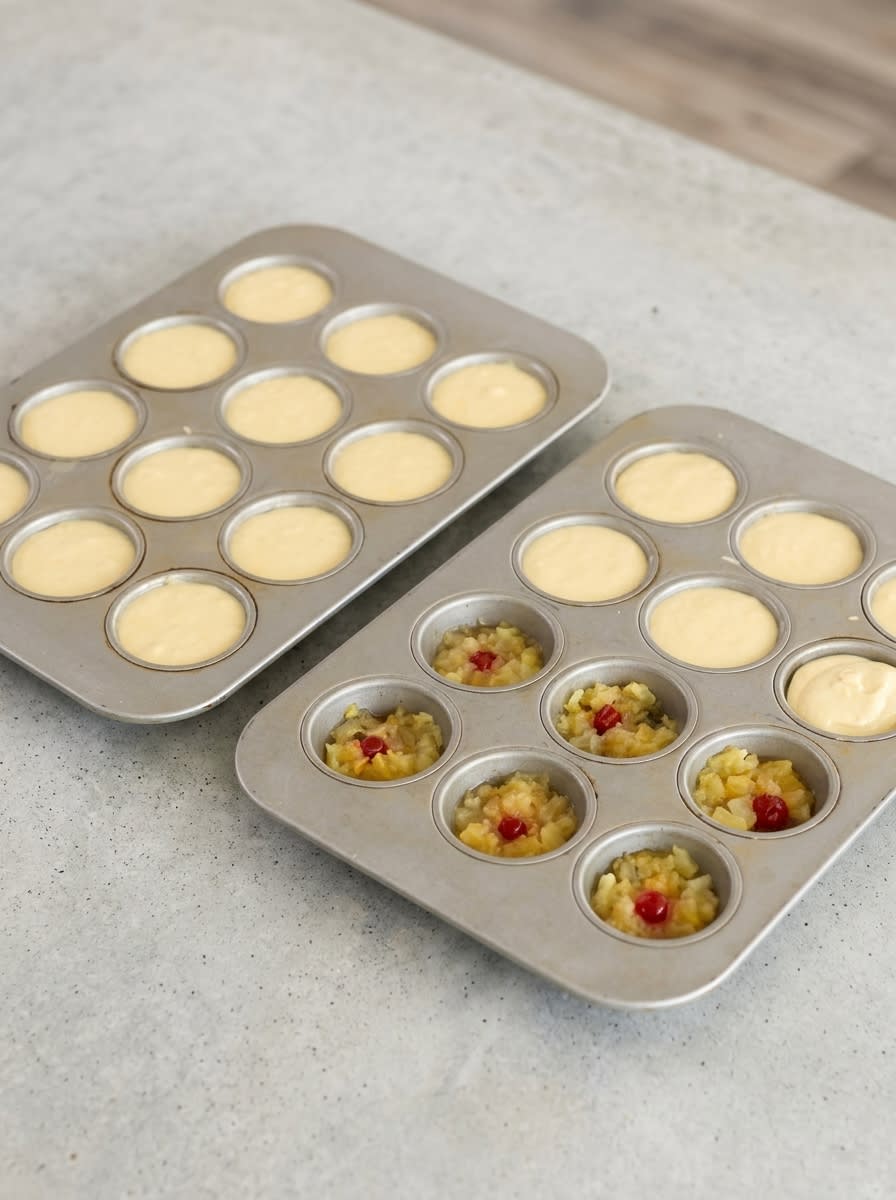
Step 1: Heat and Prep the Tins
Preheat your oven to 350 degrees Fahrenheit and position your rack right in the middle to guarantee even heat circulation. Grab two standard 12-cup muffin tins and mist them generously with your cooking spray. Do not skip the spray, even though we are adding melted butter later, as the sugar needs a barrier to prevent sticking to the walls.
Step 2: Lay the Caramel Foundation
Melt your butter and measure exactly one teaspoon into the bottom of each muffin cup. Immediately follow this with one tablespoon of brown sugar, spreading it evenly across the butter layer. Watch as the sugar begins to absorb the fat, turning into a thick, gritty paste that will melt into glaze.
Step 3: Anchor the Maraschino Cherries
Press one whole maraschino cherry directly into the center of the brown sugar in each cup. You want to push it down until it touches the metal bottom, which anchors it in place. This makes certain that when you flip the cakes, the cherry remains accurately centered in its golden frame.
Step 4: Pack the Crushed Pineapple
Spoon a heaping tablespoon of drained crushed pineapple directly over the cherry and sugar layers. Use the back of a clean spoon to firmly compact the fruit into an even, flat layer. This tight packing prevents the cake batter from seeping underneath and muddying the clean fruit presentation.
Step 5: Whisk the Liquid Ingredients
In your stand mixer bowl, combine your dry cake mix with the measured pineapple juice, vegetable oil, and large eggs. Start your mixer on low speed for 30 seconds to moisten the powders without creating a flour cloud. Once hydrated, turn the speed up to medium and beat for exactly two minutes until thick and pale yellow.
Step 6: Portion the Pineapple Upside Down Cupcakes Batter
Carefully spoon or scoop the batter into each muffin cup, filling them right to the top rim. The batter is thick enough to hold its shape, but do not let it spill over the edges of the cup. This generous fill guarantees that the cakes rise high enough to create a sturdy base for the fruit when inverted.
Step 7: Bake to a Rich Golden Hue
Slide the tins onto the center rack and bake for approximately 20 minutes. You will know they are ready when the tops are springy to the touch and a toothpick inserted into the center of the sponge comes out clean. The kitchen will fill with the rich scent of caramelized sugar and warm fruit.
Step 8: The Great Inversion Flip
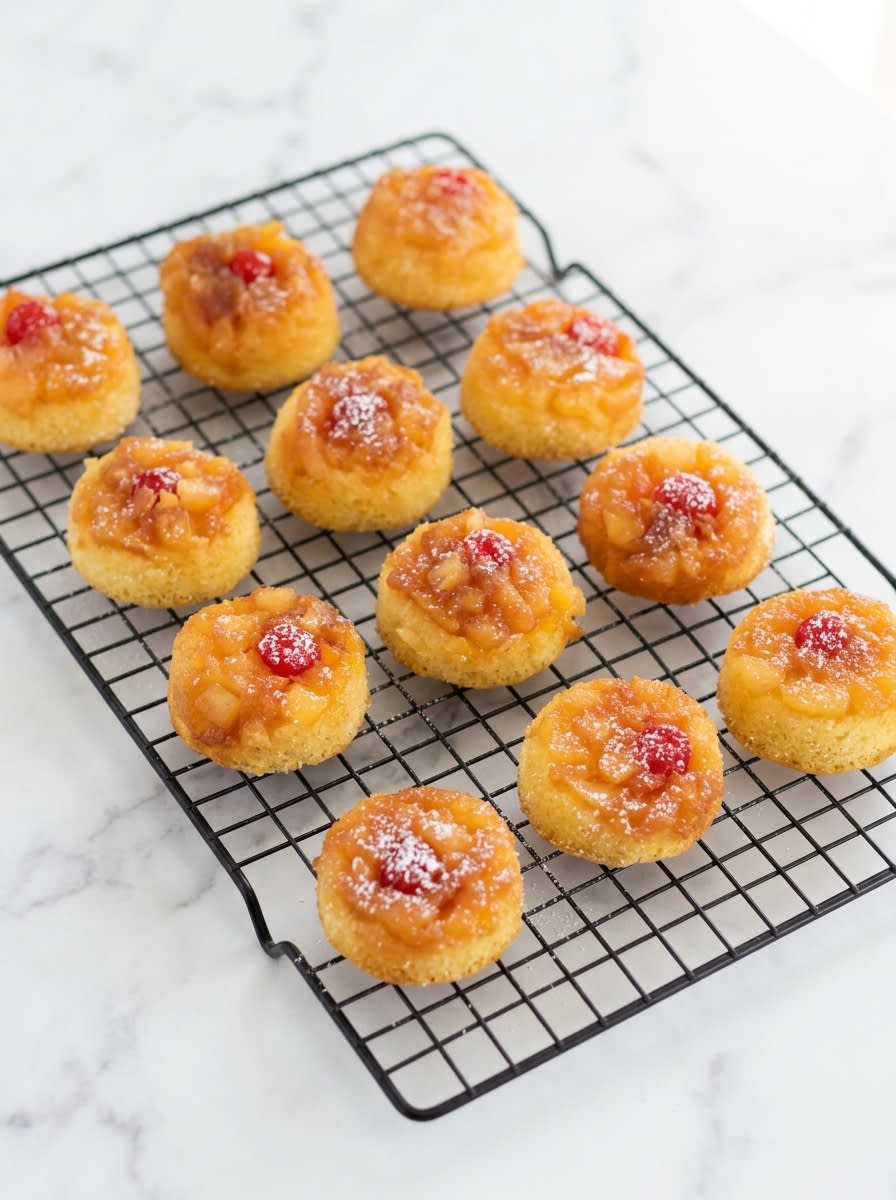
Let the pans sit on a wire rack for exactly five minutes to allow the structure to set. Place a large sheet of waxed paper or a clean baking sheet over the tops of the muffin tins. Gripping both the pan and the sheet firmly, flip them over in one swift, confident motion and lift the tin away.
The Details That Matter
Moisture control is the single most critical factor when working with canned fruit in small-batch baking. If you do not drain your crushed pineapple thoroughly, the excess liquid will sink into the batter and create a gummy, wet layer directly beneath the fruit. Press the pineapple through a fine-mesh sieve with a silicone spatula to extract every drop of surface moisture before measuring.
Weighing your ingredients on a digital scale removes the guesswork that often leads to dry, dense cupcakes. Standard measuring cups can pack flour and sugar tightly, resulting in up to twenty percent more dry ingredients than a recipe intends. For the most tender crumb, rely on precise gram measurements to keep your cake batter properly balanced.
If your cupcakes stick to the pan and tear during the flip, you likely waited too long to invert them. The caramel layer begins to cool and harden within ten minutes of leaving the oven, acting like glue instead of a release agent. If this happens, place the bottom of the tin over a warm stove burner for thirty seconds to remelt the sugar, then try flipping again.
Replacing the standard liquid in a recipe with acidic juice requires a sturdy cake base. This is why a classic sponge recipe like my peach upside down cake works so well when adapted to individual portions. The structure holds up beautifully under the weight of the fruit without collapsing in the center.
For those interested in exploring the chemical reactions of baked fruit, studying the classic cupcake method reveals how sugar density affects batter rise. When the fruit is heavy, the cake must rise around it, creating a natural seal that locks in moisture.
Keep your eggs at room temperature before mixing them into the batter. Cold eggs can cause the melted butter in the recipe to seize, leading to an uneven emulsification and a coarse, dry crumb. Submerge cold eggs in warm water for five minutes before cracking them to solve this issue.
Frequently Asked Questions
Can I use cupcake liners for these treats?
It is highly recommended to avoid paper liners because the caramel topping will stick to the paper and tear away from the cake. The beauty of this recipe relies on the caramelized sugar melting directly onto the pan walls to create a glossy outer shell. If you must use liners, choose high-quality silicone liners that can be easily peeled back after baking.
Which canned pineapple yields the best results?
Crushed pineapple in its own juice is the ideal choice because it packs tightly into a solid, even layer. Slices are often too large for standard muffin tins, and tidbits leave too many gaps where batter can seep through. Be sure to purchase pineapple packed in juice rather than heavy syrup to prevent the cupcakes from becoming cloyingly sweet.
Do I need to save the pineapple juice from the can?
Yes, you must save the juice from the canned pineapple because we use it to replace the water in the cake batter. This simple step infuses the entire sponge with natural fruit flavor and a tender crumb due to the natural acidity. If you run short of juice, top it off with a tablespoon of water or orange juice to reach the correct measure.
Can I use fresh pineapple instead of canned?
Fresh pineapple can be used, but you must cook it down slightly with a bit of sugar before placing it in the tins. Raw fresh pineapple contains an enzyme called bromelain that breaks down gelatin and proteins, which can make your sponge soggy and weak. Cooking the fresh fruit deactivates this enzyme, ensuring your cupcakes rise and hold their structure perfectly.
How do I prevent the cupcakes from sticking to the tin?
Prevention starts with spraying the muffin tin generously with non-stick cooking spray before adding the melted butter and brown sugar. The combination of cooking spray and melted butter creates a slick barrier that allows the melted sugar to slide out easily. Additionally, you must invert the pan while it is still warm so the sugar does not cool and harden.
When is the perfect moment to flip the cupcakes?
You should flip the cupcakes exactly five minutes after removing them from the oven. This brief rest allows the delicate sponge to set its structure so it does not collapse when turned over. If you wait longer than ten minutes, the sugar glaze will cool, stick to the metal, and tear the fruit tops off your cakes.
Do these upside-down cupcakes need to be stored in the refrigerator?
Because of the high moisture content in the fruit topping, these cupcakes should be stored in an airtight container in the refrigerator. Leaving them at room temperature for more than a day can cause the fruit to ferment or spoil. When you are ready to serve them, simply let them sit on the counter for fifteen minutes to take the chill off.
How long will these cupcakes last once baked?
When stored properly in an airtight container in the refrigerator, these cupcakes will remain fresh and delicious for up to four days. The moisture from the pineapple keeps the sponge incredibly tender, preventing it from drying out as quickly as standard cakes. You can also freeze them for up to three months, though the fruit texture may become slightly softer upon thawing.
Where to Deviate
For a rich, autumnal spin on this tropical classic, swap the white pineapple cake mix for a spiced ginger cake batter. The warmth of ground ginger, nutmeg, and cloves contrasts beautifully with the sharp sweetness of the caramelized pineapple. This combination mimics the cozy flavor profile found in my classic peach upside down cake story while retaining the distinct texture of individual cupcakes.
You can easily swap the maraschino cherries for fresh sweet cherries when they are in season during the summer months. Pit the fresh cherries and cut them in half before pressing them into the brown sugar base, cut side down. The fresh fruit releases a deep, complex juice that pairs wonderfully with the caramelized sugar glaze.
If you prefer a deeper, more complex caramel note, try using dark brown muscovado sugar instead of standard light brown sugar. Muscovado contains higher levels of natural molasses, which creates a robust, slightly bitter caramel that cuts through the intense sweetness of the canned fruit. This simple ingredient swap adds a professional, bakery-style depth to every single bite.
Cutting, Plating, Presenting
Presentation is everything when dealing with individual upside-down cakes. Place each cupcake on a clean white plate to let the vivid red of the cherry and the golden amber of the caramelized pineapple stand out. For an elegant touch, dust the tops very lightly with confectioners’ sugar using a fine-mesh strainer immediately before serving. This creates a beautiful contrast against the glossy, wet fruit topping.
If you want to create a decadent dessert experience, serve these cupcakes warm alongside a generous scoop of vanilla bean ice cream. The warm caramel glaze begins to melt the ice cream, creating a rich sauce that coats the tender cake crumb. This pairing mirrors the classic presentation style described in my brown sugar peach upside down cake story, where heat and cold play together.
For a lighter daytime treat, serve these cupcakes at room temperature with a dollop of unsweetened whipped cream. The airy cream cuts through the intense sweetness of the caramelized brown sugar without competing with the pineapple flavor. Pair them with a hot cup of black tea or a bitter espresso to balance the rich, sweet notes of the pastry.

Sign Off
Baking in small batches is not about compromise; it is about absolute control over every single bite. These individual treats prove that you do not need a massive centerpiece cake to deliver big, caramelized flavor. When you lift that pan and reveal twenty-four glorious, glossy crowns, you are proving that precision and creativity belong in the same kitchen.
If you enjoyed experimenting with these individual fruit-topped bakes, you might want to look at my no bake caramel peach upside down cake story for another innovative take on classic pastry. There are endless ways to play with fruit, sugar, and heat once you understand the basic mechanics of caramelization. Keep your kitchen scale handy, trust the process, and never be afraid to twist a classic recipe to fit your own style.
I love seeing your pastry experiments come to life in your own home kitchens. Share your finished bakes, your messy flips, and your glorious cross-sections with me on Pinterest, Facebook, and TikTok. Let us keep breaking the rules of baking together, one small batch at a time.