Standard cake wisdom dictates creaming butter and sugar for an eternity, but that mechanical obsession only yields a dry, structureless crumb when heavy wild fruit is waiting to crush it.

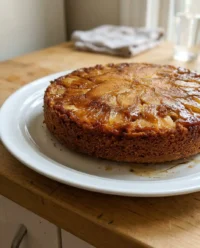
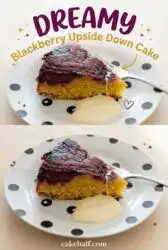
That is why this minimalist Blackberry Upside Down Cake relies on a rapid blitz method to construct a sturdy, velvet sponge capable of supporting a thick crown of jammy fruit. You drop the complicated multi-bowl choreography and let a food processor handle the emulsification in under sixty seconds. The result is a sharp contrast between the deeply tart, caramelized berry layer and a delicate crumb that refuses to turn soggy.
We are building a dessert that respects the fruit by letting it sink, bubble, and fuse directly into the cake’s structural network. Traditional upside-down cakes often suffer from a cloying, heavy glaze that smothers the fruit. By pairing wild, sharp blackberries with a light, buttery crumb, we create a bright balance that demands a second slice.
Why This Blackberry Upside Down Cake Earns Its Place
Prep: 10 min · Serves: 16 · Difficulty: Medium
- Intense wild berry caramelization creates deep flavor.
- One-bowl blitz method saves valuable kitchen cleanup.
- Sturdy sponge holds heavy fruit without collapsing.
- Balanced sweetness avoids cloying dessert fatigue.
- Fast baking time delivers immediate sensory satisfaction.
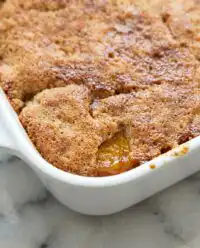
Baking should be an act of confidence, not a tightrope walk over delicate, exhausting steps. If you have enjoyed our peach upside down cake, you know the sheer thrill of the reveal when you flip a hot pan to expose a gleaming fruit mosaic.
Small-batch logic dictates that we make less to mean more. We do not need a towering three-tier monument to celebrate wild summer fruit. Instead, we condense the flavors into a single, highly concentrated layer where every square inch of crumb is saturated with rich blackberry juices. By reducing the volume, we gain total control over the heat distribution, preventing the damp center that ruins larger fruit cakes.
This is the formula that makes you look like a pastry genius without the performative fuss.
Get The Full Cake Recipe
Print
Blackberry Upside Down Cake
- Total Time: 1 hour 5 mins
- Yield: 16 servings
- Diet: Vegetarian
Description
This vibrant upside-down cake features a luxurious layer of caramelized wild blackberries resting beneath a light, buttery sponge. By utilizing a rapid food-processor method, this recipe achieves a perfect structural balance between juicy fruit and a tender, velvet crumb.
Ingredients
- 250g fresh wild blackberries
- 100g plain flour
- 100g caster sugar
- 100g unsalted butter, softened
- 50g light brown sugar
- 2 large eggs
- 1 tsp baking powder
- 0.5 tsp bicarbonate of soda
- 2 tbsp full-fat milk
- 1 tsp vanilla extract
Instructions
- Prepare the oven. Preheat your oven to 180°C (350°F) and grease a 24cm by 5cm ovenproof dish thoroughly.
- Create the base. Sprinkle the light brown sugar evenly over the greased bottom of the dish to form a sandy base.
- Dry the fruit. Wash the blackberries gently and pat them completely dry on paper towels to ensure a clean flip.
- Arrange the berries. Scatter the blackberries in a single, dense layer over the brown sugar and press them down lightly.
- Sift dry ingredients. Place a fine-mesh sieve over a food processor and sift together the flour, baking powder, and bicarbonate of soda.
- Blitz the batter. Add the softened butter, eggs, caster sugar, vanilla, and milk, processing until the mixture is smooth and satiny.
- Spread the batter. Dollop the batter over the blackberries and spread carefully into a thin, even layer.
- Bake the cake. Bake for 25 minutes until golden brown, testing the center with a skewer until it emerges clean.
- Cool and flip. Rest the cake for 10 minutes, loosen the edges with a knife, and invert onto a serving plate with a swift motion.
- Final cooling. Allow the cake to sit for at least 30 minutes before slicing to ensure the sponge is set and the caramel is absorbed.
Notes
- Use a glass or ceramic baking dish for better heat management compared to dark metal pans.
- Ensure the butter is soft to the touch to achieve a perfect emulsion during the quick blitz process.
- Double-check that blackberries are completely moisture-free to prevent the base from turning into a soggy puddle.
- Let the cake rest in the pan for exactly ten minutes to allow the caramel to thicken before flipping.
- Prep Time: 10 mins
- Cook Time: 25 mins
- Category: Dessert
- Method: Baking
- Cuisine: Modern British
What You Actually Need

Your kitchen scale is your ultimate liberation device, so put the measuring cups back in the drawer and measure by weight. We are using precise ratios of fat, sugar, and acid to ensure the sponge rises beautifully against the weight of the dense berries. Gather these elements on your counter to build your mise en place before starting.
- Wild Blackberries: You want tiny, forest-grown berries because their lower water content keeps the batter from turning soggy, and their robust skins hold together under the intense caramelizing heat of the pan bottom.
- Caster Sugar: The ultra-fine crystals dissolve instantly during our rapid food-processor blitz, yielding a tight, uniform crumb structure that acts as a structural shield against sinking juices.
- Unsalted Butter: We soften this completely so it integrates into a smooth, stable suspension without requiring a separate creaming step, providing a rich, melt-in-the-mouth texture.
- Bicarbonate of Soda: This chemical raising agent reacts immediately with the natural organic acids in the blackberries, providing an early vertical lift that keeps the sponge airy.
- Full-Fat Milk: The extra fat tenderizes the developing gluten network, creating a plush, velvet crumb that acts like a sponge, ready to absorb the hot caramel glaze.
- Light Brown Sugar: Scattered across the pan bottom, this melts into a rich, dark butterscotch glaze that shellacs the berries, preventing them from drying out during baking.
| Ingredient | Why It Matters |
|---|---|
| Wild Blackberries | High pectin and intense tartness that balances the sweet batter |
| Caster Sugar | Dissolves rapidly to prevent a coarse, tough cake structure |
| Softened Butter | Emulsifies easily with eggs to trap air during the quick blitz |
| Bicarbonate of Soda | Counteracts berry acidity while assisting the baking powder’s rise |
The interaction between the fruit’s natural acidity and our raising agents is where the magic happens. Many home bakers fear that tossing raw berries into a cake pan will result in a heavy, waterlogged mess. However, by using bicarbonate of soda alongside baking powder, we neutralize the excess acid while generating a burst of carbon dioxide. This chemical reaction happens the instant the heat hits the pan, pushing the batter upward and around the fruit, trapping the berries in a secure, golden matrix.
The Method

Step 1: Prepare Your Pan and Caramel Base
Preheat your oven to 180 degrees Celsius (350 Fahrenheit, or 160 degrees for fan-assisted ovens) to establish a stable baking environment. Take your softened butter and coat the bottom and sides of your 24 cm by 5 cm ovenproof dish with a generous layer. Sprinkle the light brown sugar evenly over the greased surface, so it forms a thin, sandy blanket. This sugar will dissolve in the oven’s heat, mingling with the melting butter to create a rich glaze that prevents your cake from sticking.
Step 2: Wash and Dry Your Wild Blackberries
Rinse your fresh wild blackberries under a gentle stream of cold water to remove any forest debris. Spread them immediately onto a flat plate lined with thick kitchen paper, rolling them gently to absorb every drop of moisture. Wet berries are the enemy of a clean flip; excess surface water will steam inside the oven, turning your beautiful fruit layer into a soupy puddle. Let them sit on the paper until they are completely dry to the touch.
Step 3: Arrange the Berries in an Even Layer
Scatter the dried blackberries evenly over the brown sugar bed in your prepared dish. You want a single, dense layer of fruit that covers the bottom of the pan as completely as possible. Press them down very lightly so they settle into the sugar without crushing the individual drupelets. This close contact guarantees that every spoonful of batter will be infused with the tart berry juices as they cook.
Step 4: Sift and Measure Your Dry Ingredients
Place a fine-mesh sieve over the bowl of your food processor to prepare for sifting. Measure out exactly one hundred grams of plain flour, one teaspoon of baking powder, and half a teaspoon of bicarbonate of soda. Tap the side of the sieve gently to aerate the dry ingredients, removing any stubborn clumps. This step is critical because it guarantees even distribution of the raising agents throughout the batter.
Step 5: Blitz the Batter to a Smooth Suspension
Add the softened butter, eggs, caster sugar, vanilla extract, and full-fat milk to the sifted dry mixture in the processor bowl. Run the processor for roughly thirty to forty-five seconds, watching through the lid until the ingredients unify into a smooth, pale batter. Do not over-process; stop the motor the instant the mixture looks satiny and uniform to avoid overworking the gluten. The batter should have a thick, ribbon-like consistency that holds its shape briefly.
Step 6: Spread the Batter Over the Berries
Dollop the smooth batter gently over the arranged blackberries using a soft spatula. Spread it carefully into a thin, even layer, being mindful not to disturb the fruit beneath. The batter should cover the berries completely, sealing them against the bottom of the dish. This thin barrier is the secret to a fast, even bake that cooks the cake through before the fruit can burn.
Step 7: Bake Your Blackberry Upside Down Cake to Golden Glory
Slide the dish onto the middle rack of your preheated oven and bake for exactly twenty-five minutes. Watch for the moment the pale batter transforms into a rich, deep golden-brown sponge that pulls away slightly from the sides. To verify the bake, insert a clean wooden skewer into the exact center of the cake; it must emerge clean and dry. If you see wet batter on the skewer, return the dish to the oven for an additional three minutes before testing again.
Step 8: Cool and Release the Edges
Remove the hot dish from the oven and set it on a wire rack to cool for exactly ten minutes. This brief pause allows the caramelized fruit juices to settle and thicken slightly, which is crucial for a clean release. Run a thin, sharp knife around the perimeter of the dish, slicing through any caramelized sugar that has crept up the walls. This step guarantees that the sponge will release cleanly from the pan when flipped.
Step 9: Perform the Flip with Absolute Confidence
Place a large, flat serving plate over the top of the warm baking dish, ensuring it is centered. Gripping both the plate and the dish securely with oven mitts, commit to the motion and invert them in one swift, fluid movement. Set the plate down on your counter and let it rest for thirty seconds before lifting the baking dish straight up. You will hear a soft hiss as the vacuum releases, revealing a stunning, gleaming crown of caramelized berries glistening over a golden sponge.
Step 10: Cool the Cake Completely Before Slicing
Allow the inverted cake to sit undisturbed on the serving plate until it reaches room temperature. This cooling phase is essential because it lets the delicate sponge firm up and absorb the remaining warm caramel. Slicing too early will cause the cake to crumble under the knife, ruining the visual drama of the cross-section. Exercise patience for at least thirty minutes to achieve the clean, sharp slices this beautiful dessert deserves.
Where to Be Precise

Weight is your weapon when dealing with wild fruit. Using a kitchen scale guarantees your flour-to-fat ratio remains constant, which is the only way to prevent a heavy batter that sinks under the moisture of the berries. If you rely on volumetric cups, you risk adding too much flour, resulting in a dry, dense sponge that fails to absorb the caramel.
If your Blackberry Upside Down Cake is soggy in the center, here is why and how to fix it: the fruit had too much surface moisture or was frozen and released excess water during baking. Next time, dry the fresh berries meticulously on paper towels, or if you must use frozen, toss them in a teaspoon of flour before placing them in the pan to absorb the run-off.
Butter temperature is non-negotiable for the blitz method. It must be soft enough that a finger leaves an effortless indentation, yet not greasy or warm, otherwise the emulsion will break in the food processor. Cold butter will create lumps in the batter, leading to uneven pockets of fat that melt too quickly during baking.
When you want to experiment with different flavor profiles, you can read our blackberry lemon cake story to see how citrus zest alters the structural behavior of fruit cakes. Adding lemon zest to the sugar layer can brighten the overall profile without adding liquid acidity to the batter.
Do not let the cake cool completely in the baking dish before flipping. If you wait longer than ten minutes, the caramelized sugar will cool, solidify, and glue the berries permanently to the bottom of your pan. If this happens, place the bottom of the dish in hot water for two minutes to melt the caramel again.
Use a ceramic or glass baking dish rather than dark metal. Metal pans conduct heat too quickly, which can scorch the brown sugar layer before the delicate sponge is fully baked through. Glass allows you to peer through the sides and monitor the caramelization as it bubbles in the oven.
Frequently Asked Questions
How do you keep an upside-down cake from getting soggy?
To prevent sogginess, you must dry your wild berries thoroughly with paper towels before placing them in the baking dish. Additionally, using a precise balance of baking powder and bicarbonate of soda helps the sponge rise rapidly, creating a barrier that absorbs the caramelized juices without collapsing. Keep the fruit in a single, neat layer rather than piling it up.
Do I have to thaw frozen blackberries for a cake?
No, you do not need to thaw frozen blackberries before baking, as thawing will cause them to release too much moisture and make the cake wet. Instead, use them straight from the freezer, tossing them lightly in a small spoonful of flour to absorb any surface condensation. Add two minutes to the overall baking time to so the center of the cake is fully cooked.
Why is my upside-down cake sticking to the pan?
Sticking usually happens when the pan is not greased generously enough or if you let the cake cool for too long before flipping. The caramel base must be warm and fluid when you perform the invert; waiting longer than ten minutes allows the sugar to harden into glue. If it sticks, place the pan bottom in hot water for a few minutes to soften the sugar.
What goes well with blackberry upside-down cake?
A dollop of cold, unsweetened clotted cream or a splash of warm, vanilla-infused custard pairs beautifully with the hot, tart berries. The rich dairy cuts through the sharp acidity of the wild fruit while complementing the buttery crumb of the sponge. A scoop of high-quality vanilla bean ice cream is also an excellent option.
Can I use this recipe with other berries?
Yes, you can easily substitute wild blackberries with raspberries, blueberries, or loganberries. Keep the total weight of the fruit at four hundred grams to maintain the correct batter-to-fruit ratio, ensuring the cake rises properly. Avoid using very large, watery fruits unless you chop them and dry them thoroughly.
How should I store leftover cake?
Store any leftover slices in an airtight container in the refrigerator for up to three days. To serve, gently warm the cake in the oven at one hundred and fifty degrees Celsius for five minutes to soften the butter and caramel layer. This warming process revives the soft, tender texture of the butter-rich crumb.
Can I freeze this cake?
Yes, you can freeze the baked and cooled cake for up to one month by wrapping it tightly in plastic wrap and aluminum foil. Thaw it overnight in the refrigerator, then warm it slightly before serving to restore the texture of the caramel fruit. Avoid freezing it with whipped cream or custard already applied.
Rebel Swaps
To bring out the herbal notes of wild blackberries, grate the zest of one organic lemon directly into the sugar base before scattering the fruit. This creates a bright, aromatic contrast to the rich brown sugar caramel, reminiscent of a classic British summer pudding. For another fruity twist, you can try our cherry dump cake which relies on a similar direct fruit-to-sugar interaction.
Replace twenty grams of the plain flour with finely ground toasted almond meal or hazelnut flour. This small-batch adjustment adds a delicate, nutty warmth that pairs beautifully with the woodsy flavor of blackberries. You can find detailed guides on matching berry acidity with nuts on how to properly balance fruit acidity in baking.
Whisk a half teaspoon of freshly grated nutmeg or ground cinnamon into the light brown sugar before spreading it across the greased pan. These warm spices react with the heat of the oven, permeating the baking batter and creating a deeply complex autumn aroma. The heat transforms these spices into a fragrant vapor that scents the entire crumb.
How to Finish and Serve
Presentation is everything when it comes to the visual drama of a cross-section cut. Slice this Blackberry Upside Down Cake while it is still slightly warm, letting the dark purple berry juices run lazily down the sides of the golden sponge. Each slice should showcase the distinct border between the jammy berry crown and the velvet crumb beneath, proving your baking precision. Avoid slicing it straight out of the oven, as the hot juices will bleed excessively and make the crumb wet.
Serve each portion on a shallow plate alongside a generous pour of cold double cream. If you prefer a warmer, spiced contrast, our apple dump cake offers excellent inspiration for pairing hot baked fruits with rich, creamy dairy elements. The contrast between the cold cream and the warm, buttery cake creates a dynamic sensory experience on the palate that balances sweetness and fat with precision.
This dessert is best enjoyed on the day of baking, when the caramelized sugar is still glossy and the sponge retains its crisp edges. If you are preparing this for an afternoon tea, serve it alongside a pot of Earl Grey tea. The citrusy bergamot notes in the tea cut through the rich sweetness of the caramel, cleaning the palate between bites and highlighting the woodsy wild berries.

The Takeaway
Baking is a science, but it is also an invitation to experiment. By throwing out the fussy rules of traditional creaming and embracing the efficiency of the food processor, you have produced a stunning cake that lets the wild berries shine. “Small batch, full conviction.” is not just a slogan; it is the realization that baking less allows us to focus on every single flavor detail.
The recipe is a starting point. You are the variable. Now that you have mastered this seasonal bake, you can study the classic classic peach upside down cake story to see how stone fruits adapt to this caramel inversion technique. Every fruit offers a unique water content and acid profile, waiting for your creative touch to balance them.
Share your beautiful creations with our community of flavor rebels. Post your baking triumphs on Pinterest, follow our kitchen experiments on Facebook, or watch our quick step-by-step videos on TikTok to stay inspired. We cannot wait to see your caramelized fruit masterpieces and how you made them your own.


