Before the world wakes, the quiet kitchen belongs to the slow sift of flour and the soft, steady hum of the oven warming the morning air.

There is a deep reverence in preparing a traditional Red Velvet Layer Cake, a recipe that demands our quiet patience rather than our haste. Unlike modern cakes that rely on aggressive sweetness, this classic relies on the gentle chemical dance of cocoa, vinegar, and buttermilk to produce its signature fine crumb. We gather at the counter not to rush a dessert to the table, but to honor the slow art of baking as a quiet act of devotion.
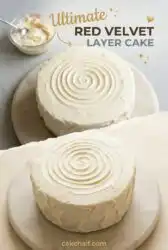
A Bite of Pure Nostalgia in This Red Velvet Layer Cake
Prep: 60 min · Serves: 12 · Difficulty: Medium
- A heritage crumb that stays incredibly soft.
- Beautiful balance of mild cocoa and cream cheese.
- Made with simple, honest pantry staples.
- The timeless centerpiece for your Sunday table.
- Hand-whipped frosting that tastes like home.
We return to this red velvet cake whenever the house needs the warmth of a true celebration. It carries the weight of memory and the promise of a quiet afternoon spent together around the table. Every slice of this cake carries a quiet history, reminiscent of the layers served at church socials and anniversary dinners long ago. When we slice into these crimson layers, we are not merely serving a dessert; we are offering a slice of comfort that has comforted families for decades.
This is the recipe my family gathers for every harvest season.
Get The Full Cake Recipe
Print
Red Velvet Layer Cake
- Total Time: 1 hour 40 mins
- Yield: 12 servings
- Diet: Vegetarian
Description
This traditional Red Velvet Layer Cake delivers a timeless, velvety crumb with a delicate balance of cocoa and tangy cream cheese frosting. It is a slow-baked, nostalgic centerpiece perfect for family gatherings and celebratory Sunday dinners.
Ingredients
- All-purpose flour
- Baking soda
- Baking powder
- Salt
- Cocoa powder
- Granulated sugar
- Eggs
- Vegetable oil
- Whole milk
- White vinegar
- Vanilla extract
- Red food coloring
- Unsalted butter
- Powdered sugar
- Cream cheese
Instructions
- Prepare the pans. Rub softened butter on two eight-inch round pans and line the bottoms with parchment paper, then preheat the oven to 330ºF (165ºC).
- Whisk dry ingredients. Combine the flour, baking soda, baking powder, salt, cocoa, and sugar in a large bowl until well blended.
- Mix liquid foundations. In a separate bowl, whisk together the eggs, oil, milk, vinegar, vanilla, and red food coloring until uniform.
- Combine the components. Pour the wet mixture into the dry ingredients and stir gently until smooth, being careful not to overwork the batter.
- Incorporate heated elements. Heat the milk and butter until simmering, then fold this mixture into the batter in batches until fully incorporated.
- Bake the layers. Divide the batter evenly into the prepared pans and bake for 35 to 40 minutes, or until a toothpick comes out clean.
- Cool the cake. Let the pans rest on a wire rack until completely cool before inverting and trimming the tops if necessary.
- Frost the cake. Whip the butter, powdered sugar, and salt together, add the cream cheese until smooth, then frost the cooled layers.
Notes
- Use a kitchen scale to measure flour by weight to prevent a dense or dry crumb.
- Always use block-style cream cheese to ensure the frosting remains stable and firm.
- Chill your baked cake layers in the refrigerator before frosting to reduce crumb interference.
- Bring your butter to room temperature naturally to maintain its structure for a cloud-like frosting texture.
- Prep Time: 60 mins
- Cook Time: 40 mins
- Category: Dessert
- Method: Baking
- Cuisine: American
From the Kitchen Shelf

Gathering the ingredients for this cake is a quiet ritual of preparation. We begin by clearing the worn wooden counter and weighing our staples with care, making sure each element is ready to play its part in the oven.
In Grandma’s day, ingredients were selected not for their novelty, but for their reliability in the cold pantry. This list reminds us that the most remarkable desserts are often built from the simplest elements, requiring only patience to transform them.
- All-purpose flour: This provides the structural foundation of our cake, offering a tender crumb without the need for delicate specialty flours.
- Cocoa powder: A modest portion of unsweetened cocoa lends a subtle, earthy undertone rather than an aggressive chocolate dominance.
- White vinegar: This essential acid reacts beautifully with the baking soda to help the layers rise into a light, pillowy texture.
- Whole milk: We use whole milk to bring a comforting richness and moisture to the batter, binding the dry ingredients together gently.
- Cream cheese: The block style provides a rich, slightly tangy foundation that offsets the sweet layers of the cake beautifully.
- Unsalted butter: Melted butter adds a deep, comforting dairy flavor that oil alone cannot provide to the delicate crumb.
| Ingredient | Why It Matters |
|---|---|
| All-purpose flour | Creates a reliable, sturdy crumb |
| Cocoa powder | Delivers the classic, subtle chocolate flavor |
| White vinegar | Activates the rising agents naturally |
| Cream cheese | Offers a thick, tangy frosting base |
| Unsalted butter | Adds rich, nostalgic flavor and softness |
Step by Step in Teresa’s Kitchen

Step 1: Prep Your Pans and Pre-heat
Begin by rubbing a thin layer of softened butter across the bottoms of two eight-inch round baking pans, then press a round of parchment paper into each. Heat your oven to 330ºF (165ºC), allowing the warmth to slowly fill the room while you prepare your workspace. This low temperature prevents the layers from doming too aggressively as they bake.
Step 2: Whisk the Dry Ingredients Together
In your largest glass bowl, combine the all-purpose flour, baking soda, baking powder, salt, cocoa powder, and granulated sugar. Whisk them with a steady hand until the pale flour turns a soft, dusty brown color and no lumps remain. As the cocoa blends into the flour, you will smell the first faint hint of chocolate.
Step 3: Mix the Liquid Foundations
In a separate bowl, whisk together the eggs, oil, milk, white vinegar, vanilla extract, and red food coloring. Watch as the brilliant crimson hue blooms throughout the liquid, becoming a rich, uniform color. The vinegar will begin to react with the milk, souring it slightly to create a home-style buttermilk.
Step 4: Combine the Wet and Dry Components
Pour your liquid mixture slowly into the dry bowl, stirring with a rubber spatula in wide, gentle circles. Mix only until the batter is smooth and free of dry pockets, observing how the color deepens into a velvet red. Be careful not to overwork the gluten at this stage, or the cake will lose its delicate tenderness.
Step 5: Warm the Milk and Butter
Heat your remaining whole milk and unsalted butter in a small saucepan over medium heat. Watch the pot closely until the milk begins to simmer gently, with small bubbles hugging the edge of the metal. Pour one-third of this hot mixture into your batter, stirring until fully incorporated, then fold in the rest.
Step 6: Bake Your Red Velvet Layer Cake
Divide the thin batter evenly between your two prepared pans, aiming for about 695 grams per pan if using a scale. Slide them onto the center rack of your oven and bake for 35 to 40 minutes. You will know they are ready when the tops bounce back gently under a warm finger and a toothpick inserted in the middle comes out clean.
Step 7: Cool the Cake Layers
Place the hot pans on a wire rack and let them rest until they are completely cool to the touch. Once cooled, run a thin spatula around the edges of the pans to release the sides, then gently invert the layers. If you wish, trim the tops slightly with a long knife to make them completely flat, keeping the sweet crumbs aside.
Step 8: Mix the Heritage Frosting
Whip your softened butter, powdered sugar, and salt together for five minutes until the mixture looks like clouds. Add your cold cream cheese in small batches, whipping until the frosting is thick and spreadable. Use this velvet frosting to crumb coat and final coat your beautiful layers, decorating the top with the reserved cake crumbs.
What Grandma Would Tell You

Always use block-style cream cheese rather than the spreadable kind from a tub. Tub cream cheese contains extra water and stabilizers that will make your frosting soupy and difficult to spread between the cake layers. If your frosting becomes too soft while decorating, set it in the refrigerator for fifteen minutes to allow the butter to firm up again.
Measuring your flour by weight is the single best way to avoid a dry cake. When you scoop directly from the flour bag with a tin measuring cup, the flour packs down, resulting in too much flour and a dense crumb. If your cake turns out dry, this excess flour is almost certainly the culprit, so consider switching to a kitchen scale for your next baking session.
Letting the baked layers rest in the refrigerator wrapped in plastic wrap makes them much easier to frost. Cold cake layers do not shed crumbs as easily as room-temperature ones, allowing your offset spatula to glide smoothly across the surface. This is a secret we often rely on when preparing a devils food cake for Sunday gatherings.
If your cake layers sink in the center, your oven temperature might be running too hot, or the oven door was opened too early during the baking process. A sudden rush of cool air can collapse the delicate rise created by the baking soda and vinegar. Always keep the oven door closed until the last five minutes of baking to prevent this sudden deflation.
When tinting the batter, choose a high-quality gel paste rather than liquid food coloring. Liquid colors introduce unnecessary water into the batter, which can alter the delicate texture of your crumb. For those seeking a deeper understanding of the science behind these red hues, you can read this red velvet cake troubleshooting guide to master the chemical balance.
Be sure to let your butter soften naturally on the counter rather than melting it in the microwave for the frosting. Microwaved butter loses its crystalline structure, meaning it cannot trap air when whipped with the sugar. Cold butter will result in a lumpy frosting, while naturally softened butter creates a smooth, cloud-like texture.
Frequently Asked Questions
Can I use this recipe for red velvet cupcakes?
Yes, this traditional batter adapts beautifully to a standard muffin tin. Line the tin with paper cups and fill each about two-thirds full before baking at 330ºF (165ºC) for 18 to 22 minutes. Keep a close eye on them, as smaller portions bake much faster than full-sized layers.
Can I bake it with 9-inch cake pans instead of 8-inch pans?
You can certainly use nine-inch pans, though your layers will be slightly thinner as a result. Reduce your baking time by five to eight minutes to prevent the thinner layers from drying out in the oven heat. Check them early with a toothpick to make sure they remain soft and tender.
How much of this recipe should I make for a 6-inch cake?
If you wish to bake a smaller six-inch cake, you should cut the entire recipe in half. This will give you just enough batter to fill two six-inch pans without overflowing. The baking time will remain very similar, but start checking for doneness around the thirty-minute mark.
Why don’t you use cake flour for this red velvet cake?
We prefer all-purpose flour because it gives the cake a comforting, home-style structure that stands up to the heavy cream cheese frosting. Cake flour can sometimes make the layers too delicate, causing them to collapse under the weight of the sweet layers. Our recipe relies on the chemical reaction of vinegar to keep the crumb tender.
Can I make this recipe with a stand mixer?
While you can use a stand mixer with a paddle attachment on low speed, we prefer mixing the batter by hand with a simple wire whisk. Mixing by hand prevents you from overworking the flour, which is the most common cause of a tough cake. The frosting, however, benefits greatly from the power of a mixer to achieve its fluffy texture.
Do all the ingredients need to be at room temperature?
Having your eggs, milk, and cream cheese at room temperature is essential for a smooth batter and frosting. Cold ingredients do not emulsify properly, which can cause your batter to look curdled or your frosting to separate. Set your ingredients out on the counter about an hour before you plan to begin baking.
How should I store the leftover cake?
Because of the cream cheese in the frosting, any leftovers must be kept in the refrigerator. Wrap the sliced cake gently in plastic wrap or store it in a covered cake dome to keep it from drying out. For the best flavor, let your slice sit on the counter for fifteen minutes before serving to soften the butter.
Classic Variations
For a subtle autumn twist, you can replace the vanilla extract in the cake batter with a teaspoon of warm almond extract. This small change introduces a sweet, cherry-like aroma that pairs beautifully with the mild cocoa flavor. It is a traditional variation we often find scribbled on the margins of old handwritten cards.
If you prefer a cake with a bit more texture, try folding a half-cup of finely chopped pecans into the cream cheese frosting. The toasted nuts provide a delightful contrast to the silky frosting, much like the rustic finishes on our lemon velvet cake. You can press additional pecans gently into the sides of the cake for a beautiful, old-fashioned presentation.
You can also bake this recipe in a classic 13×9-inch metal pan for a casual family gathering. This format requires no delicate layering or slicing, making it ideal for picnics and church potlucks where ease is appreciated. Reduce the baking time slightly and check the center with a toothpick to prevent overbaking.
The Perfect Occasion
There is no finer way to serve this beautiful cake than on a pedestal stand at the center of a Sunday dinner table. Let the cake sit at room temperature for at least twenty minutes before slicing so the cream cheese frosting can soften to its proper, luxurious texture. Serve each slice with a small silver fork, letting the rich crimson color contrast against your favorite vintage plates.
A quiet afternoon tea is another lovely setting for this traditional dessert, pairing beautifully with a pot of hot black tea or chicory coffee. The bitterness of the warm beverage cuts through the sweet tang of the cream cheese frosting, highlighting the subtle chocolate notes in the cake. It offers a moment of quiet comfort, similar to how we enjoy a slice of red velvet cheesecake during the winter holidays.
For holiday gatherings, decorate the platter with a few fresh rosemary sprigs or edible winter berries to give the dessert a festive, old-world look. The deep red layers look stunning under the soft glow of candlelight, making it a memorable finale to a family feast. Sharing this cake is a simple way to bring a sense of ceremony and love to those gathered around your hearth.

Baking Memories
As we clean the flour from our hands and wash the mixing bowls, we are left with the sweet aroma of cocoa lingering in the kitchen. Baking a cake like this is not about chasing perfection, but about the love we fold into the batter and share with those who sit at our table. Every slice is a continuation of a tradition that has brought families together for generations.
We hope you find a quiet afternoon to bring this recipe to life in your own home, letting the slow process bring you a sense of peace. If you find joy in these vintage bakes, you might also enjoy making our classic triple chocolate layer cake for your next family gathering. May your kitchen always be filled with warmth, laughter, and the comforting scent of vanilla.
We love to see your baking journeys and the memories you create in your own kitchens. Please join our community and share your beautiful creations with us on Pinterest, Facebook, or follow our stories on TikTok to stay connected.
